Set Up Payment Accounts
Use the Payment Accounts editor to define the types of payments you accept from responsible parties. If you integrate Edge
Choose Your Settings
-
 Open Payment Accounts Editor - Home ribbon bar > Tools section > Editors > Financial > Payment Accounts. (You can also use the Search field to look for the editor you want to work with.)
 -
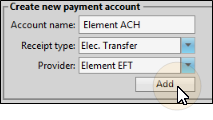
Create or Edit a Record - Select an existing record to edit, or create a new record.
-
Account Details - Identify how you will use this payment account within your Edge
-
Provider Details - (Credit card and electronic transfer accounts only.) When you create a credit card or electronic transfer account, and select to use an integrated payment processing provider, complete the Provider Details section of the window. The information required depends upon the payment type and processing system you are working with. If you have obtained separate client ID numbers for each orthodontist or office, you must create a payment account for each, with the appropriate ID numbers in the provider details fields. Refer to the appropriate details for your integration provider:
-
Save Changes - Click
 Save in your Quick Access toolbar or File ribbon bar (or press Ctrl+S on your keyboard) to save any changes you have made.


More Information
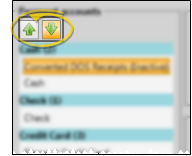
![]() Rearrange Account List - Use the arrows at the top of the payment accounts list to reorder accounts within each section. You might use this, for example, to move all inactive accounts to the bottom of the list. The accounts appear in this order when you post transactions.
Rearrange Account List - Use the arrows at the top of the payment accounts list to reorder accounts within each section. You might use this, for example, to move all inactive accounts to the bottom of the list. The accounts appear in this order when you post transactions.
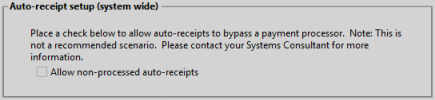
![]() Auto-Receipt Setup Option - The Auto-Receipt setup option at the bottom of the payment accounts editor provides a way to run Auto-Receipts that are not actually processed by an integrated payment provider. This feature is generally only used for testing and other specialized purposes. Please contact Ortho2 before enabling this option.
Auto-Receipt Setup Option - The Auto-Receipt setup option at the bottom of the payment accounts editor provides a way to run Auto-Receipts that are not actually processed by an integrated payment provider. This feature is generally only used for testing and other specialized purposes. Please contact Ortho2 before enabling this option.
OrthoBanc Integration - If you use the Edge
Print Payment Account List - Run the Payment Account List to obtain a list of the payment accounts you use to accept payments for your practice. The report includes the transaction type category, default description, office and doctor assignment (if any), and account type. See "Payment Account Adjustments List" for details.
Audit Transactions Processed by your Payment Accounts - Run the Processed Transactions report to obtain the details of each electronic and credit card transaction run through the selected payment processor for any range of dates or Transaction reports. The report includes the responsible party and patient identifiers, receipt description, date, and amount, and the Transaction number on which the receipt appears, as well as the payment processor details. See "Processed Transactions" for details.
![]() Editor History - When you open more than one editor without leaving the Editors window, a history of those editors appears at the top of your screen. You can click a name in the history to return to any previously opened editor, easily going back and forth between editors. This is useful, for example, when you are working with editors that are related to one another, such as the Treatment Chart Style editor and the Treatment Chart List editor.
Editor History - When you open more than one editor without leaving the Editors window, a history of those editors appears at the top of your screen. You can click a name in the history to return to any previously opened editor, easily going back and forth between editors. This is useful, for example, when you are working with editors that are related to one another, such as the Treatment Chart Style editor and the Treatment Chart List editor.

![]()
www.ortho2.com │ 1107 Buckeye Ave. │ Ames, IA 50010 │ 800.346.4504 │ Contact Us
Chat with Software Support │ Chat with Network Engineering │ Chat with New Customer Care
Remote Support │ Email Support │ Online Help Ver. 11/11/2019


