Set Up Your Patient Tracker
Use the Patient Tracker editor to set up "Views", which specify the patient and appointment details that you want to appear in your Patient Tracker, as well as enable / disable seating detail options and patient wait milestone colors. You may set up multiple views for different situations, and switch among views easily. Your Patient Tracker editor also manages certain Light Bar widget display settings.
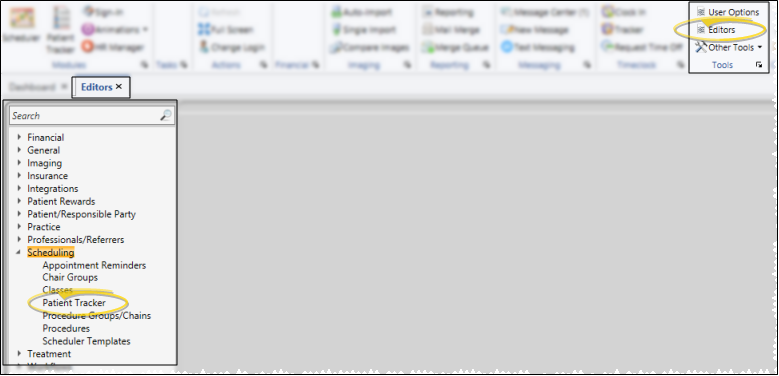
 Open the Patient Tracker Editor - Select Editors from the Tools section of the Home ribbon bar. Then from the Scheduling section, open the Patient Tracker editor. (You can also use the Search field to look for the editor you want to work with.)
General Settings - Use the General settings of your Patient Tracker editor to enable / disable seating details options, select Patient Tracker patient wait milestone colors, and manage certain Light Bar widget display settings.

Change Seating Details When Seating Patient - If you enable the Change Seating Details When Seating Patient option of your Patient Tracker editor, the seating details dialog pops up as soon as you seat a patient in the Patient Tracker. (Seating details include the chair, assistant, and doctor attending the patient.) You can also right-click a patient in the Seated section of your Patient Tracker or in the Light Bar widget to change the details at any time.
Single Doctor Queue Per Office - (Applies only when the Queue style is selected in your Light Bar.) Enable the Single Doctor Queue Per Office option in your Patient Tracker editor to separate patients in your Light Bar by the office assigned to the appointment. If this option is disabled, the Light Bar will separate patients by the doctor assigned to the appointment instead. (See "Light Bar Widget" for details.)
Light Bar Status Colors - Use the color selectors in your Patient Tracker editor to choose appointment milestone colors for your Light Bar widget: Seated, Dr. Needed, Dr. Needed High Priority, Dr. Here, Dr. Was Here and Assistant Needed.
Patient Tracker Wait Milestone Colors - You can select colors and time parameters in your Patient Tracker editor to categorize the appointments in the Waiting section of your Patient Tracker, showing you at a glance which patients arrived Pre-Appointment, as well as who has had a Short Wait or Long Wait, and who was a Late Patient. We suggest 10 minute intervals for each setting.
Pre-Appointment - Patients whose scheduled appointment time has not yet come. We suggest a softer color for this less urgent status.
Short Wait - Patients who have been waiting a short time past their appointment time. We suggest a bright color for this status.
Long Wait- Patients who have been waiting a long time past their appointment time. We suggest the most intense color for this urgent status.
Late patient - Patients who signed into your office after their scheduled appointment time had passed.
Patient Tracker View Settings - Your Patient Tracker "View" defines which details you see on your Patient Tracker, such as the patient name, appointment procedure, and waiting time. You can create as many views as you wish, and switch among them easily.
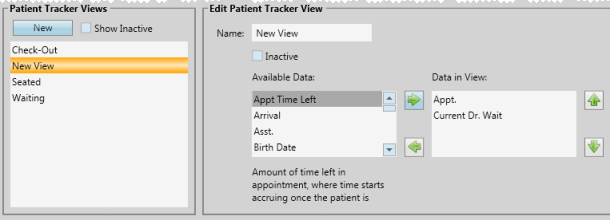
Choose View to Work With - Your list of existing Patient Tracker views appears at the left. Click a view to work with. The details for that view appear at the right.
Display Active / Inactive Records - Use the Show Inactive option to choose whether to include inactive records in the list.
Add a New View - Click New, then edit your new view to complete the details, described below.
Edit Patient Tracker View - Select an existing view from the list at the left. If you have just created a new view, it is selected automatically. Patient Tracker views are system wide: Any changes will take effect for all Edge Cloud users immediately.
Name - You can change the name of your Patient Tracker view in this field.
Inactive / Active Toggle - Once you create a record, you cannot delete it. You can, however, flag it Inactive. Records you flag as Inactive are not available for general use, but they remain in your system for reporting and other data collection needs. In addition, you can toggle records back to Active whenever needed.
Available Data - The fields in the Available Data box can be included in your Patient Tracker. When you select a field, a detailed description appears underneath the box. To add a field to the view, click the field name, then click [ --> ]. The field is removed from this box and added to the bottom of the Data in View box.
Data in View - The fields in the Data in View box will be included in your Patient Tracker when this view is selected. When you select a field, a detailed description appears underneath the box. To remove a field, click the field name and click [ <-- ]. The field is removed from this box and returned to the Available Data box.
Rearrange Fields - The order the fields appear in the Data in View box is the order they will appear in your Patient Tracker. To rearrange the order, click a field to move, then click the Up and /or Dwn buttons.
Save Changes - Click  Save in your Quick Access toolbar or File ribbon bar (or press Ctrl+S on your keyboard) to save any changes you have made.

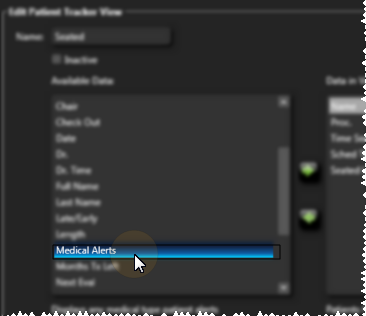
Medical Alerts - If you include medical alerts in your Patient Tracker "Views", be sure you assign the appropriate alerts to your patients as needed. See "Patient Alerts" for details.