Replace a Scheduling Template
Use the Replace Template feature to swap one scheduling template for another.You can choose to swap the template for the currently displayed date, or swap all future occurrences of a template with another template. If scheduled appointments do not fit into the new template, they will be moved to your Scheduler Bar automatically.
Existing Appointments - When you replace a template that contains scheduled appointments, any appointments that do not fit onto the new template are placed on a Scheduler board. The board heading defaults to the affected date, so you can easily re-schedule the appointments to a new location. See "Scheduler Bar" for details.
While viewing a scheduling date, you can replace the template for that date.
-
Open Scheduling Date - Open your Scheduler to the date you want to work with. (Get help opening your Scheduler.)
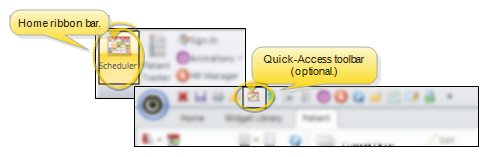
You can open your Scheduler from the Home ribbon bar or Quick Access toolbar, or from several locations in the patient folder.
Clicking the  Scheduler icon from either the Home ribbon bar or your Quick Access toolbar while a Scheduler session is already active can either bring the open Scheduler tab to the front of your Edge Cloud window, or open another Scheduler tab. See "Scheduler User Options" for detailsabout setting up this option.
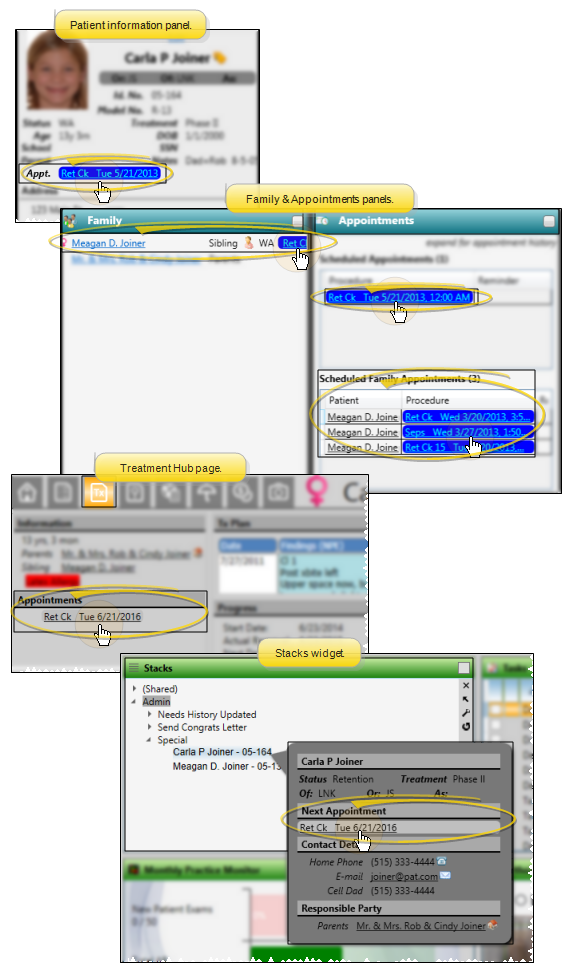
You can open your Scheduler to a specific appointment by clicking the appointment link wherever it appears in the patient folder, such as on the Patient Information Panel, the Family panel, or the Appointments panel of the patient folder Home page, on the Treatment Hub page, or by hovering over the patient name in your Stacks widget.
If you have multiple Scheduler tabs open, clicking a patient appointment link will bring the left-most tab to the front of your Edge Cloud window. Note that before you click the link, you can reorder your tabs by simply dragging them into place, thus selecting which Scheduler tab you want to work with. See "Scheduler User Options" for details about enabling/disabling the multiple Scheduler option.
-
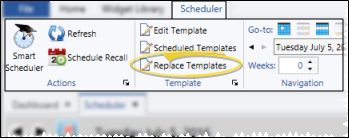
Open Replace Templates Window - Click Replace Templates from the Template section of the Scheduler ribbon bar.
-
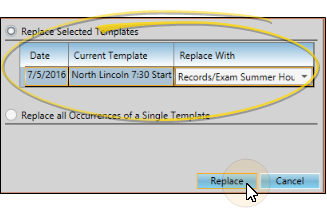
Choose Replacement Template - Select the Replace Selected Templates option, and use the Replace With drop down list to choose the template you want to use for this date. Click Replace, and confirm the action to finish. (You could also select the <<Remove Template>> option at the top of the drop down list to completely remove the scheduling template for the selected dates.) Your changes are saved immediately.
While using Week View mode, you can replace the templates for each date in the currently selected week.
-
Open Scheduling Date - Open your Scheduler to one of the dates you want to work with. (Get help opening your Scheduler.)
You can open your Scheduler from the Home ribbon bar or Quick Access toolbar, or from several locations in the patient folder.
Clicking the Scheduler icon from either the Home ribbon bar or your Quick Access toolbar while a Scheduler session is already active can either bring the open Scheduler tab to the front of your Edge Cloud window, or open another Scheduler tab. See "Scheduler User Options" for detailsabout setting up this option.
You can open your Scheduler to a specific appointment by clicking the appointment link wherever it appears in the patient folder, such as on the Patient Information Panel, the Family panel, or the Appointments panel of the patient folder Home page, on the Treatment Hub page, or by hovering over the patient name in your Stacks widget.
If you have multiple Scheduler tabs open, clicking a patient appointment link will bring the left-most tab to the front of your Edge Cloud window. Note that before you click the link, you can reorder your tabs by simply dragging them into place, thus selecting which Scheduler tab you want to work with. See "Scheduler User Options" for details about enabling/disabling the multiple Scheduler option.
-
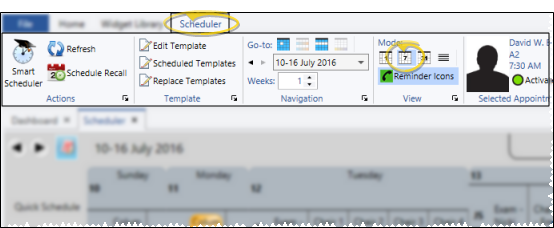
Open Week View - If you are not already in Week View mode, click the  Week View icon from the View section of the Scheduler ribbon bar.
-
Open Replace Templates Window - Click Replace Templates from the Template section of the Scheduler ribbon bar.
-
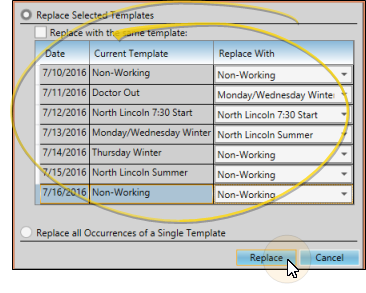
Choose Replacement Templates - Select the Replace Selected Templates option, and use the Replace With drop down list to choose the template you want to use for each date this week. Or, enable the Replace With the Same Template option to apply the same template to all dates. Click Replace, and confirm the action to finish. (You could also select the <<Remove Template>> option at the top of the drop down list to completely remove the scheduling template for the selected dates.) Your changes are saved immediately.
You can use the Replace Templates tool to swap out all future occurrences of a template with a new template, beginning with any date you choose.
-
Open your Scheduler - Get help opening your Scheduler.
You can open your Scheduler from the Home ribbon bar or Quick Access toolbar, or from several locations in the patient folder.
Clicking the Scheduler icon from either the Home ribbon bar or your Quick Access toolbar while a Scheduler session is already active can either bring the open Scheduler tab to the front of your Edge Cloud window, or open another Scheduler tab. See "Scheduler User Options" for detailsabout setting up this option.
You can open your Scheduler to a specific appointment by clicking the appointment link wherever it appears in the patient folder, such as on the Patient Information Panel, the Family panel, or the Appointments panel of the patient folder Home page, on the Treatment Hub page, or by hovering over the patient name in your Stacks widget.
If you have multiple Scheduler tabs open, clicking a patient appointment link will bring the left-most tab to the front of your Edge Cloud window. Note that before you click the link, you can reorder your tabs by simply dragging them into place, thus selecting which Scheduler tab you want to work with. See "Scheduler User Options" for details about enabling/disabling the multiple Scheduler option.
-
Open Replace Templates Window - Click Replace Templates from the Template section of the Scheduler ribbon bar.
-
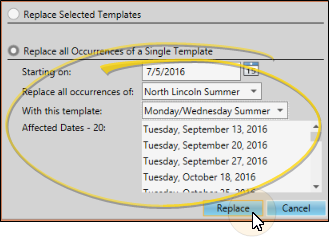
Select Replacement Template - Select the Replace All Occurrences of a Single Template option. Then enter the date to begin the replacements, the old template you want replaced, and the new template to use. The window will list the dates that will be affected by the change, as well as the total number. Click Replace, then confirm your action to finish. (You could also select the <<Remove Template>> option at the top of the drop down list to completely remove the scheduling template for the selected dates.) Your changes are saved immediately.
You can add, remove, and replace templates while viewing your Scheduler in Month View mode:
Add a Template To a Date - While in Month View mode, you can right click a date and choose Add a Template to select another template to use for this date, in addition to the template already assigned. (You might have multiple templates assigned to a single date when your doctors and/or offices need to run different schedules on the same day.) You can also apply the same template to multiple dates by holding down the Shift or Ctrl key while you choose the dates, then right-clicking and choosing Add a Template.
Remove Template - Right-click a template in Month View mode, and choose Remove Template to delete the template from the date. Any appointments already scheduled to that template are moved to your Scheduler bar, with the date as the bar heading.
Replace Templates for the Day or Week - Click the date to work with, or click the weekly heading at the left of the calendar to select an entire week. Then, click Replace Templates in the Scheduler ribbon bar. (Or, right-click a template and select Replace Template.) You can now replace templates for individual dates, or for the entire week.