Edge Pop
Use Edge Pop to see the patients and responsible parties that are calling into your office. When a pop up notification appears on your screen, it takes just a few simple clicks to open a patient or responsible party folder, or to create a new patient or responsible party record.
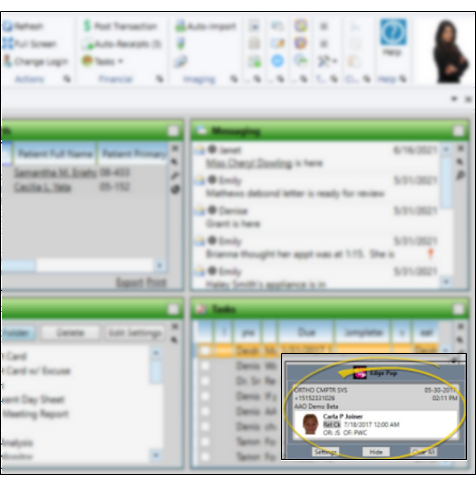
Click the Services drop down menu from the Tasks tab of the Edge Cloud Home ribbon bar and select Pop. The  Edge Pop icon will now appear in your system notification area. Right click the icon. If no settings are found, the Settings window opens automatically. Otherwise, choose the Settings option. Also, once Edge Pop is set up, you can access the Settings window from the bottom of a notification pop-up.
Setting Change Warning - If Edge Pop is working correctly, be careful not to disturb any phone or database settings, which are specific to your phone system, and are not available to Ortho2 directly. For assistance with these settings, please contact your phone system administrator or IT provider.
Phone System Requirements - In order for Edge Pop to work, your phone system needs a VoIP network that supports SIP capability. With some phone systems, it may be necessary to create new SIP users for use with Edge Pop. This may require additional licenses from your phone provider. In addition, the account you wish to use needs to be in the ring group for the phone number used for Edge Pop.
System-Specific Settings - Edge Pop settings are specific to your phone system: Ortho2 does not have access to this information directly. Please contact your phone company or IT provider to confirm you have the proper system capabilities, and to determine your Edge Pop settings.
Machine Settings - Edge Pop is a machine-specific application: When you set up a computer for Edge Pop, those settings are used for every operator that logs into that machine.
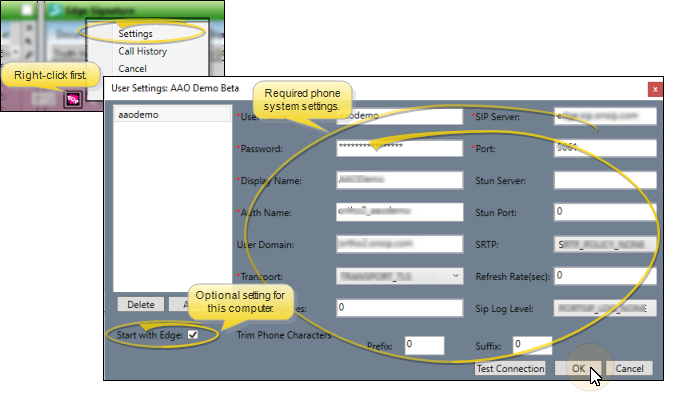
You will need information from your phone company or IT provider to fill in most of the required settings. You may also optionally choose to start Edge Pop automatically whenever Edge Cloud is opened on this computer. When finished, click Ok at the bottom of the window to save your changes and exit settings.
When Edge Pop is active on your computer, the Edge Pop icon appears in your notification area (usually at the bottom of your screen). You can optionally set up Edge Pop to start whenever someone logs into Edge Cloud on this computer.
If Edge Pop is not active on your computer, you can select Services from the Tasks section of the Edge Cloud Home ribbon bar and choose Pop to open it.
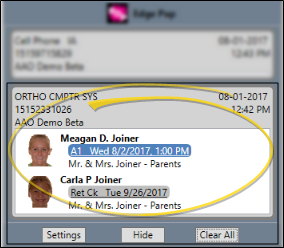
When a patient or responsible party calls in, and the number they are calling from is in the contact information section of the Edge Cloud patient or responsible party folder, a notification will pop up to alert you who is calling.
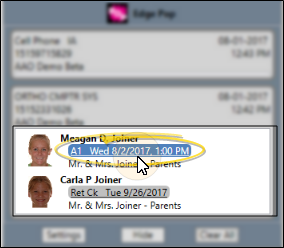
 Notification Details
The pop-up shows the patient name, image, and the next scheduled appointment. More information may appear depending on how you have Edge Cloud set up, and who is calling. If the responsible party is calling from the phone number associated with their responsible party record, their name appears in the pop-up. In addition, if the chair the patient's appointment is scheduled to includes the orthodontist and / or office assignment, you can hover over the appointment to see that information.
Open the Patient Folder
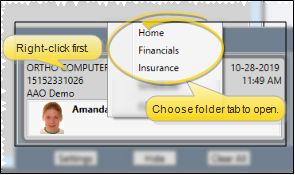
Double-click a notification to open the patient folder Home page. Or right-click and choose to open the patient Home, Financial, or Insurance page. The notification is automatically cleared from the Edge Pop list.
Open the Scheduler
Click the appointment link in the notification, or right-click and select Scheduler to open the Scheduler to the day the appointment is scheduled. The notification is automatically cleared from the Edge Pop list.
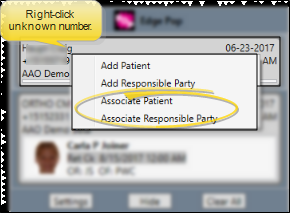
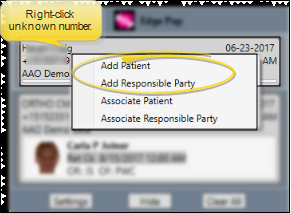
When a call comes in, and the number is not associated with a particular patient or responsible party, you can right click the notification to either create a new patient or responsible party or associate the number with an existing patient or responsible party.
Associate Number
Right-click the notification and select Associate with Patient or Associate with RP. Then use Fast Find to locate the appropriate record. The notification is automatically cleared from the Edge Pop list.
Create a New Record
Right-click the notification and select New Patient or New RP. Then complete the new record data and click Save. The notification is automatically cleared from the Edge Pop list.
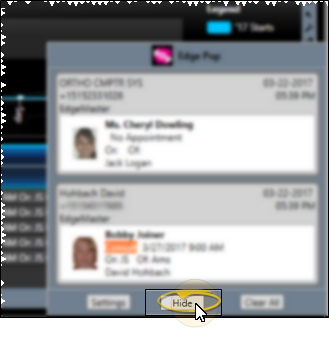
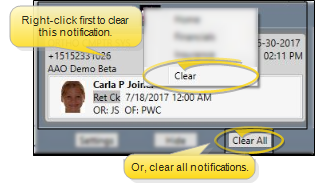
When you are finished with a notification, right-click it and select Clear to indicate that someone has taken care of any issues. You can also click Clear All to remove all notice(s) from your Edge Pop list. (Clicking a notification to open a patient folder, appointment, or association clears it automatically.)
When you want to keep notifications active, but you don't want to look at them right now, select Hide. To display them again, simply click the Edge Pop icon in your system tray.
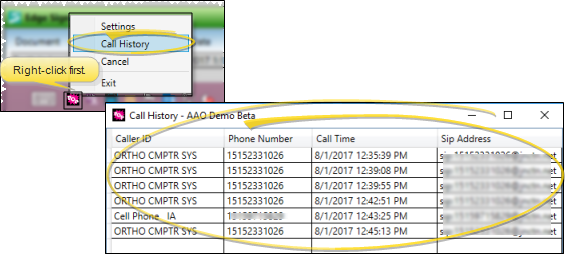
Right-click the Edge Pop icon in your computer's notification area and select Call History to view the list of phone calls that have occurred during the current Edge Pop session. The history is cleared automatically each time you close and reopen Edge Cloud or Edge Pop. To close the call history, click the X in the upper-right corner of the window.
Edge Pop Report - Run an Edge Pop Call History report to obtain a list of calls that you received via the Edge Pop service, including the call date and time, phone number, patient and responsible party name, and the employee that answered the call. You can choose to include calls received by one or more employees, or include all employees. See "Edge Pop Call History" for details.
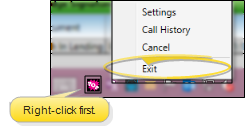
Edge Pop closes automatically whenever you exit Edge Cloud. You can also close it at any time by right-clicking the Edge Pop icon and selecting Exit. Anytime Edge Pop is closed, all current notifications, as well as the Call History, are cleared.
