Subgroup Editor
Use the Subgroup editor to create and manage the subgroups you use for selecting the records to include in reports, mail merge documents, stacks, and other
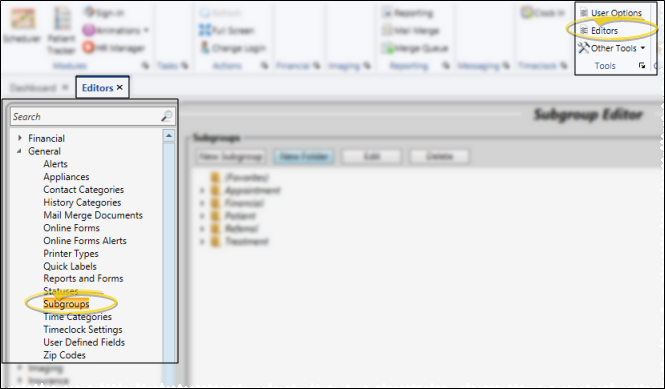
Select Editors from the Tools section of the Home ribbon bar. Then, from the General section, open the Subgroups editor. (You can also use the Search field to look for the editor you want to work with.)
![]() Manage Subgroup and Folder Names and Locations
Manage Subgroup and Folder Names and Locations
Your subgroups are categorized into folders to you can find them quickly. You use the Subgroups section of the window to manage the folders and subgroup locations.
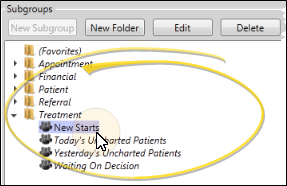
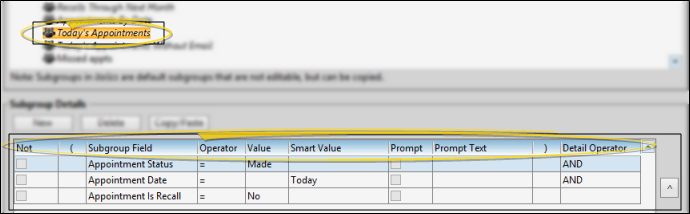
![]() Choose an Existing Subgroup - Click the arrow beside a folder name to open / close the folder, then click to choose a subgroup to work with. The details for the selected subgroup appear at the bottom of the window.
Choose an Existing Subgroup - Click the arrow beside a folder name to open / close the folder, then click to choose a subgroup to work with. The details for the selected subgroup appear at the bottom of the window.
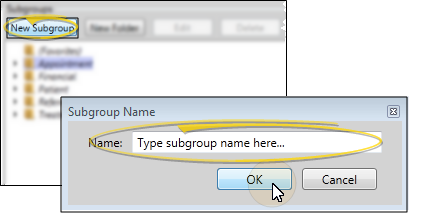
![]() Create a Subgroup from Scratch - Click a folder name to select the location of your new subgroup and click New Subgroup at thetop of the window. Or right-click the folder name and select New Subgroup. Type a name for your subgroup and click Ok. You can now edit the Subgroup Details, described be
Create a Subgroup from Scratch - Click a folder name to select the location of your new subgroup and click New Subgroup at thetop of the window. Or right-click the folder name and select New Subgroup. Type a name for your subgroup and click Ok. You can now edit the Subgroup Details, described be
Copy / Paste Subgroup - You can also right-click an existing subgroup name and select Copy, then right-click a folder name and select Paste to create a duplicate subgroup in that folder that you can edit as needed. After copying a subgroup, be sure to edit the name so you can tell the subgroups apart later.
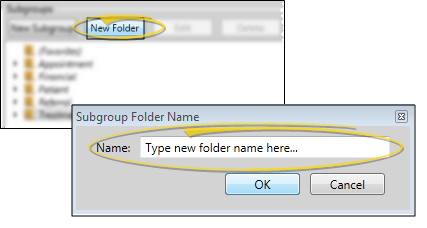
![]() Add a New Folder - Click New Folder (or right-click and select New Folder). Type a name for your folder and click Ok. You can drag your folder to a different location in your list, if needed, described below.
Add a New Folder - Click New Folder (or right-click and select New Folder). Type a name for your folder and click Ok. You can drag your folder to a different location in your list, if needed, described below.
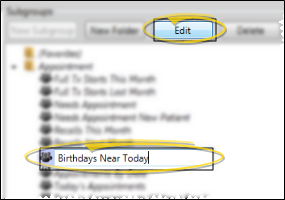
![]() Edit a Subgroup or Folder Name - Click a subgroup or folder name, then click Edit (or, right-click and select Edit). Use your backspace, delete and arrow keys to position your cursor, then type a new name. (You cannot edit or delete standard folders or subgroups that are included with your Edge Cloud system. You can, however, copy then edit them as needed for your situation. These folder and subgroup names are italicized so you can identify them.)
Edit a Subgroup or Folder Name - Click a subgroup or folder name, then click Edit (or, right-click and select Edit). Use your backspace, delete and arrow keys to position your cursor, then type a new name. (You cannot edit or delete standard folders or subgroups that are included with your Edge Cloud system. You can, however, copy then edit them as needed for your situation. These folder and subgroup names are italicized so you can identify them.)
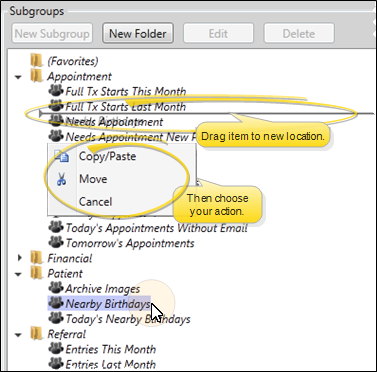
![]() Move / Copy a Subgroup or Folder - Click a subgroup or folder name and drag it to a new location in the list. When you release, you can choose to move the item from its old location to the new location, or copy/paste the item, which leaves the original folder or subgroup in tact while creating a new folder or subgroup at the new location.
Move / Copy a Subgroup or Folder - Click a subgroup or folder name and drag it to a new location in the list. When you release, you can choose to move the item from its old location to the new location, or copy/paste the item, which leaves the original folder or subgroup in tact while creating a new folder or subgroup at the new location.
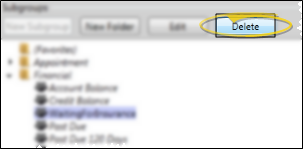
![]() Delete a Subgroup or Folder - Click a subgroup or folder name, then click Delete (or, right-click and select Delete). If you delete a folder, all subgroup templates in that folder are deleted as well. (You cannot edit or delete standard folders or subgroups that are included with your Edge Cloud system. You can, however, copy then edit them as needed for your situation. These folder and subgroup names are italicized so you can identify them.)
Delete a Subgroup or Folder - Click a subgroup or folder name, then click Delete (or, right-click and select Delete). If you delete a folder, all subgroup templates in that folder are deleted as well. (You cannot edit or delete standard folders or subgroups that are included with your Edge Cloud system. You can, however, copy then edit them as needed for your situation. These folder and subgroup names are italicized so you can identify them.)
Use the Subgroup Details section at the bottom of the window to edit the criteria the subgroup will use to include / exclude records. (You cannot edit or delete standard folders or subgroups that are included with your Edge Cloud system. You can, however, copy then edit them as needed for your situation. These folder and subgroup names are italicized so you can identify them.)
![]() Add New Criteria - Click New in the Subgroup Details section of the window to add new criteria to your subgroup. Scroll through the Subgroup Field list, and choose the one you want to work with (You can also search for a subgroup field). Your selected field is added to the bottom of your subgroup. You can now edit the details about how to evaluate this criteria, as described below.
Add New Criteria - Click New in the Subgroup Details section of the window to add new criteria to your subgroup. Scroll through the Subgroup Field list, and choose the one you want to work with (You can also search for a subgroup field). Your selected field is added to the bottom of your subgroup. You can now edit the details about how to evaluate this criteria, as described below.

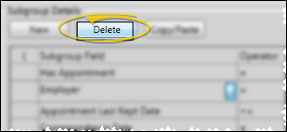
![]() Delete Subgroup Criteria - Click the criteria you want to remove from the subgroup, and click Delete in the Subgroup Details section of the window. This only deletes the criteria you selected, it does not delete the entire subgroup. (See Delete a Subgroup or Folder above to remove a subgroup from your system.)
Delete Subgroup Criteria - Click the criteria you want to remove from the subgroup, and click Delete in the Subgroup Details section of the window. This only deletes the criteria you selected, it does not delete the entire subgroup. (See Delete a Subgroup or Folder above to remove a subgroup from your system.)
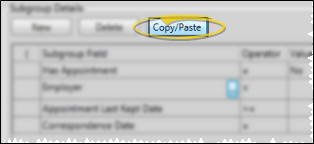
![]() Copy / Paste Subgroup Criteria - Click the criteria you want to work with, then click Copy / Paste in the Subgroup Details section of the window to add a copy of the detail to the bottom of the list. You can now edit that criteria as needed.
Copy / Paste Subgroup Criteria - Click the criteria you want to work with, then click Copy / Paste in the Subgroup Details section of the window to add a copy of the detail to the bottom of the list. You can now edit that criteria as needed.
![]() Criteria Details - Choose how to evaluate the criteria you have selected for this subgroup.
Criteria Details - Choose how to evaluate the criteria you have selected for this subgroup.
Not - Enable this field to search for records that do NOT fit the criteria you are evaluating. For example, you might want to search for patients that do not have an appointment within a certain date range.
Subgroup Field - This is the data that you will be evaluating. To choose a different type of data to work with, click [...] in the Subgroup Field column and scroll through the list of choices, or search for the field you want to work with.
![]() Operator - Choose the mathematical operator to use to evaluate the selected subgroup field against the data in the patient folder.
Operator - Choose the mathematical operator to use to evaluate the selected subgroup field against the data in the patient folder.
Equal to ( = )![]() - This operator includes records that exactly match the field value.
- This operator includes records that exactly match the field value.
Not equal to ( <> )![]() - This operator excludes records that match the field value.
- This operator excludes records that match the field value.
Greater than (> )![]() - This operator includes records whose value is more than, but not the same as, the field value.
- This operator includes records whose value is more than, but not the same as, the field value.
Greater than or equal to ( >= )![]() - This operator includes records whose value is either more than or the same as the field value.
- This operator includes records whose value is either more than or the same as the field value.
Less than ( < )![]() - This operator includes records whose value is less than, but not the same as, the field value.
- This operator includes records whose value is less than, but not the same as, the field value.
Less than or equal to ( <= )![]() - This operator includes records whose value is either less than or the same as the field value.
- This operator includes records whose value is either less than or the same as the field value.
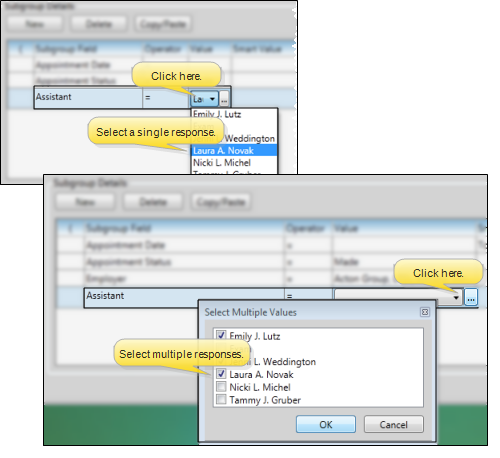
![]() Value - Enter the response you are testing for. Depending on the type of field you are working with, you may select the response from a list, or type a specific response.
Value - Enter the response you are testing for. Depending on the type of field you are working with, you may select the response from a list, or type a specific response.
Select From a List - If you are working with a subgroup field whose response is from a list, you may select one or any number of responses from that list to evaluate. To select a single response, click the Value field, and select the response you want to evaluate. To select multiple responses, click the [...] button beside the Value field and place a checkmark beside each response you wish to evaluate.
Select a Date - If you are evaluating a date, you may either enter a specific date in the Value column, or select the Smart Value column, and choose from values such as Last Week , This Week, and Today.
Text Response - If you are evaluating a field that contains a typed response (such as a User-Defined field), enter the response you are looking for exactly as it appears in your patient folders, including spaces, and punctuation. Any differences will prevent the response from being evaluated as a match.
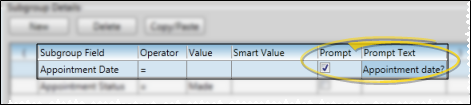
Prompt for a Value - If you want to enter the value at the time you run the subgroup, enable the Prompt option. Then, type the question to display in the Prompt Text box. Whenever you use this subgroup, the question you typed will pop onto your screen, waiting for you to enter the appropriate value to use for this subgroup job.
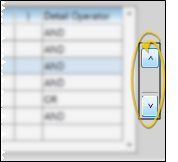
Detail Operator - When your subgroup contains multiple criteria, use the Detail Operator column to define whether a patient record must satisfy the current criteria AND the next, or whether the record must satisfy either the current criteria OR the next in order to be included in the group. If you subgroup contains only one criteria, the operator is not needed. In addition, the final criteria of a multiple-criteria subgroup does not require a detail operator, because its inclusion in the group is dependent upon the detail operator just above it.
Reorder Criteria - As
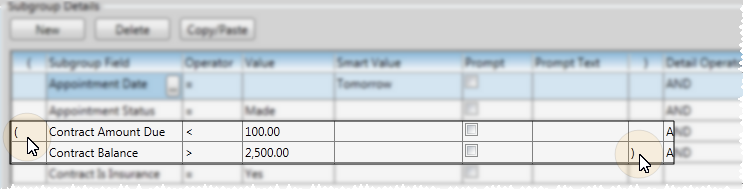
Precedence - You can modify the order of operation for certain subgroup fields by enclosing them in parentheses, thereby creating a "precedence group" that is tested first as a unit. (This works similar to how the mathematical expression 5 * 3 + 1 is evaluated differently when written as 5 * (3 + 1).)To do so, use the parentheses column at the left of the subgroup fields to mark the beginning of your group, and the parentheses column at the right of the subgroup fields to mark the ending of the group.
You can use the Export / Import tools to share your subgroups with other
![]() Export Subgroups - Click Export to open the Export Subgroups window, and select each subgroup you wish to export. You can only export subgroups you have created or imported: You cannot export built-in subgroups. Then, click Export, and choose a location and file name for your exported file. You can now share the file with others.
Export Subgroups - Click Export to open the Export Subgroups window, and select each subgroup you wish to export. You can only export subgroups you have created or imported: You cannot export built-in subgroups. Then, click Export, and choose a location and file name for your exported file. You can now share the file with others.

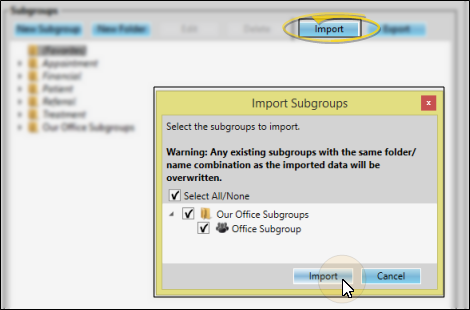
![]() Import Subgroups - Click Import to open the Import Subgroups window, and locate the exported file you want to work with. Select each subgroup you want to add to your system, and click Import. The new subgroups will be imported with their original folder and file names, overwriting any existing files with matching names.
Import Subgroups - Click Import to open the Import Subgroups window, and locate the exported file you want to work with. Select each subgroup you want to add to your system, and click Import. The new subgroups will be imported with their original folder and file names, overwriting any existing files with matching names.
Any existing subgroups with the same folder / file name as the imported data will be overwritten by the new subgroups.
Click  Save in your Quick Access toolbar or File ribbon bar (or press Ctrl+S on your keyboard) to save any changes you have made.
