Dental Conditions Editor
Use the Dental Conditions editor to create and manage health and dental conditions that you can apply to your patient tooth charts and treatment charts. Each dental condition includes a name, the area affected (i.e. whole mouth, arch, tooth, root, surface, quadrant or sextant), description, and display details.
![]() Open the Dental Conditions Editor
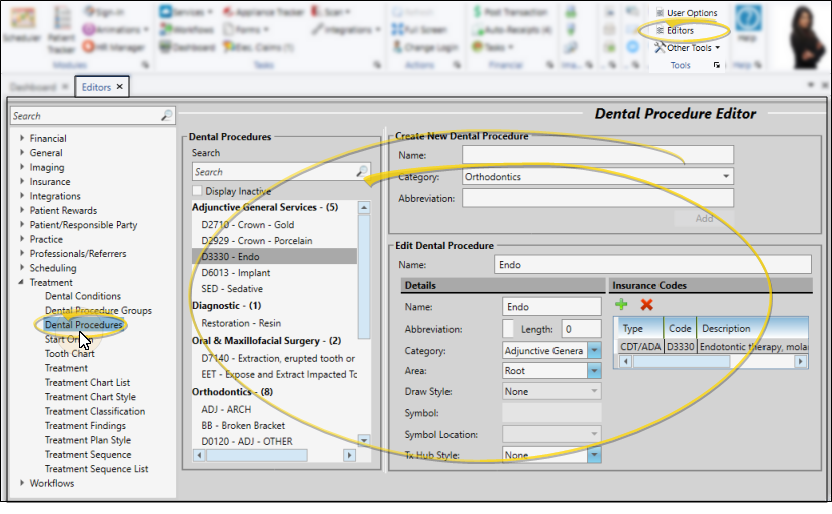
Open the Dental Conditions Editor
Select Editors from the Tools section of the Home ribbon bar. Then, from the Treatment section, open the Dental Conditions editor. (You can also use the Search field to look for the editor you want to work with.)
![]() Create or Edit Dental Conditions
Create or Edit Dental Conditions
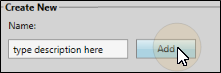
Create a New Record - Type a name in the Create New Dental Condition portion of the window. Then click Add. The new condition is automatically assigned to the currently selected specialty, but you can edit your record to enable other specialties, as well as complete the additional details.
Created Records Can't Be Deleted - Once you create a record, you cannot delete it. You can, however, flag it Inactive. Records you flag as Inactive are not available for general use, but they remain in your system for reporting and other data collection needs. In addition, you can toggle records back to Active whenever needed.
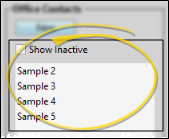
Select Existing Record - Your list of existing records appears at the left. Click the record to work with, then review and edit the details at the right. If not all your records appear in the list, enable the Display Inactive option. For Edge Specialist users, only dental conditions assigned to the selected specialty will appear in the list.
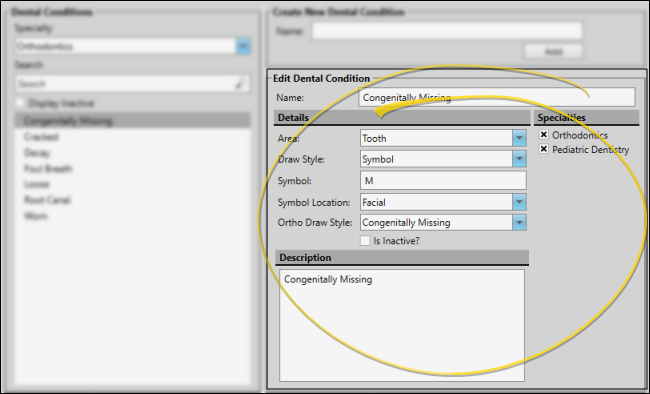
Name - You can edit the name of this record if needed.
![]() Area - Specify whether this dental condition should be applied to an individual tooth, an arch, the whole mouth, a quadrant or sextant, root, tooth surface, or other area. Your choices for applying and editing this condition in a patient's tooth chart and treatment chart depend on the area you select.
Area - Specify whether this dental condition should be applied to an individual tooth, an arch, the whole mouth, a quadrant or sextant, root, tooth surface, or other area. Your choices for applying and editing this condition in a patient's tooth chart and treatment chart depend on the area you select.
Arch - This area applies the condition to either the patient's maxillary or mandibular arch. As you apply this condition, you will need to select the arch. Once saved in a patient folder, you can see this information in the treatment chart (if your filter allows Dental Conditions), and hover or click the "M" (Mouth) icon at the top left of the tooth chart to see and edit the details. Because this area impacts multiple teeth, any Draw Style or Ortho Draw Style (described below) is ignored. In the treatment chart, this condition is flagged with "man" or "max", denoting the selected arch.
Mouth - This area applies the condition to the entire mouth. Once saved in a patient folder, you can see this information in the treatment chart (if your filter allows Dental Conditions), and hover or click the "M" (Mouth) icon at the top left of the tooth chart to see and edit the details. Because this area impacts multiple teeth, any Draw Style or Ortho Draw Style (described below) is ignored.
Other - This area applies the condition to a location outside patient's mouth or teeth, but that you want readily available to your clinical staff, such as allergies or sensitivity issues. Once saved in a patient folder, you can see this information in the treatment chart (if your filter allows Dental Conditions), and hover or click the "M" (Mouth) icon at the top left of the tooth chart to see and edit the details. Because this area impacts multiple teeth, any Draw Style or Ortho Draw Style (described below) is ignored.
Quadrant - This area applies the condition to a specific quadrant of the patient's mouth. As you apply this condition, you will need to select the quadrant. Once saved in a patient folder, you can see this information in the treatment chart (if your filter allows Dental Conditions), and hover or click the "M" (Mouth) icon at the top left of the tooth chart to see and edit the details. Because this area impacts multiple teeth, any Draw Style or Ortho Draw Style (described below) is ignored. In the treatment chart, this condition is flagged with "Q1" (denoting upper right quadrant), "Q2" (denoting upper left quadrant), "Q3"(denoting lower left quadrant) or "Q4" (denoting lower right quadrant).
Root - This area applies the condition to the root of a specific tooth. Once saved in a patient folder, the associated Draw Style or Ortho Draw Style (described below) appears in the tooth chart, and you can see this information in the patient's treatment chart (if your filter allows Dental Conditions). In the treatment chart, this condition is flagged with the word "root".
Sextant - This area applies the condition to a specific sextant of the patient's mouth. As you apply this condition, you will need to select the location. Once saved in a patient folder, you can see this information in the treatment chart (if your filter allows Dental Conditions), and hover or click the "M" (Mouth) icon at the top left of the tooth chart to see and edit the details. Because this area impacts multiple teeth, any Draw Style or Ortho Draw Style (described below) is ignored. In the treatment chart, this condition is flagged with "S1" (denoting upper right posterior), "S2" (denoting upper anterior), "S3"(denoting upper left posterior), "S4" (denoting lower left posterior), "S5" (denoting lower anterior), or "S6" (denoting lower right posterior).
Surface - This area applies the condition to one or more surfaces of a specific tooth. As you apply this condition, you will need to select the affected location(s). Once saved in a patient folder, the associated Draw Style or Ortho Draw Style (described below) appears in the tooth chart, and you can see this information in the patient's treatment chart (if your filter allows Dental Conditions). In the treatment chart, this condition is flagged with one or more of these symbols: "M" (denoting mesial), "D" (denoting distal), "LV"(denoting lingual V), "L" (denoting lingual), "O" (denoting occulsal), "B" (denoting Buccal), and "FV" (denoting facial V).
Tooth - This area applies the condition to a specific tooth. In the treatment chart, this condition is flagged with the tooth number in the format (Universal Numbering, FDI Notation, or Palmer Notation) selected as the default in your Tooth Chart User Options (not necessarily the tooth numbering system currently selected in your Patient ribbon bar.)
![]() Draw Style, Symbol, & Ortho Draw Style - The Draw Style, Symbol, and Ortho Draw Style fields work together to determine how dental conditions with Root, Surface, or Tooth areas (described above) appear on the patient's tooth chart. Regardless of these settings, any dental condition you apply to a patient will be listed in the tooth history, and patient treatment chart (if your filter allows Dental Conditions).
Draw Style, Symbol, & Ortho Draw Style - The Draw Style, Symbol, and Ortho Draw Style fields work together to determine how dental conditions with Root, Surface, or Tooth areas (described above) appear on the patient's tooth chart. Regardless of these settings, any dental condition you apply to a patient will be listed in the tooth history, and patient treatment chart (if your filter allows Dental Conditions).
Draw Style "None" - A dental condition with this setting will not show up on the patient's tooth chart, even if you have selected an Ortho Draw Style.
Draw Styles "Fill", "Striped", and "Image" - A dental condition with any of these settings will show the selected Ortho Draw Style image. However, if your Ortho Draw Style is "none", the condition will not show up on the tooth chart display.
Draw Styles "Symbol" and "Large Symbol" - A dental condition with either of these settings will show the keyboard character that you type in the Symbol field, regardless of the selected Ortho Draw Style. However, if your Ortho Draw Style is "none" the condition will not show up on the tooth chart. In addition, if the Symbol field is blank, nothing will show up on the tooth chart display, even if you have selected an Ortho Draw Style.
Once saved in a patient folder, the associated Draw Style or Ortho Draw Style (described below) appears in the tooth chart, and you can see this information in the patient's treatment chart (if your filter allows Dental Conditions).
Inactive / Active Toggle - Once you create a record, you cannot delete it. You can, however, flag it Inactive. Records you flag as Inactive are not available for general use, but they remain in your system for reporting and other data collection needs. In addition, you can toggle records back to Active whenever needed.
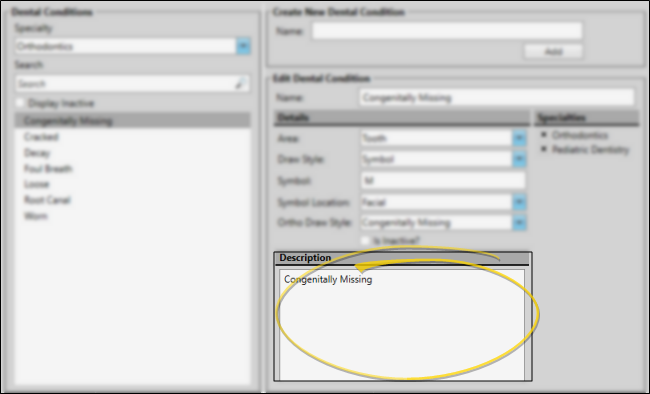
![]() Description - Use this box to type further details about this dental condition.
Description - Use this box to type further details about this dental condition.
Click  Save in your Quick Access toolbar or File ribbon bar (or press Ctrl+S on your keyboard) to save any changes you have made.
