Set Up Miscellaneous Charges & Groups
Use the Miscellaneous Charge editor to create and maintain your list of non-contract charges. Each charge type includes a description, corresponding insurance code, and default amount. You can also create groups of charges that should be posted together.
How to Get Here
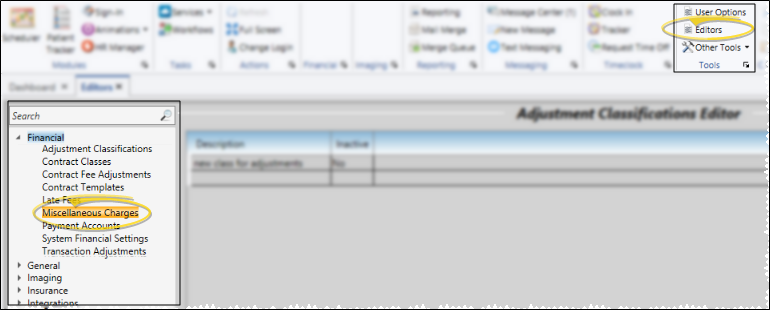
![]() Open Miscellaneous Charges Editor - Home ribbon bar > Tools section > Editors > Financial > Miscellaneous Charges. (You can also use the Search field to look for the editor you want to work with.)
Open Miscellaneous Charges Editor - Home ribbon bar > Tools section > Editors > Financial > Miscellaneous Charges. (You can also use the Search field to look for the editor you want to work with.)
Choose Your Settings
You work with individual miscellaneous charge records at the top portion of the window, and charge groups at the bottom of the window.
![]() Select Existing Record - Your list of existing records appears at the left. Click the record to work with, then review and edit the details at the right.
Select Existing Record - Your list of existing records appears at the left. Click the record to work with, then review and edit the details at the right.
 Show / Hide Inactive icon at the top of the window to include both active and inactive records.
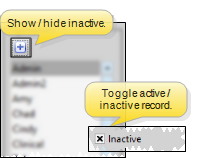
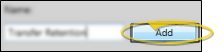
![]() Create a New Record - Type a description in the Create New portion of the window. Then click Add. You can then edit your record to complete the details.
Create a New Record - Type a description in the Create New portion of the window. Then click Add. You can then edit your record to complete the details.
![]() Miscellaneous Charge Details - Select a miscellaneous charge record from the top section of the window. If you just created a new record, it is selected automatically.
Miscellaneous Charge Details - Select a miscellaneous charge record from the top section of the window. If you just created a new record, it is selected automatically.

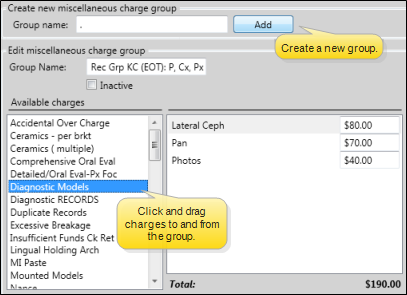
![]() Charge Group Details - Select a charge group record from the bottom section of the window. You can then drag individual miscellaneous charges into and out of the group. If you just created a new miscellaneous charge, you will need to save those changes before the charge will be available for adding to a group. Although you post a charge group as a single transaction, the individual charges will appear in the patient's ledger and on your Transaction Report.
Charge Group Details - Select a charge group record from the bottom section of the window. You can then drag individual miscellaneous charges into and out of the group. If you just created a new miscellaneous charge, you will need to save those changes before the charge will be available for adding to a group. Although you post a charge group as a single transaction, the individual charges will appear in the patient's ledger and on your Transaction Report.
![]() Save Changes - Click
Save Changes - Click  Save in your Quick Access toolbar or File ribbon bar (or press Ctrl+S on your keyboard) to save any changes you have made.

More Information
Print - You may want to print this list as a report for reference. See "Miscellaneous Charge List" for details.
![]() Editor History - When you open more than one editor without leaving the Editors window, a history of those editors appears at the top of your screen. You can click a name in the history to return to any previously opened editor, easily going back and forth between editors. This is useful, for example, when you are working with editors that are related to one another, such as the Treatment Chart Style editor and the Treatment Chart List editor.
Editor History - When you open more than one editor without leaving the Editors window, a history of those editors appears at the top of your screen. You can click a name in the history to return to any previously opened editor, easily going back and forth between editors. This is useful, for example, when you are working with editors that are related to one another, such as the Treatment Chart Style editor and the Treatment Chart List editor.

![]()
www.ortho2.com │ 1107 Buckeye Ave. │ Ames, IA 50010 │ 800.346.4504 │ Contact Us
Chat with Software Support │ Chat with Network Engineering │ Chat with New Customer Care
Remote Support │ Email Support │ Online Help Ver. 11/11/2019


