View Monthly Schedule
Use Month View mode to see a monthly calendar that includes template assignments and scheduling statistics.
-
 Open Your Scheduler - You can open this feature in multiple ways: Use the method that's most convenient for you.
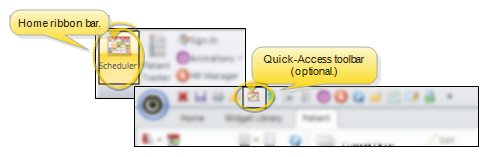
You can open your Scheduler from the Home ribbon bar or Quick Access toolbar, or from several locations in the patient folder.
Clicking the  Scheduler icon from either the Home ribbon bar or your Quick Access toolbar while a Scheduler session is already active can either bring the open Scheduler tab to the front of your Edge Cloud window, or open another Scheduler tab. See "Scheduler User Options" for detailsabout setting up this option.
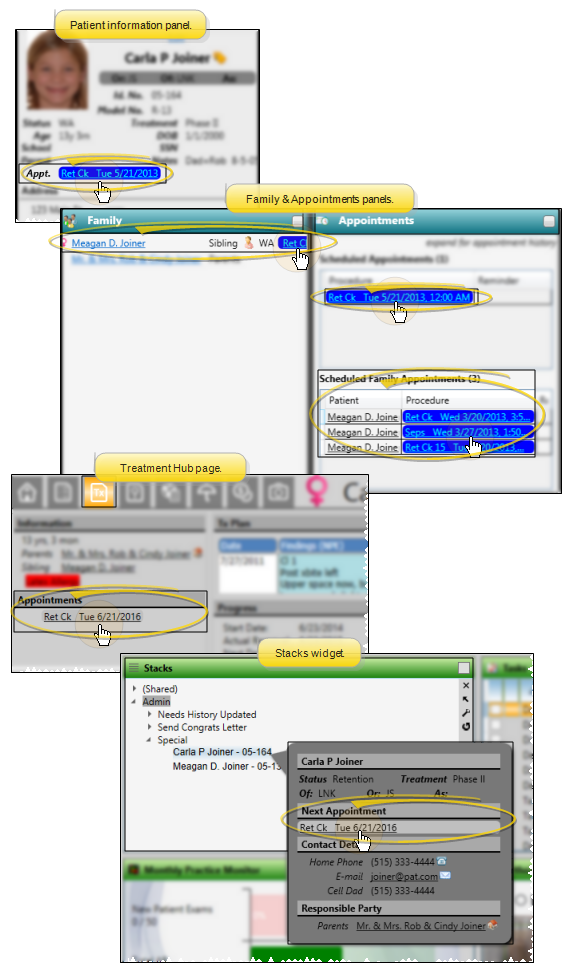
You can open your Scheduler to a specific appointment by clicking the appointment link wherever it appears in the patient folder, such as on the Patient Information Panel, the Family panel, or the Appointments panel of the patient folder Home page, on the Treatment Hub page, or by hovering over the patient name in your Stacks widget.
If you have multiple Scheduler tabs open, clicking a patient appointment link will bring the left-most tab to the front of your Edge Cloud window. Note that before you click the link, you can reorder your tabs by simply dragging them into place, thus selecting which Scheduler tab you want to work with. See "Scheduler User Options" for details about enabling/disabling the multiple Scheduler option.
-
Choose the Viewing Mode - Scheduler ribbon bar >  Month View.
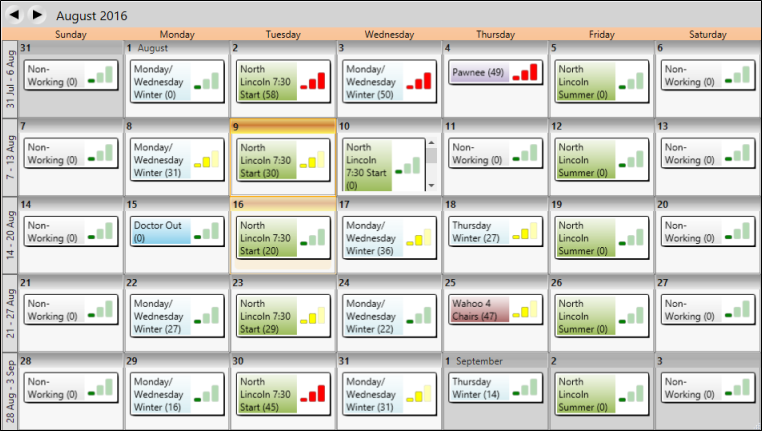
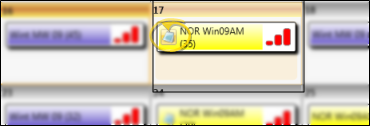
Review Assigned Template - The name and color of the template assigned to the date is included for each date.
Review Daily Statistics- Each date includes the scheduling statistics for that day.
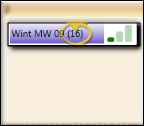
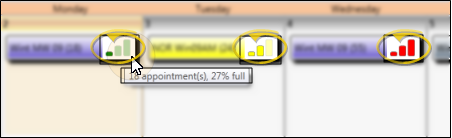
Number of Appointments - The number of appointments scheduled for the day is shown in parenthesis.
Percentage Scheduled - The graph bars beside the template name indicate how heavily the day is scheduled: Green indicates a light day (0 - 40%), yellow indicates a moderate day (40-75%), and red indicates a heavily scheduled day (75% or above). You can hover over the date header to see the exact percentage of the day that is scheduled.
View Notes - Click the  Notes icon on your monthly schedule to see any notes that have been created for that day. You cannot add or edit notes from month-view mode. (If you don't see a Notes icon, there are no notes available for that date.) See "Scheduler Notes" for details.
Go To a Date - Click in a date square, then click  Day View from the Scheduler ribbon bar, or simply double-click on the date to go to the scheduling grid for that day.
Add a Template To a Date - While in Month View mode, you can right click a date and choose Add a Template to select another template to use for this date, in addition to the template already assigned. (You might have multiple templates assigned to a single date when your doctors and/or offices need to run different schedules on the same day.) You can also apply the same template to multiple dates by holding down the Shift or Ctrl key while you choose the dates, then right-clicking and choosing Add a Template.
Remove Template - Right-click a template in Month View mode, and choose Remove Template to delete the template from the date. Any appointments already scheduled to that template are moved to your Scheduler bar, with the date as the bar heading.
Replace Templates for the Day or Week - Click the date to work with, or click the weekly heading at the left of the calendar to select an entire week. Then, click Replace Templates in the Scheduler ribbon bar. (Or, right-click a template and select Replace Template.) You can now replace templates for individual dates, or for the entire week.
Print Monthly Calendar - Click  Print from your File ribbon bar or Quick Access toolbar (or press Ctrl+P on your keyboard) to print a copy of the current screen contents. (See "Printing from Edge Cloud" for details.)