Treatment Findings Editor
Use the Treatment Findings editor to set up the categories and standard responses to enter into your patients' treatment findings records. You can select the categories that you want to import into the patient's Insurance detail page, choose categories that will prompt you to apply a treatment sequence when a response from that category is added to the patients' findings, and specify which categories allow you to type custom responses into patient records.
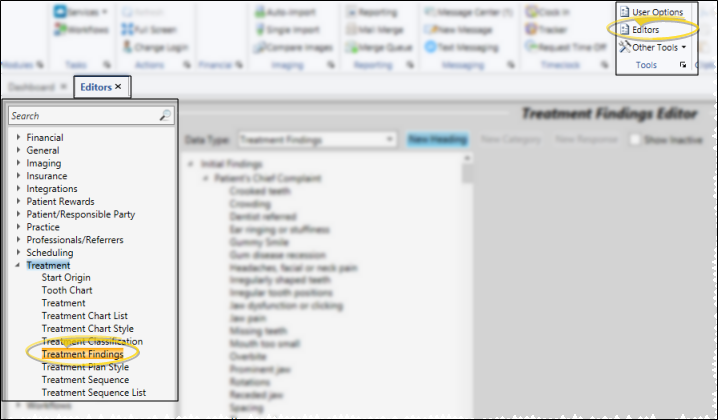
Select Editors from the Tools section of the Home ribbon bar. Then from the Treatment section, open the Treatment Findings editor. (You can also use the Search field to look for the editor you want to work with.)
 Select Data Type - Choose the type of data to work with. Use the Treatment Findings data type to track your patients' medical and orthodontic findings. Use the Miscellaneous Information data type to track additional non-medical information about the patient.
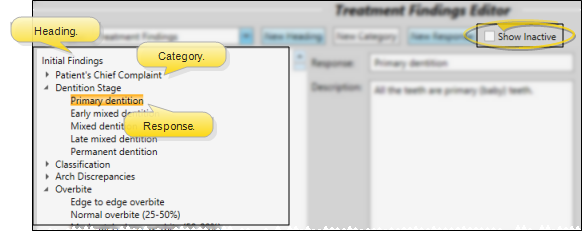
Choose Record to Work With - Your findings records are sub-divided into a hierarchy of Headings, Categories, and Responses. You may expand or collapse folders as needed to help you find the record you want to work with. You can enable / disable the Show Inactive option to include / exclude the inactive records in the list.
Create New Record - Select the position where you would like to insert the new record, and click Add Heading, Add Category, or Add Response, then complete the details for the type of record you are creating. Your cursor position determines the type of new record you can create. For example, you cannot create a response record when your current position is a heading, and you cannot create a new category when your current position is within a list of responses.
Once you create a new record, you cannot delete it.

Edit Details - Select a record to work with. Then make your changes in the fields at the right of the window. The fields available depend upon the type of record you selected.
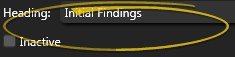
Headings - You can edit the name of the heading, and toggle the inactive flag. If you flag a heading as inactive, the associated categories and responses will not be available to patient folders.
Categories - You can edit the name of your categories, and toggle the inactive flag as needed. In addition, you can specify how that category is used in patient folders.
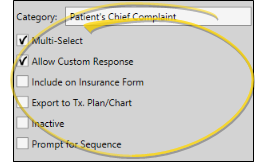
Category Name - Type a name for the category. This description may be used in merge documents, and may be included on insurance forms (described below).
Single Select / Multi-Select - Disable the Multi-Select option of your Treatment Findings editor to allow only one response from this category to be selected for a patient folder. Or, enable Multi-Select to allow multiple responses from this category to be selected for a patient.
Allow
Custom
Response - Choose whether you can create and edit new responses in this category for individual patients.
Include on Insurance Form - Enable this option to allow importing the patient's responses to this category into the Insurance details page of the patient folder when you use the Import feature. Those details will in turn be used as the narrative description on certain insurance forms. (See "Patient Insurance Details" for details.) Categories flagged Inactive are not imported into the Insurance page, even if this option is enabled.
Export to Tx. Plan / Chart - Enable the Export to Tx Plan / Chart option in your Treatment Findings editor to include this category in the default list of responses to import into a treatment plan or treatment chart record. This is only a default: You can include / exclude any findings in an import as needed. (See "Add Findings to Treatment Plan / Chart" for detailsabout using the import feature.)
Inactive / Active Toggle - Once you create a record, you cannot delete it. You can, however, flag it Inactive. Records you flag as Inactive are not available for general use, but they remain in your system for reporting and other data collection needs. In addition, you can toggle records back to Active whenever needed.
Prompt for Sequence Option - Enable the Prompt for Sequence option of one or more Treatment Findings categories to be prompted to apply a treatment sequence to the patient's Treatment Plan when a response is first entered for those categories. The sequence prompt is not triggered if you edit the category later. (See "Treatment Sequence" for details.)
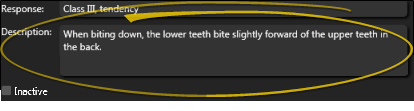
Responses - You can edit the name of your findings responses, change the longer layman's description, which is often written in sentence format for word processing purposes, and toggle the inactive flag as needed.
Reorder Records - You can reorder your headings, categories and responses by dragging and dropping them to new locations.
Save Changes - Click  Save in your Quick Access toolbar or File ribbon bar (or press Ctrl+S on your keyboard) to save any changes you have made.

Use Findings in Merge Documents - You can insert both the short and long descriptions of your patients' treatment findings and miscellaneous information from the Findings page of the patient folder into your mail merge documents, and print them in either list or paragraph form. See "Mail Merge Tool: Findings Variables" for details.
System-Wide Settings - When you change a record in the Findings editor,
the description also changes in any associated patient
folders.
Print Treatment Findings List - Run the Treatment Category report to review the list of responses you have available for inputting into the Findings page of your patient folders. The report includes all headings, categories, short responses, and long descriptions in your Treatment Findings editor. See "Treatment Category Report" for details.