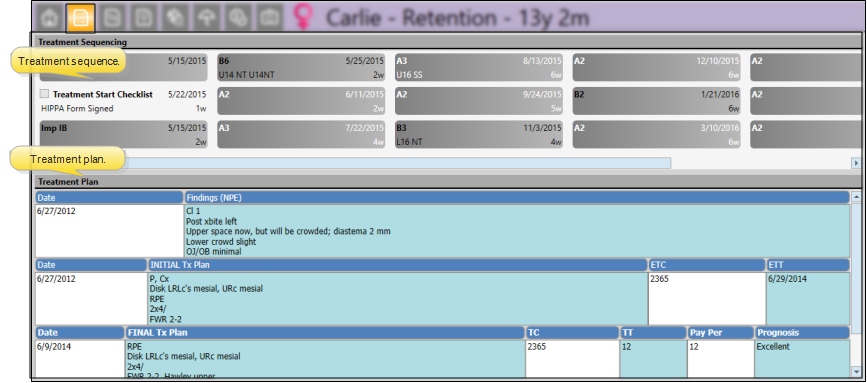
The patient's Treatment Sequence, or list of proposed and completed appointments, appears at the top of the Treatment Plan page of the patient folder. Use the scroll bar at the bottom of the sequence section of the window to view additional appointments and checklists, if needed. Right-click to edit or process an item, or to change the sequence. You can integrate treatment sequencing with the patient's findings responses, treatment chart records, and needs appointment list, and view the sequence while scheduling patient appointments.
Get Started
Create Treatment Sequence Templates - Use the Treatment Sequence Editor to create templates of appointments and checklist items that are generally required for completing different types of treatment. After selecting a treatment sequence template for a patient, you may edit the sequence at any time to meet that patient's unique treatment needs. See "Treatment Sequence Templates" for details.
Prompt for Sequence Option - Enable the Prompt for Sequence option of one or more Treatment Findings categories to be prompted to apply a treatment sequence to the patient's Treatment Plan when a response is first entered for those categories. The sequence prompt is not triggered if you edit the category later. See "Treatment Findings Editor" for details. If you do not apply a treatment sequence at that time, you can manually create one later, as described below.
Use This Feature
![]() Open Treatment Sequence - Open a patient folder, and go to the
Open Treatment Sequence - Open a patient folder, and go to the  Treatment Plan page. The Treatment Sequence appears in the top portion of the window.
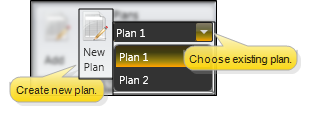
![]() Select the Plan to Work With - Each treatment sequence is tied to a specific treatment plan. If the patient has multiple treatment plans, select the plan to work with.
Select the Plan to Work With - Each treatment sequence is tied to a specific treatment plan. If the patient has multiple treatment plans, select the plan to work with.
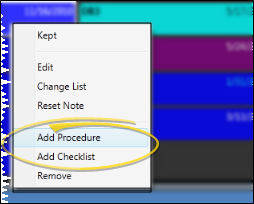
![]() Set Up a Treatment Sequence - When you add a treatment sequence to a patient chart, you usually apply a treatment sequence template first, then add additional appointments and checklist items specific to that patient's proposed treatment. Alternately, you can create a patient's treatment sequence from scratch, manually adding appointments and checklist items as needed.
Set Up a Treatment Sequence - When you add a treatment sequence to a patient chart, you usually apply a treatment sequence template first, then add additional appointments and checklist items specific to that patient's proposed treatment. Alternately, you can create a patient's treatment sequence from scratch, manually adding appointments and checklist items as needed.
 Change in the Sequence section of the Patient ribbon bar, and select the treatment sequence template to apply to this treatment plan.
 Refresh your page.)
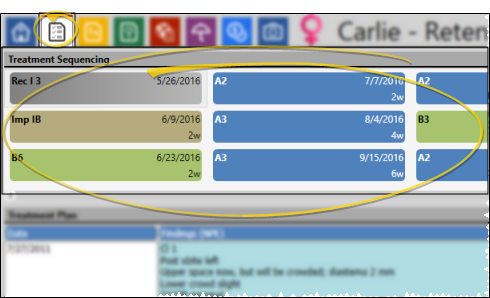
![]() Update a Treatment Sequence - As the patient progresses through treatment, you update the associated items in the treatment sequence to reflect that progress. Although you can right-click to manually process and edit items, certain sequencing tasks happen automatically as you schedule and process patient appointments.
Update a Treatment Sequence - As the patient progresses through treatment, you update the associated items in the treatment sequence to reflect that progress. Although you can right-click to manually process and edit items, certain sequencing tasks happen automatically as you schedule and process patient appointments.
![]() Save Changes - Click
Save Changes - Click  Save in your Quick Access toolbar or File ribbon bar (or press Ctrl+S on your keyboard) to save any changes you have made.

More Information
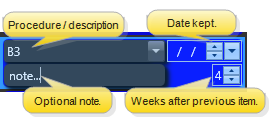
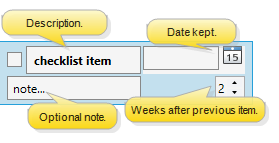
Building a Treatment Sequence From Scratch - You can build a treatment sequence from scratch by adding as many individual procedures and checklist items as needed. However, it is usually more efficient to apply a treatment sequence template, then add and remove items to customize it for the patient. See "Treatment Sequence Templates" for details.
Treatment Sequence & Findings Integration - You can optionally be prompted to apply a treatment sequence when you enter a Findings response into a patient folder. The sequence prompt is not triggered if you edit the category later. See "Add / Edit Patient Findings" for details.
Treatment Sequence & Needs Appointment Integration - Patients in an appointment-required status that have no future appointment scheduled are automatically placed
Treatment Sequence & Scheduler Integration - You can review a patient's treatment sequence while scheduling an appointment. This feature helps you stay on the proposed course of treatment with every appointment.
Treatment Sequence & Treatment Chart Integration - When you create a treatment chart record that includes that includes both a column that requires a response from your Procedure List, and a List Only column that is assigned to a list with the Next Appt Time enabled, the patient's next treatment sequence appointment is entered as the default automatically.See "Add, Edit, & Sign Treatment Chart Records" for details.
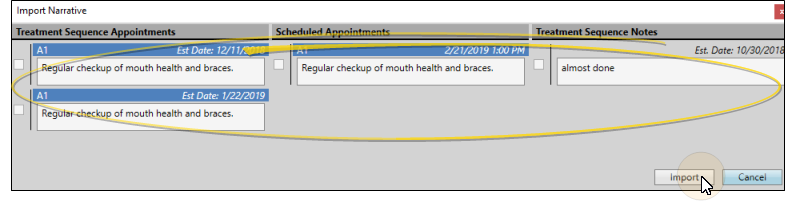
Import Narrative into Treatment Chart - While adding data to a Text Only or List and Text treatment chart column, click the drop down button beside the  Import icon on the Treatment Chart section of the Patient ribbon bar, then select Import Narrative. (Or, press F3 on your keyboard.) You will see a window of all narratives associated with scheduled appointments, and upcoming Treatment Sequence appointments and checklist notes. Enable each narrative you wish to add to the treatment chart, and click Import. If you later change the narrative assigned to an appointment or treatment sequence checklist, any treatment chart records that imported the narrative will not be changed. See "Procedures Editor" for details about creating narratives for
View Treatment Sequence in Treatment Hub - You can choose to show / hide the patient's active treatment sequence items at the bottom of your treatment chart records. Once a sequence procedure is flagged as "kept", it is removed from the treatment chart automatically. See "Treatment Hub" for details.
![]()
www.ortho2.com │ 1107 Buckeye Ave. │ Ames, IA 50010 │ 800.346.4504 │ Contact Us
Chat with Software Support │ Chat with Network Engineering │ Chat with New Customer Care
Remote Support │ Email Support │ Online Help Ver. 11/11/2019


