Procedures Editor
Use the Procedures editor to maintain your list of patient appointment procedures. You can link Workflows to your procedure descriptions, which trigger tasks such as printing letters or applying miscellaneous charges when an appointment is scheduled or processed, assign Patient Reward point values to appointments, and classify appointments for calculations used by your practice statistical analysis
reports and graphs.
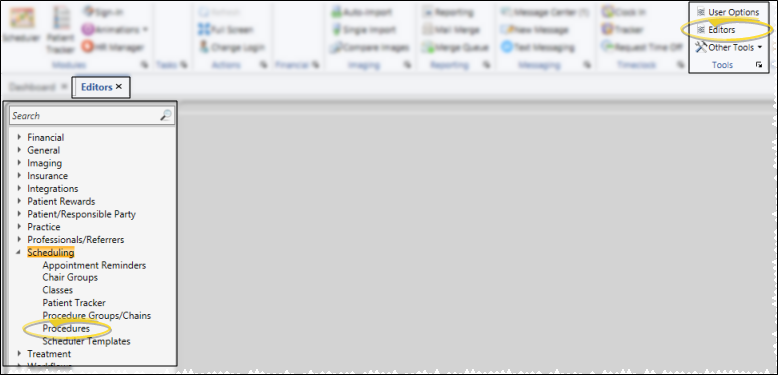
Select Editors from the Tools section of the Home ribbon bar. Then from the Scheduling section, open the Procedures editor. (You can also use the Search field to look for the editor you want to work with.)
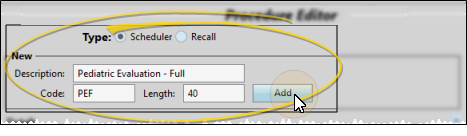
Create a New Record - At the top of the editor window, select to create either a Scheduler appointment or a Recall appointment. Then, type a description, code, and appointment length (in minutes) in the New section of the window, and click Add. (Once you create a record, you cannot delete it. You can, however, flag it Inactive. Records you flag as Inactive are not available for general use, but they remain in your system for reporting and other data collection needs. In addition, you can toggle records back to Active whenever needed.)
New Record Note - Be sure you have selected the appropriate type before clicking Add. Once created, you cannot change whether the procedure is for Scheduler or Recall appointments.
Select Existing Record - Your list of existing records appears at the left. Click the record to work with, then review and edit the details at the right. If not all your records appear in the list, enable the Display Inactive option.
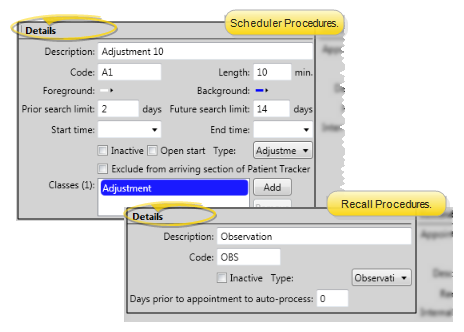
Use the Details section of the window to define how the selected procedure should be scheduled. The details available depend on whether you are working with a Scheduler or Recall procedure.
Scheduler and Recall Appointment Details
Description- Type the full in-office description for the appointment. This description appears in the scheduler appointment hover and in several areas of the patient folder.
Code - Enter an appointment code or abbreviation.
Length - (Scheduler appointments only. Not available for Recall appointments.) Enter the number of minutes to schedule for this appointment. You will notice the Doctor Time fields, described below, are prepared for you according to the length you enter.
Inactive / Active Toggle - Once you create a record, you cannot delete it. You can, however, flag it Inactive. Records you flag as Inactive are not available for general use, but they remain in your system for reporting and other data collection needs. In addition, you can toggle records back to Active whenever needed.
Type - (Statistical category) Select the general classification for this procedure. This setting determines how the appointment will be categorized in certain statistical reports, such as the Deband Analysis report, Procedure Analysis report, Starts and Exams report, and your Practice Monitor and Chart widgets.
Scheduler Appointments Only
Foreground / Background Colors - Set up the colors that will be displayed when this procedure is scheduled. Before an appointment is scheduled, your grid template displays the colors of the class assigned to that cell (if any). After an appointment is scheduled, your grid template displays the colors of the procedure scheduled to that cell. Thus, you might want to coordinate your classification colors and associated appointment colors. (See "Classes Editor" for details about setting up your classes and colors.)
Prior / Future Search Limits - Enter the number of days before and after the Smart Scheduler search date to include when searching for openings for this procedure.
Start / End Times - Enter the earliest and latest times you want to schedule this procedure. These times will be the default when you search for this procedure with your Smart Scheduler, but you can change the times for individual appointment searches as needed.
Open Start - Enable this option to require that the first cell of this procedure be scheduled to a cell flagged as Open Start. (You can flag cells as Open Start in your scheduler templates, and toggle this option as you search for appointments as needed.)
Exclude From Arriving Section of Patient Tracker - Enable this option to omit patients with this procedure from appearing in the Arriving section of your Patient Tracker. See "Patient Tracker" for details.
Classes - Click Add, then select a class of grid cells that this procedure should be scheduled to. If it can be scheduled to multiple classes, you can add additional classes as needed. You can also select a currently assigned class, and click Remove. If you do not select any classes, the Smart Scheduler will only return Scheduler cells that have no class assigned to them when you search for a time slot for this appointment. (Use the Class Editor to create your list of classes, and flag cells for certain classes with your Template Editor.)
Recall Appointments Only
Days Prior to Appointment to Auto-Process - If you enter a number in this field, when you schedule a regular appointment for a patient that has a recall appointment within the number of days you specified, the recall appointment will default to being processed as "Kept".
Use this section of your Procedures editor to select the reminders to associate with the selected procedure, and define how you want the procedure to appear on your patients' appointment cards.
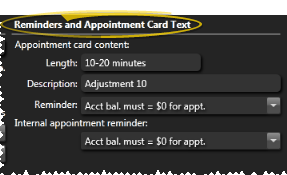
Length - (Scheduler appointments only. Not available for Recall appointments.) Type the appointment length you want to print on the appointment card, which is not necessarily the number of minutes you actually schedule for this appointment.
Description - Type a description in layman's terms so the patient understands what will be happening.
Procedure Reminder - Type a reminder, or select one from your list to print on the appointment card.This will be the default reminder for this appointment, but you can change it as you schedule an appointment if needed. (See "Appointment Reminders Editor" for details about creating the lists for both Scheduler and Recall appointments.) The patient will see this reminder on appointment cards.
Internal Appointment Reminder - Type a reminder, or select one from your list to print on your appointment day sheet and other internal reference sources. This will be the default reminder for this appointment, but you can change it as you schedule an appointment if needed. (See "Appointment Reminders Editor" for details about creating your reminder lists.) The patient will not see this reminder.
You can select to trigger a workflow and / or update the patient's milestone dates when you process this appointment.
Process Appointment Workflows - Select the processing status you want to work with, then choose an existing workflow, or use the  Workflow Wizard icon to create a new workflow to assign to this record. When you process this procedure, the assigned workflow (if any) will be triggered automatically.
Workflows you assign here are specific to this procedure: You can use the workflow Trigger editor to assign workflows to appointment triggers that are not procedure-specific.
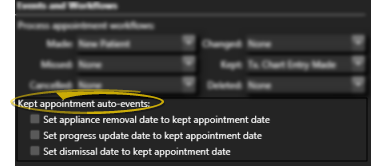
Kept Appointment Auto-Events - (Scheduler appointments only. Not available for Recall appointments.) Enable one or more of the Kept Appointment date options to automatically set the corresponding milestone date in the patient folder to the date you processed this procedure as Kept. Keeping these dates updated is important for generating accurate results in several system reports.
(Scheduler appointments only. Not available for Recall appointments.)
Use the Doctor Time section of the window to identify when the doctor's presence is required during this appointment. These settings are used for calculating available doctor time in your scheduling grids.
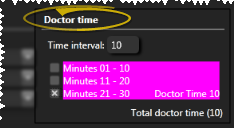
Time Interval - Enter the number of minutes you consider a "unit" of time in your appointment schedule. The number of rows in the Doctor Time table adjusts automatically, according to the length of time you have entered for the procedure.
Enable Doctor Time - Put a checkmark beside each row of the Doctor Time table to indicate when the doctor's presence is required during this procedure. The total amount of doctor time required for this procedure appears at the bottom of the table.
(Scheduler appointments only. Not available for Recall appointments.)
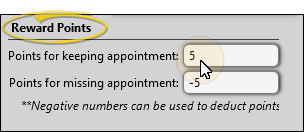
Use the Reward Points section of the Procedures editor to enter the number of reward points a patient earns or loses when the appointment procedure is processed. Enter positive numbers to apply points, and negative numbers to deduct points from the patient's reward point total. For example, you might award 5 points when a patient keeps an adjustment visit, and deduct 5 points when an adjustment visit is missed.
(Scheduler appointments only. Not available for Recall appointments.)
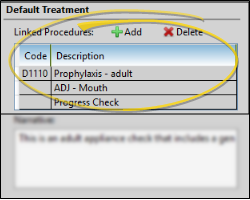
Use this section of the window to assign dental procedures to this procedure, and provide a written narrative that can be imported into the patient's Treatment Hub when this procedure is scheduled.
Linked Procedures - Use the  Add and
  Delete buttons in the Default Treatment section of the window to link / remove dental procedures to this procedure. When the procedure is scheduled, the procedure(s) you link here will automatically be added to the patient's planned procedures, which can be viewed and edited from the Scheduler and the patient's Treatment Chart. (See "Dental Procedures Editor" for details about setting up your dental procedures.)
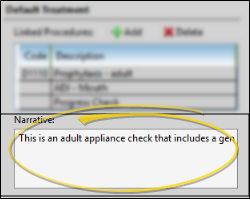
Narrative - Type a detailed description for this procedure. Then, when this procedure is scheduled for a patient, or is the next suggested Treatment Sequence item, you can import this narrative into a new treatment chart record in the patient's Treatment Hub. See "Add, Edit, & Sign Treatment Chart Records" for details.
Click  Save in your Quick Access toolbar or File ribbon bar (or press Ctrl+S on your keyboard) to save any changes you have made.

Print a Procedure List Report - Run a Procedure List report to review the list of active appointment and recall procedures you have created to schedule for your patients. The grid cell colors you have chosen
for each procedure are included on the report, so it is best to print it with a color printer. Records flagged Inactive are not included in the report. See "Appointment / Recall Procedure List" for details.