Patient Tracker
Your Patient Tracker works in conjunction with Patient Sign In to show you the patients that should be arriving at your office soon, as well as those that are waiting in your reception area, those that are seated, and those currently in checkout. You can view the Patient Tracker in both full-window and widget modes. The Light Bar widget further details the patients in your Patient Tracker, showing you the doctor's activity within each patient appointment, and accumulating appointment time statistics.
Patient Tracker Editor - Use the Patient Tracker editor to set up "Views", which specify the patient and appointment details that you want to appear in your Patient Tracker, as well as enable / disable seating detail options and patient wait milestone colors. You may set up multiple views for different situations, and switch among views easily. Your Patient Tracker editor also manages certain Light Bar widget display settings. See "Set Up Your Patient Tracker" for details.
Patient Tracker User Options - Use the Patient Tracker user options (available from the User Options menu, or the Settings icon on the Patient Tracker window) to choose which patients to include in your display. You may choose to filter patients by orthodontist, office, or assistant, as well as include or exclude entire Patient Tracker sections, such as patients that are Arriving or in Checkout. In addition, you can assign a sound to play when a patient enters any of your displayed areas, and choose whether appointment timers count up or down. Your choices are operator-specific, and can be different for the Patient Tracker module (opened from the Modules section of the Home ribbon bar) and Patient Tracker widget (opened from the Widget Library ribbon bar). See "Patient Tracker User Options" for details.
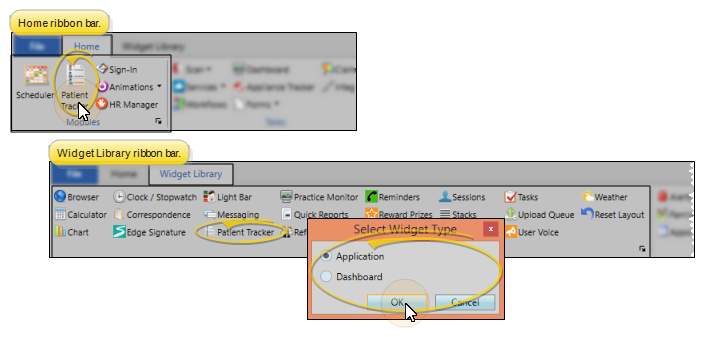
You can open the Patient Tracker application from the Modules section of your Home ribbon bar, or open the Patient Tracker widget from the Widget Library ribbon bar. In addition, you can open the Patient Tracker application without opening Edge Cloud by searching for the "Patient Tracker" app from your Windows Start menu. If you open the application in this manner, you might want to add a shortcut to your desktop or App page to make it easier to open the next time.
The Patient Tracker window shows you the appointment progress of all the patients signed into your office, and optionally patients due to arrive soon. The use of different colors help you see at a glance exactly what is happening, and who needs attention next.
 Patient Tracker Sections - The Patient Tracker is divided into several sections: Arriving, Waiting, Seated, and Checkout so you can tell at a glance the overall appointment flow in your office. You can use your Patient Tracker user options to select which sections to display on your computer screen.
Arriving section - The Arriving section of the Patient Tracker automatically notifies you of patients whose appointment time is approaching, but who have not yet signed into your office. You set up the amount of time before an appointment that patients should be included in this section in your Patient Tracker user options. In addition, you can use your Procedures editor to exclude specific appointments from being displayed in this section. See "Procedures Editor" for details.
Waiting section - Patients are automatically placed into the Waiting section of your Patient Tracker when they sign into your office. In addition, when you drag & drop a patient from the Arriving section into this section, they are considered signed in. Only patients with appointments today are included: If you forget to exit a patient from the Patient Tracker, the patient will not appear in this section tomorrow. You can select colors and time parameters in your Patient Tracker editor to categorize the appointments in the Waiting section of your Patient Tracker, showing you at a glance which patients arrived Pre-Appointment, as well as who has had a Short Wait or Long Wait, and who was a Late Patient.
Seated section - When you select the Seat Patient action, the patient moves to the Seated section of the Patient Tracker. This indicates the patient has been escorted to your operatory, and is progressing through the appointment. If you enable the Change Seating Details When Seating Patient option of your Patient Tracker editor, the seating details dialog pops up as soon as you seat a patient in the Patient Tracker. (Seating details include the chair, assistant, and doctor attending the patient.) You can also right-click a patient in the Seated section of your Patient Tracker or in the Light Bar widget to change the details at any time. While patients are in the Seated section, you may use the light bar widget to further direct and identify the doctor's activity during the appointment.
Checkout section - You move patients into the Checkout section of your Patient Tracker when they are ready for you to schedule their next appointment, update their billing, and complete any other necessary check-out activity.
Waiting Section Colors - You can select colors and time parameters in your Patient Tracker editor to categorize the appointments in the Waiting section of your Patient Tracker, showing you at a glance which patients arrived Pre-Appointment, as well as who has had a Short Wait or Long Wait, and who was a Late Patient.
Pre-Appointment - Patients whose scheduled appointment time has not yet come. We suggest a softer color for this less urgent status.
Short Wait - Patients who have been waiting a short time past their appointment time. We suggest a bright color for this status.
Long Wait- Patients who have been waiting a long time past their appointment time. We suggest the most intense color for this urgent status.
Late patient - Patients who signed into your office after their scheduled appointment time had passed.
Seated Section Colors - The colors you see in the Seated section of your Patient Tracker match the colors in your Light Bar widget, and indicate the doctor and assistant activity of each appointment. You can change these colors in your Patient Tracker editor, so your screen may not look like our examples.
Seated (Default = Blue)- The patient is seated, but no action has been taken or is currently required.
Dr. is Here (Default = Green) - The patient has been flagged as Doctor is Here.
Dr. is Needed (Default = Orange)/Dr, Needed - High Priority (Default = Red)- The patient has been flagged as Doctor is Needed, or Doctor is Needed - High Priority.
Assistant is Needed (Default = Purple) - The Set Assistant Needed flag has been enabled for the patient in this computer's selected chair.
You can update the Patient Tracker section for your patients' appointments from the Patient Tracker, the light bar widget, or your Scheduler. Your Patient Tracker user options can optionally be set up to play a sound to notify you whenever a patient moves from one Patient Tracker section to another. In addition, you can update a patient's light bar status (i.e. Dr. Is Needed and Dr. Is Here) from the Patient Tracker or the light bar.
Drag & Drop Patient Tracker Sections - You can drag and drop patients from one Patient Tracker section to another.
Drag & Drop from Patient Tracker to Light Bar - You can drag and drop patients from the Waiting section of the Patient Tracker to a chair in your Light Bar widget. This flags the patients as seated, and moves them to the Seated section of the Patient Tracker. This works best if either your Patient Tracker or light bar is open as an Application widget.
Drag & Drop from Scheduler to Light Bar - Once a patient is signed into your office, you can drag the appointment from your Scheduler to a chair in your light bar widget. This flags the patients as seated, and moves them to the Seated section of the Patient Tracker. This works best if your light bar is open as an Application widget.
Right-Click Patient Tracker and Light Bar Actions - You can right-click an appointment in your Patient Tracker, the light bar widget, or your Scheduler and select to move patients to another Patient Tracker section to another. For example, selecting the Sign In action places the patient in the Waiting section of your Patient Tracker, and selecting the Seat action places the patient in the Seated section. When you use the right-click menu, you can only select Patient Tracker actions that have not yet occurred for that patient. Also, when you right-click an appointment in your Patient Tracker or the light bar widget, you can also update the patient's light bar status.
Undo - Select the Undo action from the right-click menu to reverse the Patient Tracker routine by one step. For example, when you undo a patient in the Seated section, that patient is returned to the Waiting section of your Patient Tracker. Further, when you undo a patient in the Waiting section, that patient is no longer signed into your office.
Exit Patient - Select the Exit action from the Scheduler or Patient Tracker right-click menu to remove the patient from your Patient Tracker. These are patients that have either completed your check-out process, or left your office without checking out. Patients are also checked out and exited from the Patient Tracker when you process their appointments as Kept.
Open Patient Folder / Treatment Hub - You can double-click an appointment in your Patient Tracker to open the patient's Treatment Hub page. Or, right-click and select Open, then choose to open either the patient folder Home page, or the Treatment Hub page.
Activate Patient in Scheduler - Right-click an appointment in your Patient Tracker, and select Active Patient in Scheduler. You can now switch to your Scheduler window to work with the patient's appointment.
Change Seating Details - If you enable the Change Seating Details When Seating Patient option of your Patient Tracker editor, the seating details dialog pops up as soon as you seat a patient in the Patient Tracker. (Seating details include the chair, assistant, and doctor attending the patient.) You can also right-click a patient in the Seated section of your Patient Tracker or in the Light Bar widget to change the details at any time.
Process Appointment - Right-click an appointment in your Patient Tracker and select Process Appointment. Then choose the appropriate action. Processing your patient appointments as "Kept", "Missed", "Changed", "Canceled", or "Deleted" provides you with a way to collect statistics that help you identify trends for both your practice and individual patient compliance. At the very least, we highly recommend that you process appointments as kept and missed. See "Process Appointments" for details.
Move & Sort Columns - You can drag Patient Tracker column headings to re-order the display, and click a column heading to sort that section by the selected column data. Click the same heading again to reverse the sort order.
Patient Tracker Notification - You can review the Patient Tracker status of your patients with the notification icon that appears on the patient's appointment in your Scheduler See "Your Scheduler" for details.
Auto-fill Patient Tracker Checkout and Exit - When you process an appointment as Kept, the patient is automatically exited from the Patient Tracker, and the checkout and exited times are set to the time you processed the kept appointment.
Full Screen Option - You might find it useful to view your Patient Tracker in full screen mode, to make it as large as possible in your operatory. See "Full Screen Mode" for details.
Trigger a Workflow - Use Patient Tracker workflow workflow triggers (Checkout, Exit, Seat, Sign-in) to activate workflows whenever you update a patient's Patient Tracker status.
Print Appointment Length Details - Run the Procedure Length Summary report to review the contrast between the amount of time you schedule for procedures with the time it actually takes to perform an appointment, according to the data you
collect as you process patients through your Patient Tracker system. See "Procedure Length Summary" for details.


