Add / Edit Patient Findings
Use the editing mode of your patients' Treatment Findings page to add your initial findings to the patient record, record the results of patient progress evaluations, and update findings as needed whenever a patient advances to a new phase of treatment.
Set Up Findings Categories & Responses - Use the Treatment Findings editor to set up the categories and standard responses to enter into your patients' treatment findings records. You can select the categories that you want to import into the patient's Insurance detail page, choose categories that will prompt you to apply a treatment sequence when a response from that category is added to the patients' findings, and specify which categories allow you to type custom responses into patient records. (See "Treatment Findings Editor" for details.)
Set Up Start Origin Descriptions - Use the Start Origin editor to create your list of reasons patients decided to start treatment at your office (i.e. Exam, Insurance Approved, Medical Necessity). The data is collected by treatment phase on the Findings page of the patient folder. You can optionally add standard Gaidge descriptions to this list. See "Start Origin Descriptions" for details.
Enable Touch Screen Friendly Editing - (Optional.) Enable the Touch Friendly Tx. Findings option of your Visual User Options to include the Edit Only Findings link on the Findings page of the patient folder. You can use the Edit Only Findings link to remove the treatment date and notes section while editing a patient's Findings, which provides more screen space so the findings categories and responses appear larger. This makes it easier to add and edit patient findings with a touch screen device.
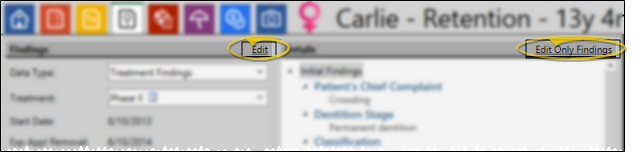
 Open Treatment Findings Editing Window - Patient folder >
  Treatment Findings page > Treatment Findings or Miscellaneous Information data type > Edit or Edit Only Findings.
Click the Edit link at the top of the Findings window to enable editing mode. You can then add and edit the treatment dates, findings responses, and tooth chart for the selected phase of treatment. Alternately, if the Touch Friendly Tx. Findings option of your Visual User Options is enabled, an Edit Only Findings link will also appear at the top-right of the window. You can use the Edit Only Findings link to remove the treatment date and notes section while editing a patient's Findings, which provides more screen space so the findings categories and responses appear larger. This makes it easier to add and edit patient findings with a touch screen device.
Copy Findings to New Phase - When you update a patient's treatment phase from the Patient Information Panel, you have the opportunity to copy the previous findings, as well as the findings notes, start origin, start date, expected appliance removal date, and actual appliance removal date, to the new treatment phase on the Findings page of the patient folder.
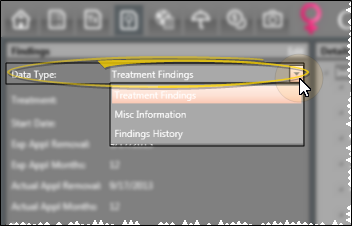
Data Type - While in Edit mode, you can toggle between working with the patient's Treatment Findings and Misc. Information data types, as well as edit tooth chart data. However, if you are using Edit Only Findings mode, the left panel of the editing window is eliminated, so you can only work with the originally selected data type, and the tooth chart is not available.
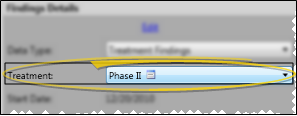
Treatment Phase - (Edit mode only: Edit Only Findings mode does not display this field.) Your patients' findings are stored by treatment phase to more accurately track treatment progress. Click the Treatment field to select the phase to work with. Only phases that have been previously assigned to the patient are available to you. An icon (i.e. Phase I  ) indicates treatment phases that contain responses.
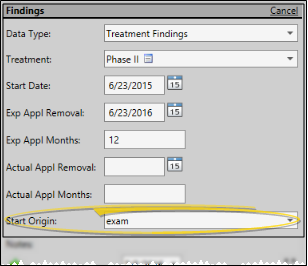
Dates & Notes - (Edit mode only: Edit Only Findings mode does not display these fields.) Each phase of treatment includes a treatment start date, number of expected treatment months, expected appliance removal date, and finally the actual appliance removal date. Although treatment dates appear on the patient's Treatment Hub, you cannot edit them from that page. You can, however, use workflow activities to automate entering the start date and actual appliance removal date for the patient's current treatment. See "Workflow Activities" for details. You can insert additional information about this treatment phase in the Notes section at the bottom of the window. (See "Treatment Phase Editor" for details about setting up the default number of treatment months expected for each phase of treatment.)

Start Origin - (Treatment Findings data type only.) The Start Origin is the reason or origin of the patient's decision to start this phase of treatment. You can apply the start origin when you first create the contract for this phase of treatment, or change it here as needed. (See "Start Origin Descriptions" for details about managing your list of responses; See "Start Origin Report" for details about printing your start origins data for any range of start dates.)
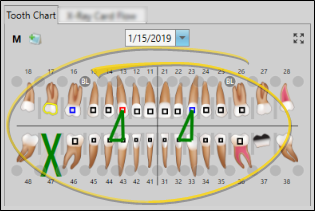
Tooth Chart - The tooth chart appears on the Findings window and the Treatment Chart window. You may review
and edit the patient's tooth chart
records from either location. See "Patient Tooth Chart" for details.
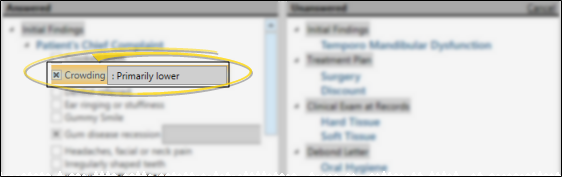
Add / Edit Responses - The two findings panels on the editing window list the categories that have been Answered and Unanswered for the patient. You can expand and collapse the Answered categories to show / hide the patient's current responses, as well as expand and collapse Unanswered categories to view available responses as needed. As soon as you select a response from a heading in the Unanswered column, that heading immediately moves to the Answered column. This helps you keep track of which information you have already completed for a patient. (See "Treatment Findings Editor" for details about creating your treatment categories and response lists.)
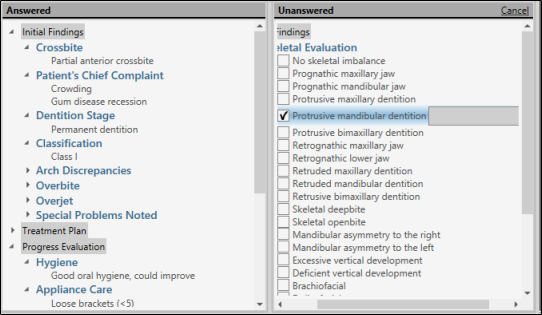
Select / Deselect Responses - Click an available response to select it for the patient. Certain treatment categories (set up in your Findings editor) allow you to select multiple responses, while other categories allow only one response per patient. Responses that are preceded by a square allow multiple responses: Responses that are preceded by a circle allow only one response.
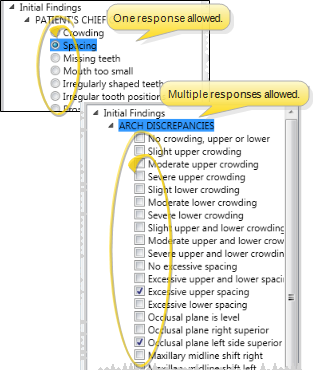
Single Select / Multi-Select - Disable the Multi-Select option of your Treatment Findings editor to allow only one response from this category to be selected for a patient folder. Or, enable Multi-Select to allow multiple responses from this category to be selected for a patient. Responses that are preceded by a square allow multiple responses: Responses that are preceded by a circle allow only one response.
Prompt for Sequence Option - Enable the Prompt for Sequence option of one or more Treatment Findings categories to be prompted to apply a treatment sequence to the patient's Treatment Plan when a response is first entered for those categories. The sequence prompt is not triggered if you edit the category later. When the sequence prompt opens, you may: 1) Cancel without selecting a sequence; 2) Assign a new sequence to the latest Treatment Plan, overwriting any current sequence, or ; 3) Create a new Treatment Plan, and assign a sequence to it.
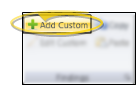
Create a Custom Response - (Available only if the Findings editor allows it for the selected category.) If the listed responses do not fit this patient, click  Add Custom in the Findings section of the Patient ribbon bar (or, right-click where you want to add the new response and select Add Custom), and enter your response and layman's description. Custom responses are not available to any other patient. Custom responses are flagged with an icon in the patient's Findings results so you can easily identify them.
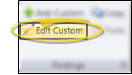
Edit a Custom Response - Click a custom response, then click  Edit Custom from the Findings section of the Patient ribbon bar (or, right-click the custom response and select Edit Custom). You can then make your changes.
Append a Response - Select the response you want to append, then type your additional information in the text box. Appended responses are unique to this patient.
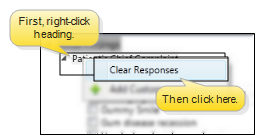
Remove Responses - To clear all of the patient's answers for a specific category, right-click that category heading, then select Clear Responses.
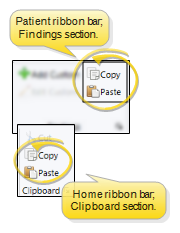
Copy / Paste Data - Click any field, then use the  Copy and
  Paste icons on the Patient or Home ribbon bar (or press Ctrl+C or Ctrl+V ) to copy / paste all of the patient's findings responses for this treatment phase. If you paste findings into another treatment phase, or another patient's Findings page, all existing responses are replaced. If you paste findings into a text editor (i.e. Notepad or Word), the data is pasted as a simple text list. This feature does not provide for copying / pasting a single response.
Save Changes - Click  Save in your Quick Access toolbar or File ribbon bar (or press Ctrl+S on your keyboard) to save any changes you have made.

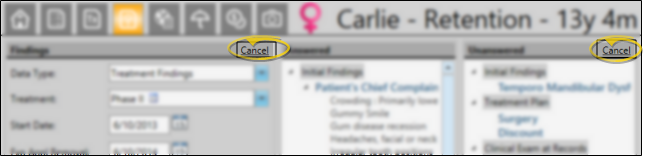
Cancel Changes - You can also click the Cancel link at the top of the editing window to ignore your changes and return to the Findings page of the patient folder.
Edit Tooth Chart - The tooth chart appears on the Findings window and the Treatment Chart window. You may review
and edit the patient's tooth chart
records from either location. See "Patient Tooth Chart" for details.
Import Findings Into Treatment Chart / Plan - The data you enter into the Findings page of the patient folder can be imported directly into the treatment chart and plan. See "Add Findings to Treatment Plan / Chart" for details.
Copy Findings to New Phase - When you update a patient's treatment phase from the Patient Information Panel, you have the opportunity to copy the previous findings, as well as the findings notes, start origin, start date, expected appliance removal date, and actual appliance removal date, to the new treatment phase on the Findings page of the patient folder.


