Use the tooth chart to record and review the state and health of your patients'
teeth
You can open the tooth chart from several places in the patient folder, view both current and past tooth chart data, switch the numbering system
![]() Tooth Chart Settings - Use your Tooth Chart user options, Tooth Chart editor, Treatment Chart Style editor, Dental Conditions editor and Dental Procedures editor to manage how your tooth chart looks and works for you.
Tooth Chart Settings - Use your Tooth Chart user options, Tooth Chart editor, Treatment Chart Style editor, Dental Conditions editor and Dental Procedures editor to manage how your tooth chart looks and works for you.
Numbering Method and Viewing Options - Use your Tooth Chart user options to choose your primary tooth numbering method, and determine how your tooth chart is displayed in patient folders. See "Tooth Chart Options" for details.
Tooth Chart Draw Styles - Use the Dental Conditions and Dental Procedures editors to customize how tooth conditions and procedures appear on the tooth chart.
![]() Open the Tooth Chart - You can open the tooth chart from either the patient's Treatment
Open the Tooth Chart - You can open the tooth chart from either the patient's Treatment
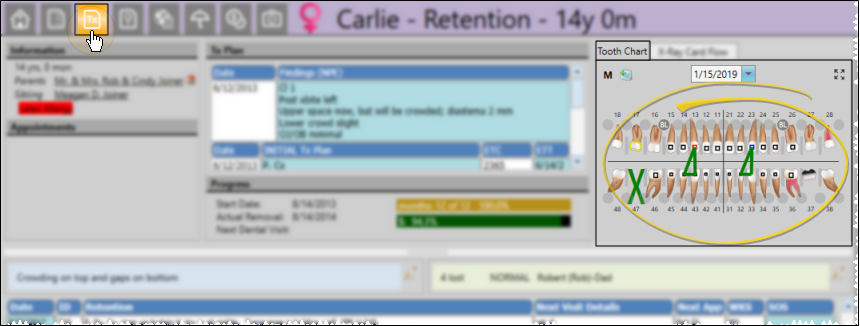
Treament Hub - The tooth chart appears on the right side of the patient folder  Treatment Hub page. You can both view and edit the tooth chart data from this window.
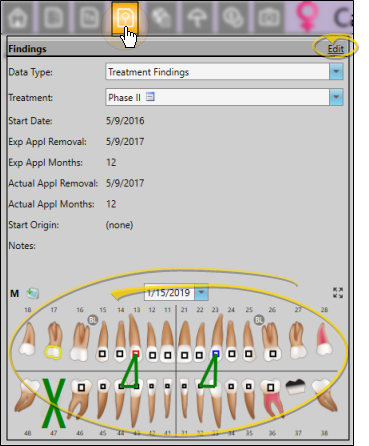
Findings Page - The tooth chart appears at the bottom of the patient folder  Treatment Findings page. To make changes to either the patient's findings or tooth chart data, click the Edit link at the top of the window.
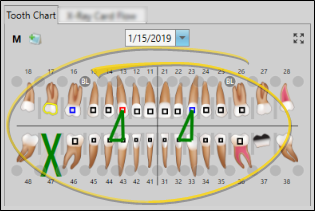
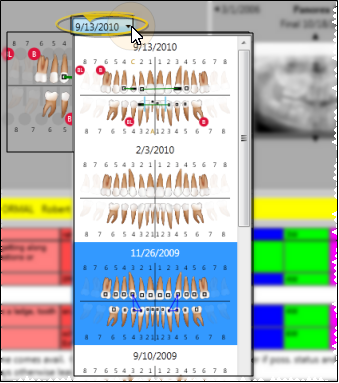
![]() Select Record to View - Tooth chart data is saved by date, with the most current data appearing when you first open the tooth chart. You can use the drop down field to choose a different date to view.
Select Record to View - Tooth chart data is saved by date, with the most current data appearing when you first open the tooth chart. You can use the drop down field to choose a different date to view.
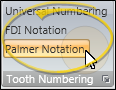
![]() Numbering Method - Use the Tooth Numbering section of the Patient ribbon bar to temporarily change the tooth numbering system to display. When you exit and reload a patient's folder, your default tooth numbering system will be used. (See "Tooth Chart Options" for details about selecting the default numbering method.)
Numbering Method - Use the Tooth Numbering section of the Patient ribbon bar to temporarily change the tooth numbering system to display. When you exit and reload a patient's folder, your default tooth numbering system will be used. (See "Tooth Chart Options" for details about selecting the default numbering method.)
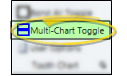
![]() Multi-Chart Mode - Click the
Multi-Chart Mode - Click the  Multi-Chart Toggle icon from the Tooth Chart section of the Patient ribbon bar to switch a tooth chart to display either a single chart with all teeth combined, or a split chart showing adult and child teeth separately. Be sure you select the appropriate multi-chart mode before making changes to the tooth chart: Toggling the multi-chart mode for a saved tooth chart may result in data loss.
Full Screen / Header Modes - Click the  Full Screen icon in the upper right corner of the tooth chart to toggle viewing the chart in full screen mode. You can also click
  Header in the Treatment Chart section of the Patient ribbon bar (or press F8 on your keyboard) to remove the tooth chart and other patient header information from the treatment chart window, allowing full screen access to treatment chart records.
![]() Tooth Chart Icons - Your tooth chart will display several different icons, depending on the conditions, procedures and notes that have been applied to it. You can find more information about each icon in the additional sections of this article, below.
Tooth Chart Icons - Your tooth chart will display several different icons, depending on the conditions, procedures and notes that have been applied to it. You can find more information about each icon in the additional sections of this article, below.
 /
/  - Dentition: Deciduous / permanent tooth, respectively. See "Dentition" for details.
 /
/
 /
/  - Dental Conditions: Caries, Endo, Impacted, Keep.
 /
/  /
/  /
/  /
/  - Dental Procedures: Crowns, Filling, Implant, Pontics:
M - Mouth Conditions / Procedures: Hover or click the letter "M" in the upper-left corner of the tooth chart to view and edit any full mouth conditions and dental procedures you have applied for this patient. See "Dental Conditions" and "Dental Procedures" for details.
 - Extraction: See "Extractions" for details.
 - TAD: See "Tads" for details.
![]() - Spacer: See "Spacers" for details.
- Spacer: See "Spacers" for details.
 /
/  - Bonded / Banded: See "Bonding / Banding" for details
 - Elastics: See "Elastics" for details.
 - Linked Image: See "View Linked Image" for details.

 Tooth Chart Notes - Click this icon to view and edit notes you have made about this patient's tooth chart. See "Tooth Chart Notes" for details.
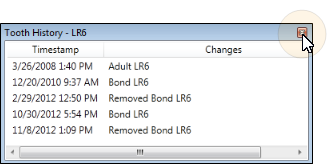
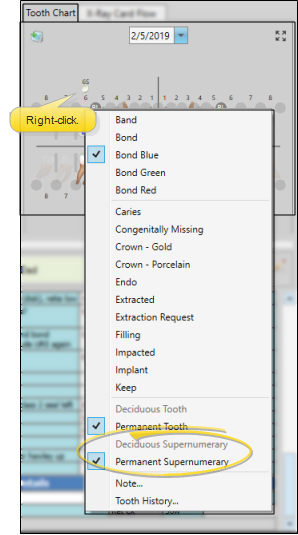
![]() Tooth History - Right-click a tooth, then select Tooth History (at the very bottom of the list) to pop up a window that lists the conditions applied to that tooth, along with the date and time the changes were made. Click the red X at the upper-right corner of the window to close the history. Tooth identification depends upon the currently selected numbering method.
Tooth History - Right-click a tooth, then select Tooth History (at the very bottom of the list) to pop up a window that lists the conditions applied to that tooth, along with the date and time the changes were made. Click the red X at the upper-right corner of the window to close the history. Tooth identification depends upon the currently selected numbering method.
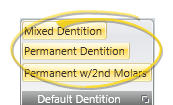
You can apply a pre-determined dentition template to all teeth at once, as well as select the dentition stage of individual teeth
You must apply dentition before you can add tooth conditions, procedures, elastics, TADs, bands, or any other other element to the tooth chart.
![]() Apply Dentition Template -
Apply Dentition Template -
![]() Toggle Individual Tooth Dentition - To toggle the dentition of an individual tooth,
Toggle Individual Tooth Dentition - To toggle the dentition of an individual tooth,
Click vs Drag Tooth Chart Actions - When you click and release a tooth, the tooth chart toggles the dentition stage. When you click and hold a tooth, you can then drag to add elastics. See "Elastics" for details.
![]() Supernumary Teeth - Right-click the position of the tooth, and select either Deciduous Supernumerary or Permanent Supernumerary. An icon and tooth number, followed by the letter "s" will appear in that position in the tooth chart.
Supernumary Teeth - Right-click the position of the tooth, and select either Deciduous Supernumerary or Permanent Supernumerary. An icon and tooth number, followed by the letter "s" will appear in that position in the tooth chart.
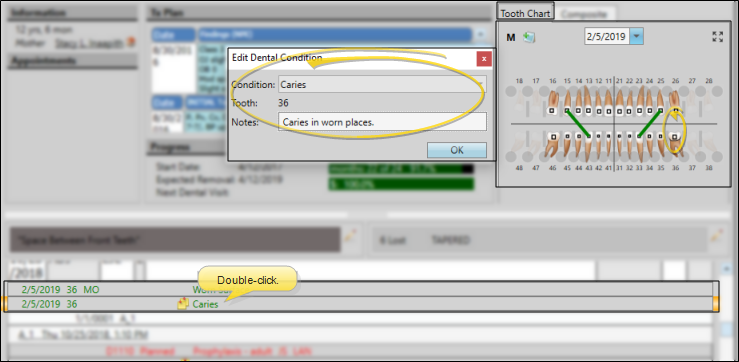
You can apply, edit, and delete dental conditions, such as caries and missing teeth, from the patient's tooth chart.

Once applied, the draw style you have set up in your Dental Conditions editor will appear in the tooth chart for conditions applied to individual teeth. You can right-click a tooth to view the applied conditions, and review the tooth history, as well. To view conditions applied to the whole mouth or other areas, hover over or click the "M" in the upper left corner of the tooth chart.
You can add and manage dental procedures directly from the tooth chart
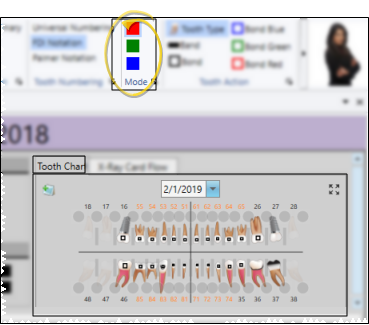
Procedure Mode Option - If you enable the Tooth Chart Dental Procedure Mode option in your Tooth Chart user options, you can select the mode you want to apply to procedures as you enter them into the tooth chart: Red = planned; green = existing; blue= completed. If the procedure mode option is disabled, procedures will be entered as "planned". (See "Tooth Chart Options" for details.)
Once applied the draw style you have set up in your Dental Procedures editor will appear in
To view and edit dental procedure details, double-click the entry in the treatment chart, or click the "M" in the upper-left corner of the tooth chart and select the procedure. You can also right-click the treatment chart item to access additional procedure actions. Once a dental procedure is flagged as "completed", you can edit it only for the next 24 hours. After that, the record becomes permanent.

![]() View and Edit Dental Procedure Details
View and Edit Dental Procedure Details
To view and edit dental procedure details, double-click the entry in the treatment chart, or click the "M" in the upper-left corner of the tooth chart and select the procedure. You can also right-click the treatment chart item to access additional procedure actions. Once a dental procedure is flagged as "completed", you can edit it only for the next 24 hours. After that, the record becomes permanent.
Right-click to apply extraction requests and completed extractions to your patients' tooth charts. Requests can be automatically added to mail merge letters for quick referral correspondence.
Apply / Remove Extraction Request - Right-click the tooth to work with and select the
Update Records - Remember to return to a patient's tooth chart to change the tooth status from Extraction Request to Extracted when you receive confirmation that the extraction has taken place.
Apply Extraction Completed - Right-click the tooth, and select the Extracted condition as needed.
Add TAD (temporary anchorage device) placements and requests to a patient's tooth chart. TAD icon appears at the base of the tooth wherever the device has been applied.
Apply / Remove TAD - You can either right-click the TAD circle and choose the TAD placement, TAD request, or extraction request to apply. Or, click the circle at the base of a tooth repeatedly to apply common TAD options.
Visual Indictors - TAD not present, Buccal TAD, Buccal + Lingual TAD, Lingual TAD. TAD requests show the same graphics, but with gray backgrounds.
Elastics Library Option - You can include TAD placements and requests, and extraction requests in your elastics libraries for quick application in your patient tooth charts. See "Tooth Chart Editor" for details.
Update Records - Remember to return to a patient's tooth chart to change the TAD status from a request to a placement when you receive confirmation that the procedure has taken place.
![]()
Right-click to add details.
![]()
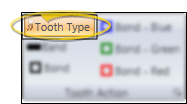
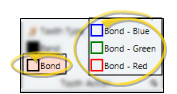
You can bond / debond individual teeth as needed, or select to bond / debond all teeth at once. The Bonded icon indicates teeth that are currently bonded. You can apply and remove the banding option to individual teeth as needed. The Banded icon indicates teeth that are currently banded.
![]() Bond / Debond Individual Teeth - To apply or remove bonds for individual teeth, you can either enable Bond mode from the
Bond / Debond Individual Teeth - To apply or remove bonds for individual teeth, you can either enable Bond mode from the
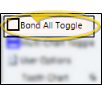
![]() Bond / Debond All Teeth -
Bond / Debond All Teeth -
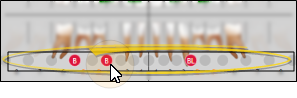
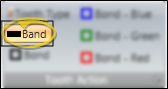
![]() Band / Deband Teeth - To apply or remove bands, you can either enable Band mode from the
Band / Deband Teeth - To apply or remove bands, you can either enable Band mode from the
You can draw individual elastics onto the tooth chart as needed, or apply an entire elastics template to a tooth chart.
Set Up Elastics Types
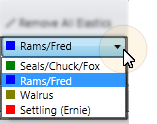
![]() Choose Elastics Type - (Optional.)
Choose Elastics Type - (Optional.)
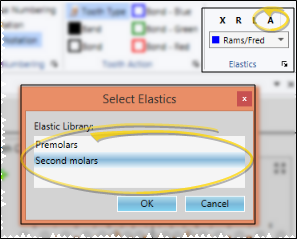
![]() Apply Elastic Template -
Apply Elastic Template -
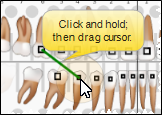
![]() Draw Individual Elastics - In the tooth chart, click and hold the first tooth you want to work with. Drag your cursor to the last tooth you want included in the group and release your mouse button. You can continue adding elastics to the tooth chart, selecting different elastic types whenever needed.
Draw Individual Elastics - In the tooth chart, click and hold the first tooth you want to work with. Drag your cursor to the last tooth you want included in the group and release your mouse button. You can continue adding elastics to the tooth chart, selecting different elastic types whenever needed.
Click vs Drag Tooth Chart Actions - When you click and release a tooth, the tooth chart toggles the dentition stage. When you click and hold a tooth, you can then drag to add elastics.
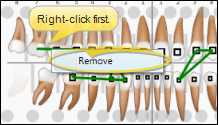
![]() Remove Individual Elastic - Right-click the elastics line you want to work with and select Remove.
Remove Individual Elastic - Right-click the elastics line you want to work with and select Remove.
![]() Remove All Elastics -
Remove All Elastics -

![]() Remove Right / Left Elastics - Select R or L from the Elastics section of the Patient ribbon bar to clear all elastics from the right or left side of a patient's tooth chart, respectively.
Remove Right / Left Elastics - Select R or L from the Elastics section of the Patient ribbon bar to clear all elastics from the right or left side of a patient's tooth chart, respectively.

![]() Visual Indicator - Elastics appear as lines on the tooth chart, color-coded according to the name / color you selected.
Visual Indicator - Elastics appear as lines on the tooth chart, color-coded according to the name / color you selected.
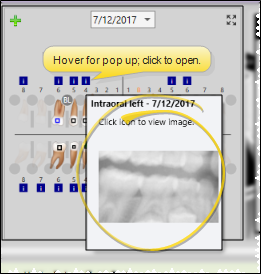
While viewing the patient's tooth chart, you can hover over the Information icon to pop up a thumbnail of the image that is linked to that tooth, or click the icon to open the patient's Imaging page, with that image maximized. See "Link Images to Tooth Chart" for details.
Right-click the tooth to work with and select the Note option. Then type the text of the note and click Ok. You can then hover over the
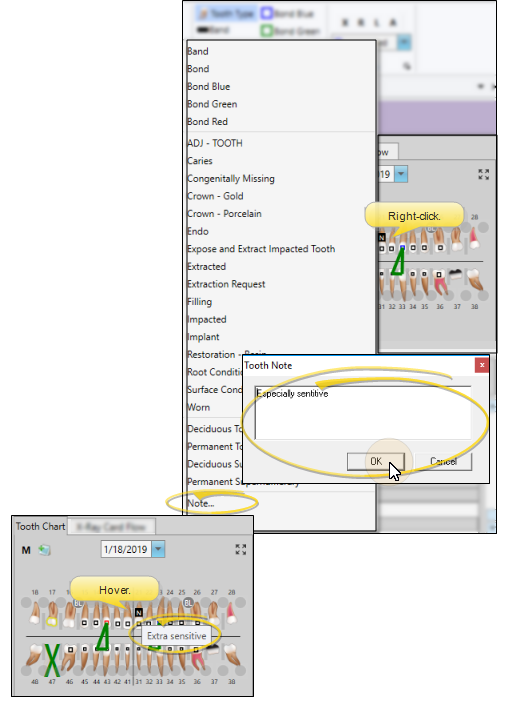
Click the  Add a Note or Notes icon in the upper left corner of the tooth chart (depending on whether or not a note already exists) to add and review notes about this chart. You can include the Treatment > Tooth Chart Note variable in mail merge documents to print the latest note in the merge output.
Click  Save in your Quick Access toolbar or File ribbon bar (or press Ctrl+S on your keyboard) to save any changes you have made.

Tooth Chart / Treatment Chart Integration - (Optional.) The tooth chart / treatment chart integration provides a way for you to add narrative text to a patient's treatment chart as you edit a patient tooth chart. Simply add a new record to a patient's treatment chart, and place your cursor in a text or list and text column. Then enter data into the tooth chart, including adding and removing elastics. The
tooth chart data will be translated into a narrative description in the
active column of your treatment chart record. See "Add, Edit, & Sign Treatment Chart Records" for details.
Apply Extraction Requests with Elastics Templates - You can include common extraction requests in your elastics template library, and apply those templates to patient tooth charts as needed. See "Tooth Chart Editor" for details.
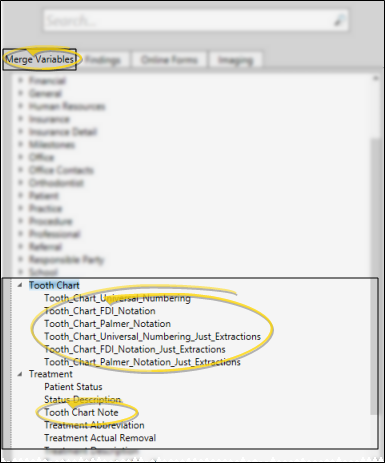
Include Tooth Chart / Extraction Variables in Mail Merge Documents - You can include a tooth chart variable in a mail merge document to include a graphical representation of your extraction requests in letters you send to a patient's dentist or other professional. You can choose from among several variables, specifying which numbering system to use, and whether to include just extraction requests or all tooth chart notations in the output. You can also include a tooth chart note variable to print the contents of the latest note in the document. See "Mail Merge Tool: Variables" for details.
Trigger a Workflow - Use the Extraction Request workflow trigger to activate a workflow whenever you apply the Extraction Request property to a patient's tooth chart.
![]()
www.ortho2.com │ 1107 Buckeye Ave. │ Ames, IA 50010 │ 800.346.4504 │ Contact Us
Chat with Software Support │ Chat with Network Engineering │ Chat with New Customer Care
Remote Support │ Email Support │ Online Help Ver. 11/11/2019


