Link Images to Tooth Chart
As you import an image, such as a bitewing radiograph, into a patient folder, you can link that image to one or more teeth, then view that image within the patient's tooth chart.
Specify Image Type(s) to Link - Enable the X-Ray Location property of any image type that you want to be able to assign to specific teeth in your tooth chart. Typically, these would include your Intraoral Left and Intraoral Right bitewing images. See "Image Types Editor" for details.
 Link Images to Tooth Chart - Use the Single Import feature to import an image that has the X-Ray Location property enabled (described above) into the patient folder. During the process, you are asked to select the teeth to link to that image.
-
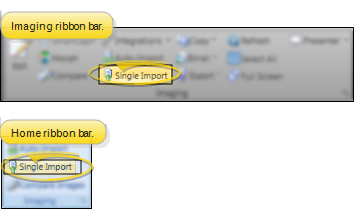
Open Single Import Window - Home or Imaging ribbon bar > Imaging section >  Single Import. (You can also right-click an existing image, or drag a new image onto an Imaging layout to open the Single Import window: See "Import Single Images" for details.) If a patient record is already active, that patient's information will be loaded automatically. Otherwise, you use Fast Find (either typing information or swiping a registered reward card) to search for the patient to work with.
-
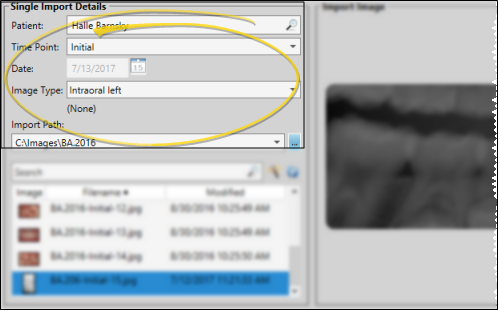
Choose Single Import Details - Choose the appropriate patient, time point, date, and image type. Then select the Import Path where the image is located. If there are already images in the time point, you cannot change the date. (See "Import Single Images" for details about entering each field.)
No Overwrite Warning - When you use Single Import to add an X-Ray Location image to a patient folder, you will not see any overwrite warning, even if an image has already been imported into the image type you select. Each X-Ray Location image you import is simply added to the patient's Imaging index, as well as linked to the patient's tooth chart.
Time Point / Image Dates - Although all images in a time point have the same time point date, you can edit the date an individual image was taken via the Edit > Image Properties tool. See "Image Properties" for details.
-
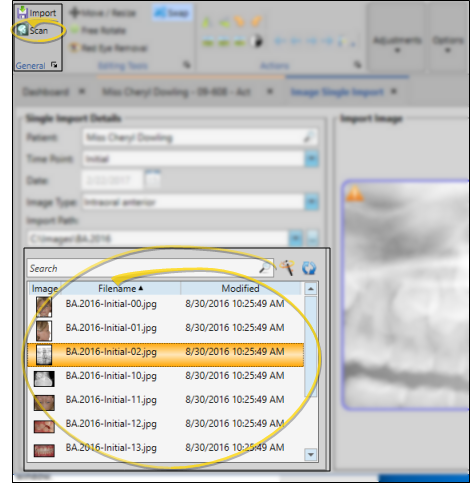
Choose Image - Use the list at the bottom of the screen to choose the image to import. You can optionally type all or part of the image filename in the Search field to search for an image in the Image Path you selected, or use the  Wizard icon to search for images in the path that include the patient's last name. Finally, you can click Scan from the Imaging ribbon bar to scan a new image from any scanner connected to your computer. Your chosen image appears at the right of the window.
-
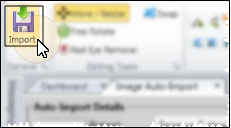
Start Import - Review the image on the right side of the screen, and made any necessary edits or adjustments.Then, click  Import from the General section of the Imaging ribbon bar.
No Overwrite Warning - When you use Single Import to add an X-Ray Location image to a patient folder, you will not see any overwrite warning, even if an image has already been imported into the image type you select. Each X-Ray Location image you import is simply added to the patient's Imaging index, as well as linked to the patient's tooth chart.
-
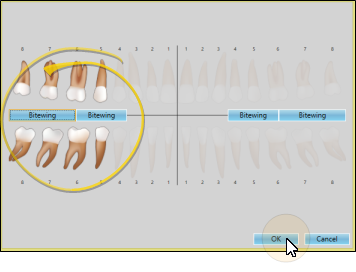
Choose X-Ray Location - Use the tooth chart graphic to select the teeth to link to the image you are importing. You can use the Bitewing buttons to enable the most commonly included teeth, or click a tooth to include / exclude it from the linked image. When you have selected all the teeth to link to this image, click Ok to import the image.
X-Ray Location Image Type - You can only link the patient 's tooth chart with image types that have the X-Ray Location property enabled: Image types with this property disabled will omit this step of the Single Import process. See "Image Types Editor" for details.
No Overwrite Warning - You will not see any overwrite warning when importing an X-Ray Location image, even if an image has already been linked to the teeth you select. The new image will simply replace the previously linked image.
After images are imported, you see a completion notification dialog. If the Delete After Import option in your Imaging User Options is set up to either retain original images or delete original images, you simply see a notice that the process is complete. However, if the Delete After Import option is set up to prompt you before deleting original images, select either Yes or No to direct the handling of the original images.
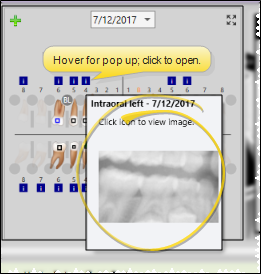
View Linked Image in Tooth Chart - While viewing the patient's tooth chart, you can hover over the  Information icon to pop up a thumbnail of the image that is linked to that tooth, or click the icon to open the patient's Imaging page, with that image maximized. (You can view the tooth chart from either the patient's Treatment Hub or Findings page. See "Patient Tooth Chart" for details.)
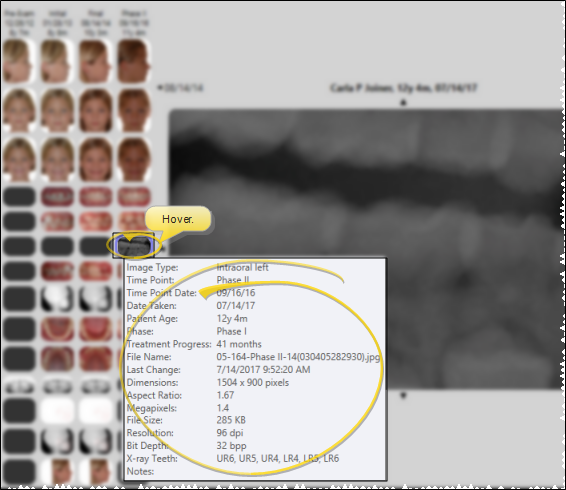
View Linked Teeth on Imaging Page - While viewing the Index layout of a patient's Imaging page, you can hover over an image to pop up that image's properties, and review which teeth have been linked to that image. (The linked teeth are not included when you open the Properties window by right-clicking the image, or when using the Edit > Image Properties tool.)
Update / Remove Linked Image - To update a linked X-Ray Location image, simply Single Import the new image, and link it to the appropriate teeth. The previous image will be overwritten. If you import an X-Ray Location image in error, or simply want to remove the links, use the Edit > Delete Image tool to remove the image and the link from both the patient's Imaging page and the tooth chart. (See "Image Properties" for details about deleting an image.)
Auto-Import Doesn't Link Images - When you auto import a series of images, you are not asked to link any images to the tooth chart, even if an image has the X-Ray Location property enabled. You must use Single Import to link an image to one or more teeth. Also, when you Single Import an X-Ray Location image, you are not warned if an existing image is available. The new image is simply added to the patient's image Index layout. This provides a way for you to link several x-rays to the tooth chart, specifying different teeth for each image as needed.
Refresh - Click  Refresh on the Quick Access toolbar (or press F5 on your keyboard) to refresh the data on your screen.


