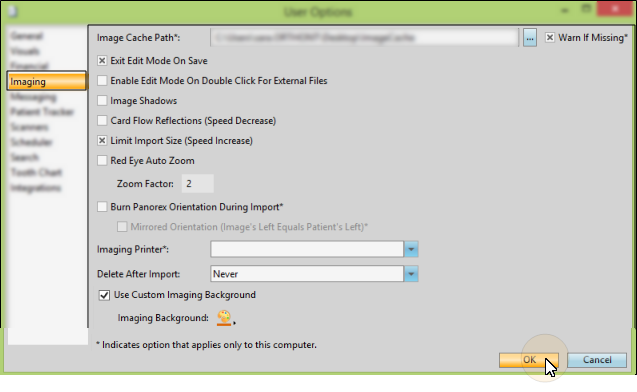
Use the Imaging tab of your User Options window to set up your imaging display preferences, your default imaging printer, and the image import options that are unique to you and / or your workstation. Your security rights must include full access to the User Options Editor setting in the Practice Administration security group for this feature to work for you.
The options marked with an asterisk ( * ) are specific to this workstation: The remaining options are specific to you - other users that log onto this computer may have other settings. (If another Edge Cloud user has the settings you want to use, that user can use the Assign Options tool to copy those settings to you, or vice-versa.)
Image Cache Location - (* Workstation-specific setting.) Designate an Image Cache location that will be used by this workstation for new and changed images waiting to be uploaded to your server, and for archived images to remain linked to your patient folders. If you do not set up a local image cache location in your Imaging User Options, or if the location is not available when you log onto Edge Cloud, Edge Cloud will auto-fill this field with the first system-wide location available to your workstation. See "General Imaging Editor" for details.
Warn if Missing - (* Workstation-specific setting.) If this option is enabled, whenever you start Edge Cloud, your system will check to be sure that either the local image cache location setting, described above, or a system-wide image cache location is in place and available to your workstation to prevent accidental image deletion. If this option is disabled, Edge Cloud will not warn you when an image cache location is not available, increasing the possibility of data loss. (See "General Imaging Editor" for details about setting up system-wide image cache locations.)
Exit Edit Mode on Save - (User-specific setting.) Enable this option to return to viewing mode after saving changes you have made to an image while in Edit mode. If this option is disabled, you will remain in Edit mode after you save changes, so that you can make further changes to the image as needed.
Enable Edit Mode On Double Click for External Files - (User-specific setting.) Enable this option to open external files with their default application when you double-click them from the patient's Imaging page. For example, if you add a Word document to a patient's Imaging page, you can double-click to open and edit that document in Word. (See "Image Types Editor" for details about adding external files to Imaging pages.)
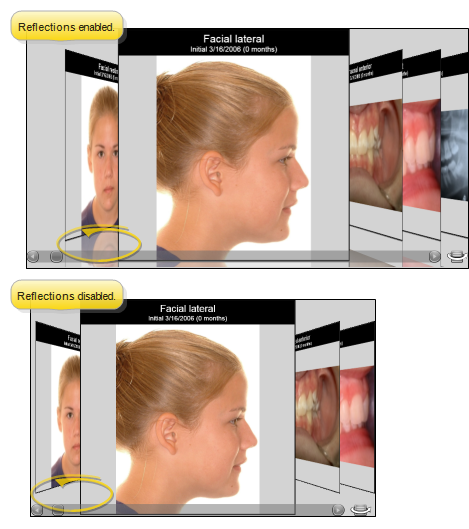
Image Shadows - (User-specific setting.) Enable or disable this option to include or remove a shadow effect behind your image layouts. This does not affect your card flow layouts: The card flow layout can optionally include an image reflection, rather than a shadow effect.
Card Flow Reflections - (User-specific setting.).) Enable or disable this option to include or remove a reflection of each image in your card flow layouts. (Enabling this option may decrease the speed of your imaging system.)
Limit Import Size - (User-specific setting.).) Enable this option to limit the file size of images you import to 1.5 times the size you have set for the large height and width options for that image type. ( See "Image Types Editor" for details.) Limiting import size may improve the speed of your imaging system. If you enable this option, be sure your scanners and other digital imaging devices do not create files larger than your system will allow.
Red Eye Auto Zoom / Zoom Factor - (User-specific setting.).) Enable this option, and enter a magnification value in the Zoom Factor field to use for the red eye reduction tool. The larger the number, the closer the zoom: A magnification value of 1 or disabling the option does not zoom into the image at all. (See "Image Editing Adjustments" for details about how to use the red eye reduction tool with your images.)
Burn Panorex Orientation During Import - (* Workstation-specific setting.) Enable the Burn Panorex setting of your Imaging User Options to include the orientation label (L or R) on panorex images as they are imported into patient folders. If your machine flips panorex films, be sure to enable the Mirrored Orientation option also.
Imaging Printer - (* Workstation-specific setting.) Select the default printer to use for printing images. When you use the Quick Print feature, the image or layout will be sent to this printer automatically.
Delete After Import - (User-specific setting.) Use this option to direct whether or not images will be deleted from their original location (i.e. your camera memory card) during import. Choose Prompt to be prompted to delete the images; choose Never to always leave the images in their original location (you will need to manually manage these images later), or choose Always to delete the original files as soon as they are imported.
Use Custom Imaging Background - Enable this option, then use the Imaging Background selector to choose a color. Your selected color will be the background color of your patients' Imaging pages.
Save Your Changes - Click Ok to save any changes to your user options and exit the window. If another Edge Cloud user has the settings you want to use, that user can use the Assign Options tool to copy those settings to you, or vice-versa.
 ) to view all tools available in that section of the ribbon bar.
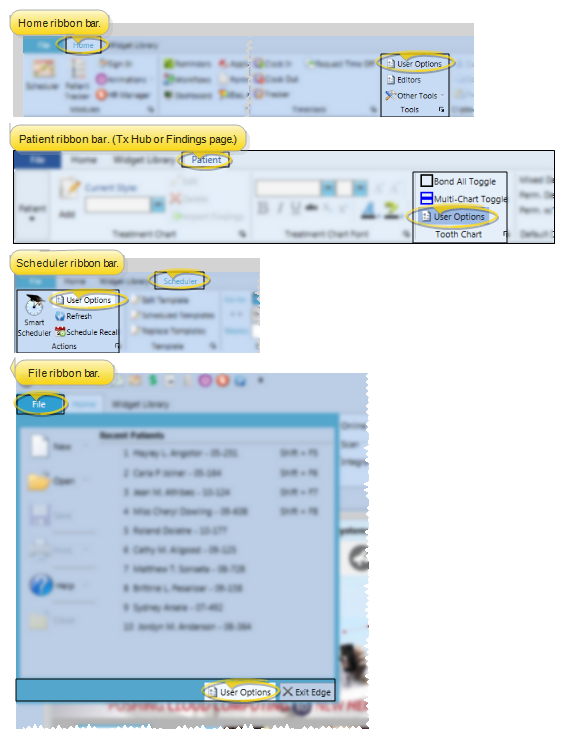
.png)