Treatment Hub
With the Treatment Hub, you can access your patients' treatment plan, treatment chart records, treatment progress, dental procedures and images all in one convenient place.
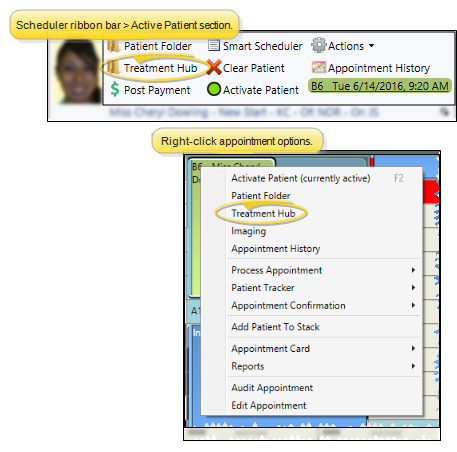
You can open the Treatment Hub page by clicking the Treatment Hub icon from the patient folder header or the Scheduler ribbon bar, or by right-clicking the patient appointment in your Scheduler.
Patient Folder - Open the patient folder and select the  Treatment Hub tab in the patient folder header.
Scheduler - Activate a patient in your Scheduler and select Treatment Hub from the Scheduler ribbon bar, or right-click a patient appointment and select the Treatment Hub option, to open the patient's Treatment Hub page.See "Your Scheduler" for details.
Alert Stop - If the patient has an alert trigger enabled for this feature, the Alert Stop pup-up window will appear when you initiate this feature for the patient. Review the alert information, then click the box to continue. (See "Patient Alerts" for details.)
Milestone Reminders - You may be prompted to update milestone dates when you either schedule an appointment or open the treatment chart for a patient whose Next Dental Visit and/or Next Progress Report date is either today or in the past. See "Manage Milestone Reminders" for details.
Show / Hide Header - Click the  Header icon in the Treatment Chart section of the Patient ribbon bar (or press F8 on your keyboard) to show / hide the treatment plan, tooth chart and other patient header information. Hiding the header provides full screen space to view and manage the patient's treatment chart records and dental procedures. (You can also add this feature to your Quick Access toolbar at the top of your Edge Cloud window.)
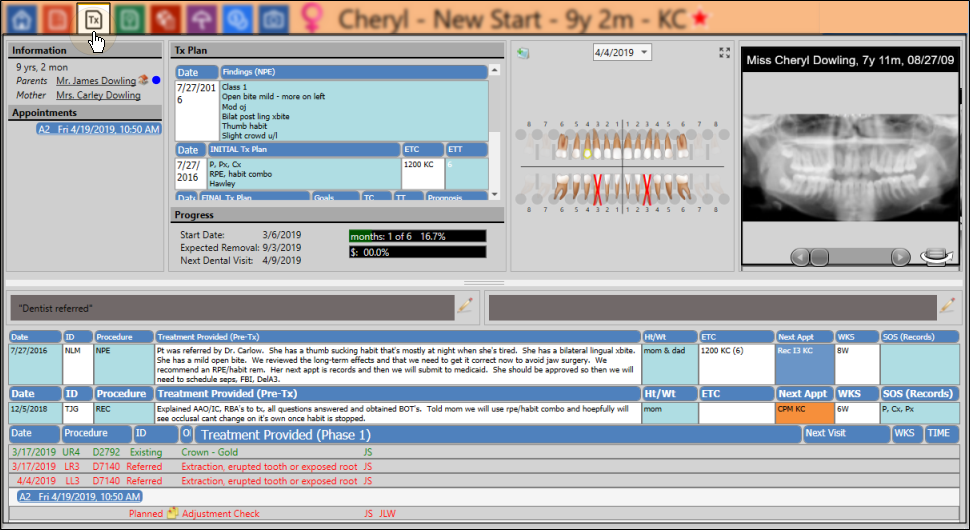
The top portion of the treatment hub window includes patient and appointment information, patient-specific messages, and medical alerts. You can also view the treatment plan and tooth chart from the Treatment Hub header. In addition, you can use the slider bar at the bottom of the Treatment Hub header section to change the amount of space allocated to it.
Show / Hide Header - Click the Header icon in the Treatment Chart section of the Patient ribbon bar (or press F8 on your keyboard) to show / hide the treatment plan, tooth chart and other patient header information. Hiding the header provides full screen space to view and manage the patient's treatment chart records and dental procedures. (You can also add this feature to your Quick Access toolbar at the top of your Edge Cloud window.)
 Information and Appointments - These sections of the Treatment Hub header include the patient age, responsible party and family names, any medical alerts, (in red), and the patient's scheduled appointments, If this person's record has a visual tag applied, the appropriate color/shape appears beside the name. Because this information appears in the Treatment Hub header, you might want to keep the patient information panel minimized during general use.
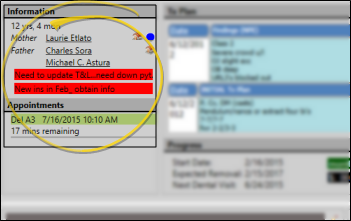
Responsible Party Links - You can click a responsible party name to go to that party's page, or hover over the name to view contact details and initiate an email message.
Guardian Icon- The  Guardian icon appears beside a name to indicate when the patient's address exactly matches the responsible party's address, indicating that the patient lives with that party.
Visual Tag - If this person's record has a visual tag applied, the appropriate color/shape appears beside the name. See "Visual Tags" for details.
Sibling Links - If a sibling is also a patient in your office, you can click the sibling name to open that patient folder. (See "Patient Family Panel" for details about linking patient families.)
Alert Links - Patient alerts with the "Medical" flag enabled appear in red on the Treatment Hub summary. You can click an alert description to open the patient's Alert Editor. (See "Patient Alerts" for details.)
Appointment Links - You can hover over the patient's next scheduled appointment link to view additional details. In addition, if the patient has a currently active appointment, the appointment timer appears. Your Patient Tracker timer setting determines whether the appointment timer shows the number of minutes that have passed, or the number of remaining minutes until the scheduled end time. (See "Patient Tracker User Options" for details.) You can click an appointment link to open that date in your Scheduler, or right click to edit the appointment details, and Patient Tracker times.
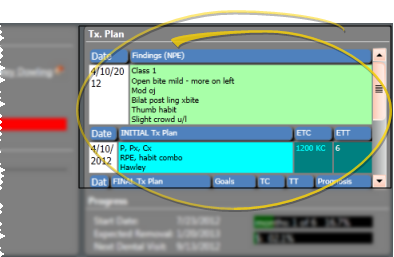
Treatment Plan - The patient's most recent treatment plan appears in the upper-middle section of the Treatment Hub header. Only styles with the Include on Tx Hub option enabled will be included. (See "Treatment Chart & Plan Styles" for details about enabling chart and plan options.)
Treatment and Financial Progress - The progress section of the Treatment Hub includes the treatment dates for the patient's current phase of treatment, the financial progress made toward completing the contract, and the projected date of the patient's next dental visit,
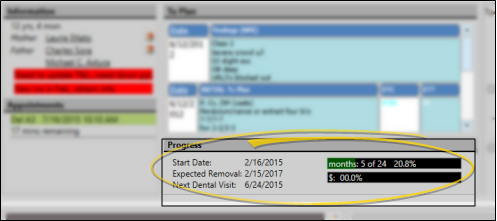
Progress - The two progress bars indicate the patient's percentage of treatment time that has taken place, as calculated from the start date and expected or actual removal date, and the percentage of the contract fee that has been paid so far. (See "Treatment Findings" for details about setting the start date and removal dates.) The treatment progress bar changes color to indicate how treatment is progressing relative to the estimate. Green = at or below estimate; Red = Over estimate; Yellow = Patient treatment completed. (You can optionally provide a way for patients and parents to see the treatment progress graph via your Practice Connect app. See "Practice Connect" for details.)
Dental Visit - The next dental visit date auto-fills from the Milestones panel of the patient's Home page, and cannot be edited here. See "Patient Appliances & Milestones" for details
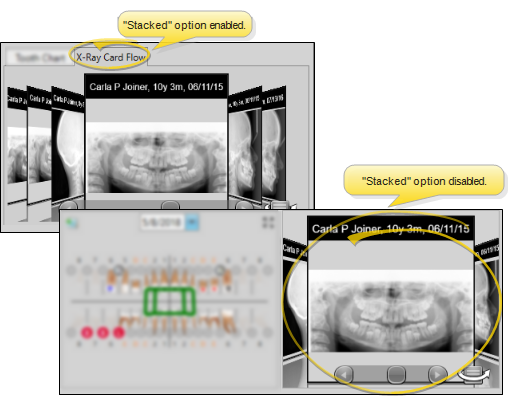
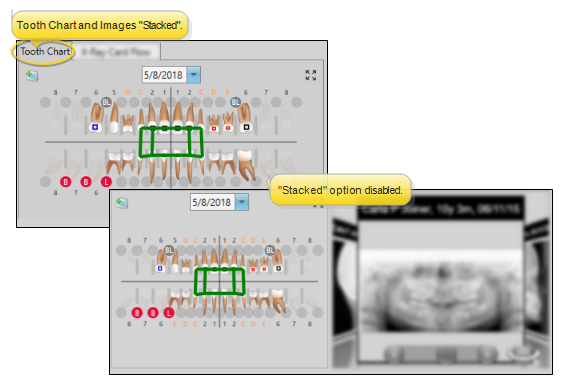
Patient Images - The patient's images appear at the top of the Treatment Hub header, in the layout you select in your Imaging Layouts editor. We recommend you select a or cardflow or cardflip layout, which displays individual images, while providing you a way to view additional images and timepoints as well as maximize images from within the Treatment Hub. Use your Tooth Chart user options to choose whether to stack the patient's tooth chart and images, or show them side-by-side. In addition, double-clicking an image in the Treatment Hub opens the patient Imaging page to that image.
Tooth Chart - The patient's tooth chart appears at the top of the Treatment Hub page. Use your Tooth Chart user options to choose whether to stack the patient's tooth chart and images, or show them side-by-side. See "Patient Tooth Chart" for details about using the tooth chart.
To expand the tooth chart to fill the patient folder window, click the  Expand button in the upper-right corner of the chart. Click the button again to minimize the chart.
Header Slider - Use the slider bar between the Treatment Hub header and the message boxes to change the space allotted to each section. In addition to using the Header icon in the ribbon bar (or pressing F8 on your keyboard) to show / hide the header, you can use the slider to completely eliminate the header section, providing the maximum space for viewing treatment chart records.
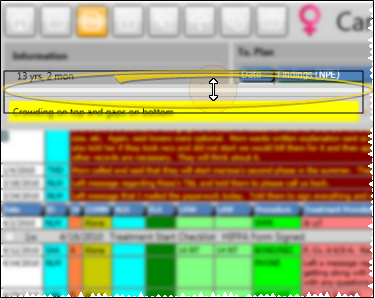
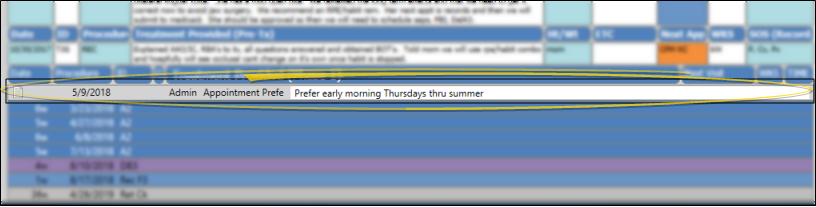
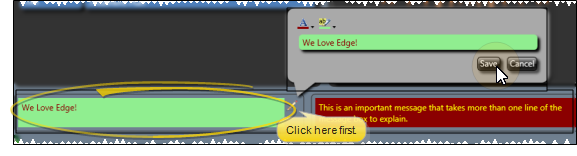
Two patient message boxes appear between the Treatment Hub header and the patient's treatment chart records.You can type anything you like in these patient-specific message boxes. If at least one of your messages is two or more lines long, the message box area "grows" to fit all your text.
To change message text or colors, click the  icon beside the message you want to edit. Then type your message, or use the color selectors to choose the colors you want to use.
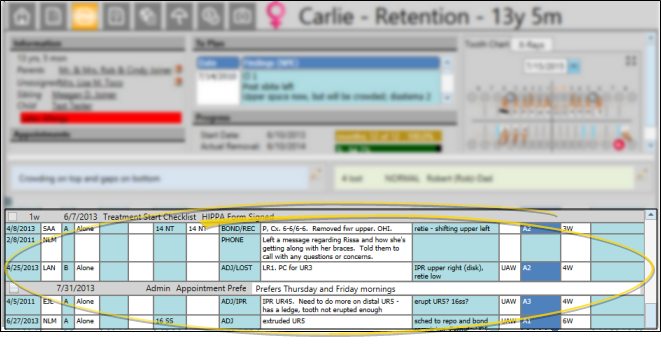
The bottom portion of the Treatment Hub page contains the patient's treatment chart records. You can optionally display correspondence history items , dental conditions and procedures, notepad items, and treatment sequence appointments in this section of the window.
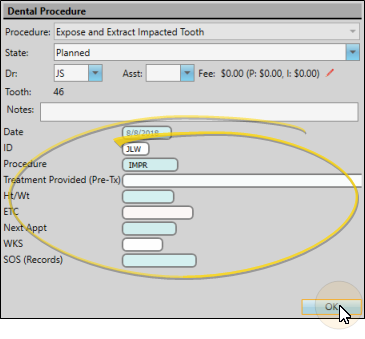
Treatment Chart Records and Dental Procedure Details - You can optionally assign a treatment chart style to a dental procedure. Then, after applying the procedure to a patient folder, you can edit that procedure and enter the treatment chart details. These details remain in the dental procedure record, and do not appear in the list of treatment chart records. See "Dental Procedures" for details.
Treatment Chart Filters - Your Treatment Hub can display information in addition to treatment chart records: Use the  Filters icon in Treatment Chart section of the Patient ribbon bar to show / hide additional information, and to select whether to view the records in ascending or descending chronological order. Edge Cloud remembers your filter settings the next time you view the Treatment Hub.
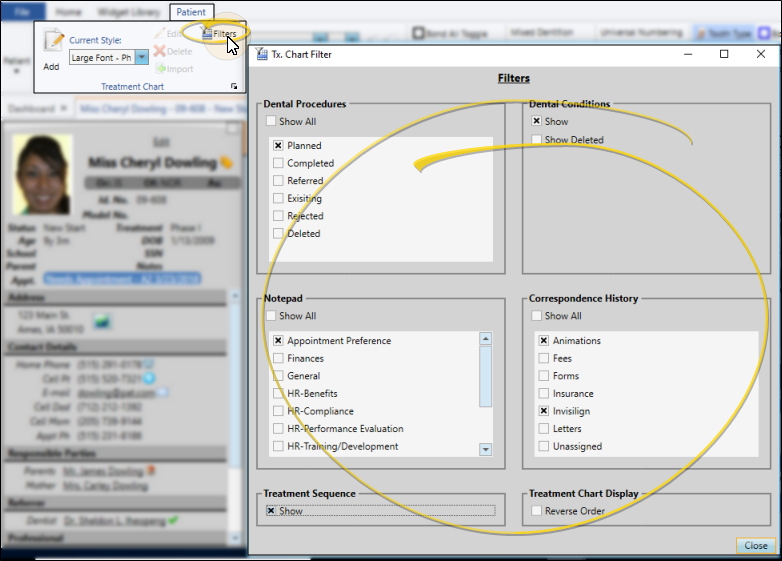
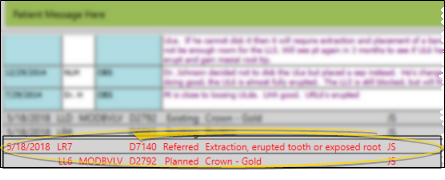
Dental Conditions - Enable the Dental Conditions treatment chart filter to include the patient's dental conditions within your treatment chart records. You can also choose to show or hide deleted conditions. When enabled, dental conditions appear chronologically among your treatment chart records. To change the details of the condition, double-click the item within the treatment chart record (or, right-click and select Edit). You can also right-click the item and select Delete to remove the condition from the tooth chart. See "Patient Tooth Chart" for details about applying and managing dental conditions.
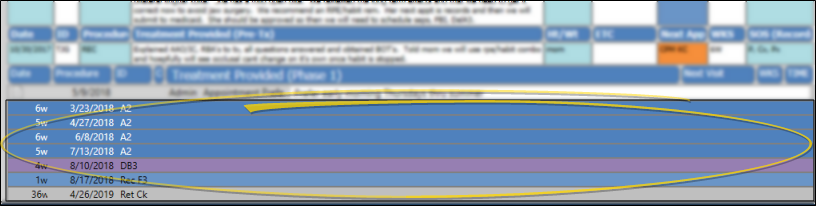
Dental Procedures - Enable any dental procedure statuses you want to include within your treatment chart records. When enabled, dental procedures appear chronologically among your treatment chart records. To change the details of the procedure, double-click the item within the treatment chart record, or right-click the item to choose a different procedure action. You can also click an appointment header, or the bar at the far left of the dental procedure row to work with that group of procedures. See "Dental Procedures" for details.
Notepad Entries - Enable any patient notepad categories you want to include within your treatment chart records. When enabled, notepad items appear chronologically among your treatment chart records. The notepad icon in the left column identifies these entries. See "Patient Notepad" for details about the patient notepad.
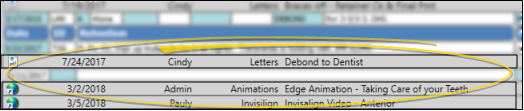
Correspondence History - Enable any correspondence history categories you want to include within your treatment chart records. Only records from the Correspondence tab of the patient's correspondence history will be included. When enabled, correspondence history items appear chronologically among your treatment chart records. You can click the icon in the left column to open the associated document or video. See "Patient Correspondence History" for details.
Treatment Sequence - You can choose to show / hide the patient's active treatment sequence items at the bottom of your treatment chart records. Once a sequence procedure is flagged as "kept", it is removed from the treatment chart automatically. See "Treatment Sequence" for details about managing your patients' treatment sequence.
Treatment Chart Display Reverse Order - Leave the Reverse Order option disabled to display treatment chart records in the order they were entered: The newest records appearing at the bottom of the list. Enable this option to display treatment chart records in reverse chronological order: The newest records appearing first.
Add and Edit Treatment Chart Records - Add a treatment chart record to a patient folder to document each appointment you complete for a patient. You can manually enter treatment chart records, as well as import patient findings, appointment narratives and tooth chart data. In addition, authorized persons (such as the orthodontists), can verify treatment chart activity by signing the records. See "Add, Edit, & Sign Treatment Chart Records" for details.
View Treatment Chart Record Details - The information shown in an individual treatment chart record depends upon the style you used to create it, and whether you have imported any of the information. You can use the Filters settings, described above, to list the records in either ascending or descending chronological order. You can only edit a treatment chart record within 24 hours of creating it. Afterward, you cannot make any changes. See "Add, Edit, & Sign Treatment Chart Records" for details about creating and managing treatment chart records.
Delete Record - Select a record that has been created within the past 24 hours, and click  Delete on the Treatment Chart or Treatment Plan section of the Patient ribbon bar, or right-click the record and select Delete. After 24 hours, the record becomes permanent.
View and Edit Dental Procedure Details
To view and edit dental procedure details, double-click the entry in the treatment chart, or click the "M" in the upper-left corner of the tooth chart and select the procedure. You can also right-click the treatment chart item to access additional procedure actions. Once a dental procedure is flagged as "completed", you can edit it only for the next 24 hours. After that, the record becomes permanent.

Print Treatment Hub - Click  Print from your File ribbon bar or Quick Access toolbar (or press Ctrl+P on your keyboard) to print a copy of the current screen contents. (See "Printing from Edge Cloud" for details.) You can choose to include all data from the current screen, including the patient information and progress, treatment plan, and tooth chart on the print out, or include only the currently displayed treatment chart records.
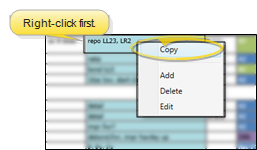
Copy Column Text - You can right-click a treatment chart column to copy the text to your clipboard. You can then paste the text into another Edge Cloud field, or a text application (such as a word processor or email message).
Sign Treatment Chart Records - Users with appropriate security rights can right-click to sign treatment chart entries, lending additional
accountability to the records. This feature is especially useful in university settings, where entries are double-checked for accuracy. See "Add, Edit, & Sign Treatment Chart Records" for details.
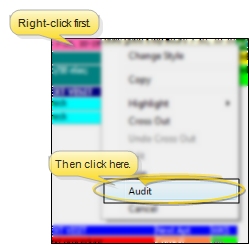
Audit Record - Right-click any record and select Audit to review the operator, date, and time the record was created, as well as when it was last changed.
Trigger a Workflow - Use the Open Treatment Chart workflow trigger to activate a workflow whenever you open the Treatment Hub page of a patient folder.
Automate Record Creation with a Workflow - Use the Create Tx. Chart Entry workflow activity to open the Treatment Hub page of the patient folder, and add a new treatment blank chart record whenever the activity is triggered by a workflow. See "Workflow Editor" for details.
Work with Patient Folders - Edge Cloud includes several tools for working within your patient folders, regardless of which page is currently selected.
Patient Information Panel - The Patient Information Panel contains patient treatment, biographical, and contact information. You can personalize the panel to include additional widgets you use most often. The panel always appears on the left side of the patient's Home page. You can optionally hide / show the panel on all other patient folder pages. See "Patient Information Panel" for details.
Office Color Code - The background of the patient folder header is color-coded according to the office assigned to the patient. See "Set Up Office Locations" for details about assigning the color.
Resize Header - Click the bar between the patient folder header and the information panel to change the space allotted to each section.
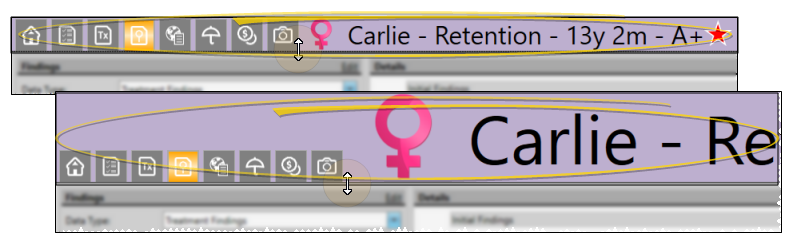
The patient folder header displays the patient nickname, status abbreviation (in the color determined by your Status editor), age, and optionally a gender icon (enabled / disabled in your Visuals user options), as well as the patient tag and visual tag you have assigned to the patient, if any. You use the tabs at the left of the header to move from one patient folder page to another. You can resize the header by dragging the splitter bar between the header and the patient folder window to change the space allotted to each section. In addition, you can hover over the nickname to view a tooltip of the patient's phonetic name. The background of the patient folder header is color-coded according to the office assigned to the patient.
Reposition / Close Tabs - Right-click the page header to close, reposition, rearrange, or resize the window. Tell me more...
Re-Open Patient Folder - Click  Other Actions then select
  Reopen from the Patient section of the Patient ribbon bar to open a second session of the patient folder. If you have multiple screens, you can then drag one of the folder tabs to another screen. This feature is particularly useful for systems with dual monitors that want to keep the patient folder information available while viewing images (or any other page of the patient folder) on another screen.
Refresh - Click  Refresh on the Quick Access toolbar (or press F5 on your keyboard) to refresh the data on your screen.