Treatment Chart & Plan Styles
Use the Style Editor to set up the columns of information you want to include when you create a patient treatment chart or plan record. You may create as many styles as needed, so that you only need to record certain types of information during certain phases or stages of a patient's treatment.
Testing Your Styles - While working on treatment chart and plan styles, you may want to make some test entries. Consider using a fictional patient for these tests, so as not to “mess up” an actual patient’s chart.
You can set up treatment chart and plan style columns to accept responses from pre-defined lists. If you plan to use this feature, you will need to set up the list before you create your styles Use the
![]() Set Up Treatment Chart and Plan Styles
Set Up Treatment Chart and Plan Styles
-
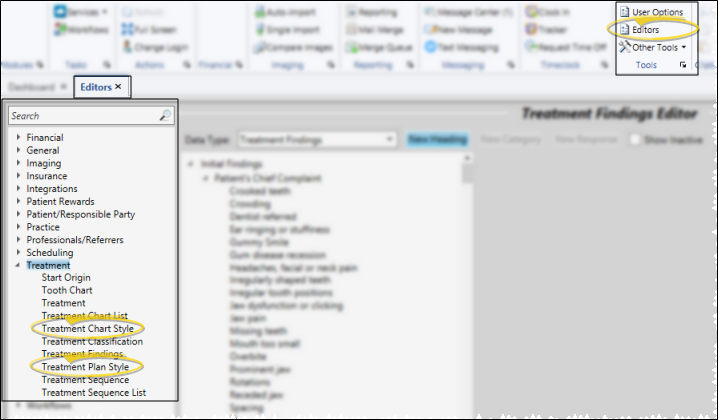
 Open the Style Editor - Select Editors from the Tools section of the Home ribbon bar. Then from the Treatment section, open the Treatment Chart Style or Treatment Plan Style editor. (You can also use the Search field to look for the editor you want to work with.)
The styles are different for your treatment chart and treatment plan: Be sure you open the editor for the type of styles you want to work with.
-
Choose a Style to Work With - You can choose to work with an existing style, copy a style to work with, or create a new style from scratch. Once you create a record, you cannot delete it. You can, however, flag it Inactive. Records you flag as Inactive are not available for general use, but they remain in your system for reporting and other data collection needs. In addition, you can toggle records back to Active whenever needed.Select Existing Record - Your list of existing records appears at the left. Click the record to work with, then review and edit the details.
You can use the checkbox at the right of the list to toggle the active / inactive status of an record. If not all your records appear in the list, use the
 Show / Hide Inactive icon at the top of the window to include both active and inactive records.
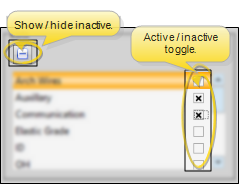 Copy a Style - Click a style name, then click Copy to create a copy of a style You may then edit the details as needed.
 Create a New Record - Type a description in the Create New portion of the window. Then click Add. You can then edit your record to complete the details.
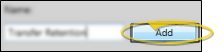
-
Edit Style Name and Status - The top portion of the style details includes the style name and active / inactive status. Be sure you name you styles to they are easily distinguishable from one another. Once you create a record, you cannot delete it. You can, however, flag it Inactive. Records you flag as Inactive are not available for general use, but they remain in your system for reporting and other data collection needs. In addition, you can toggle records back to Active whenever needed. If you are working with a Treatment Plan style, you can enable the

-
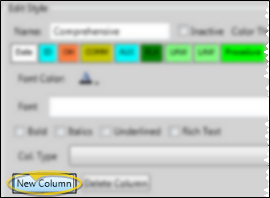
Add, Edit, and Delete Style Columns - A sample of the style you are working on appears on your screen, along with the fields you use to add and remove columns, and define the properties of each column of your style. You can control the way information can be entered into a column, integrate columns with your tooth chart, needs appointment list, and patient rewards system, and use color and other properties to emphasize certain columns.Add a New column - Click New Column
Re-Order columns - Simply click and drag to arrange your columns in new locations.
Column Heading - To edit a column heading, click in the column you want to change, and type the new heading. You can also copy, cut and paste text into the heading.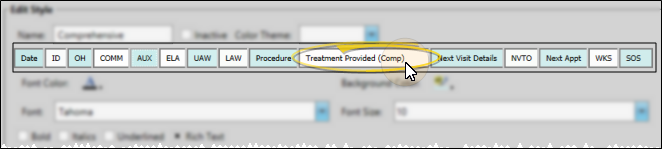 Column Properties - Click the column you want to work with, then change the property fields as needed. The properties determine how the column looks, and how information will be entered into the column when the style is applied to a patient's treatment chart or plan record
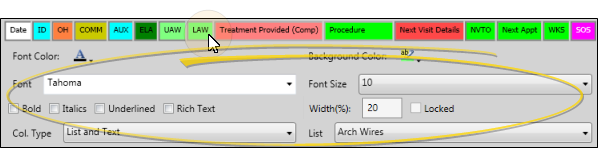
Colors & Fonts - You can change the background color, font, and text emphasis (Bold, Italics, Underline) for the currently selected column. As you make changes, the sample style will change to reflect your new settings.
Rich Text Option - After you create a treatment chart or plan record with this style, you might want to add emphasis to certain text. When the Rich Text option is enabled, you can apply formatting just to text that you select. When this option is disabled, any formatting changes you make will affect the text of the entire column.
Width - Adjust the width of your columns by dragging the column boundaries in the sample style. .
Column Type / List - The way you enter data into a treatment chart or treatment plan column depends on the input method you select in the Column Type field of the Style editor. The input methods include typing text into a column, requiring a response from a list, allowing a combination of typing / selecting from a list, and choosing a response from your Text Only - This column type requires that you type (or copy & paste) text into the column. In addition, you can use text only columns to import patient findingsImport Tooth Chart Data into Treatment Chart - With your cursor in a Text Only or List and Text column, make any needed changes to the tooth chart, including adding and removing elastics. The tooth chart data will be translated into a narrative description in the active column of your treatment chart record.See "Patient Tooth Chart" for details.
Import Findings into Treatment Chart - With your cursor in a Text Only or List and Text column,
 Import icon from the Treatment Chart section of the Patient ribbon bar (or
Import Narrative into Treatment Chart - While adding data to a Text Only or List and Text treatment chart column, click the drop down button beside the
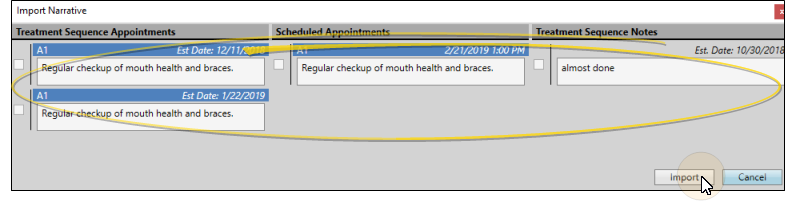
Import icon on the Treatment Chart section of the Patient ribbon bar, then select Import Narrative. (Or, press F3 on your keyboard.) You will see a window of all narratives associated with scheduled appointments, and upcoming Treatment Sequence appointments and checklist notes. Enable each narrative you wish to add to the treatment chart, and click Import. If you later change the narrative assigned to an appointment or treatment sequence checklist, any treatment chart records that imported the narrative will not be changed. See "Procedures Editor" for details about creating narratives for  List Only - This column type requires that you select a response from an assigned list. You cannot edit the response. (See "Treatment Chart & Plan Lists" for details about list options.) In addition, you can associate list responses with Patient Rewards
Search Options - When the Text Search option is enabled for a list, you can begin typing a list response, and your cursor will jump to the response that begins with your typed text.
Auto Complete Option - When the Auto Complete option is enabled for a list, you can press the Tab key on your keyboard to add the entirety of the currently selected response to the treatment chart / plan record. If this option is disabled, you must click the response to add the entire response text to the record.
Patient Rewards - To add or deduct Patient Reward points when a specific response is entered in a patient's treatment chart, enter a description and point value (either positive or negative) in the Patient Reward fields of your Treatment Chart List. For example, you might award 5 points when the response "Excellent" is selected for the Oral Hygiene column of a treatment chart record, or deduct 5 points if the response is "Poor".
Workflows - You can use responses from your Treatment Chart lists within a conditional element to evaluate a patient's newly-created treatment chart record. In addition, you can optionally trigger a workflow when you enter a specific list response in a patient's Treatment Chart or Treatment Plan.
List and Text - This column type provides for both selecting from an assigned list, and/or typing text. You can select multiple responses from the list by pressing the space bar between responses. You can edit the text of the list responses, as well as add additional text as needed. (See "Treatment Chart & Plan Lists" for details about list options.) In addition, you can use List and Text columns to import patient findingsSearch Options - When the Text Search option is enabled for a list, you can begin typing a list response, and your cursor will jump to the response that begins with your typed text.
Auto Complete Option - When the Auto Complete option is enabled for a list, you can press the Tab key on your keyboard to add the entirety of the currently selected response to the treatment chart / plan record. If this option is disabled, you must click the response to add the entire response text to the record.
Patient Rewards - To add or deduct Patient Reward points when a specific response is entered in a patient's treatment chart, enter a description and point value (either positive or negative) in the Patient Reward fields of your Treatment Chart List. For example, you might award 5 points when the response "Excellent" is selected for the Oral Hygiene column of a treatment chart record, or deduct 5 points if the response is "Poor".
Workflows - You can use responses from your Treatment Chart lists within a conditional element to evaluate a patient's newly-created treatment chart record. In addition, you can optionally trigger a workflow when you enter a specific list response in a patient's Treatment Chart or Treatment Plan.
Import Tooth Chart Data into Treatment Chart - With your cursor in a Text Only or List and Text column, make any needed changes to the tooth chart, including adding and removing elastics. The tooth chart data will be translated into a narrative description in the active column of your treatment chart record.See "Patient Tooth Chart" for details.
Import Findings into Treatment Chart - With your cursor in a Text Only or List and Text column,
Import icon from the Treatment Chart section of the Patient ribbon bar (orImport Narrative into Treatment Chart - While adding data to a Text Only or List and Text treatment chart column, click the drop down button beside the
Import icon on the Treatment Chart section of the Patient ribbon bar, then select Import Narrative. (Or, press F3 on your keyboard.) You will see a window of all narratives associated with scheduled appointments, and upcoming Treatment Sequence appointments and checklist notes. Enable each narrative you wish to add to the treatment chart, and click Import. If you later change the narrative assigned to an appointment or treatment sequence checklist, any treatment chart records that imported the narrative will not be changed. See "Procedures Editor" for details about creating narratives for
Procedure List - This column type requires that you select a single response from Search
Needs Appointment Integration - When a treatment chart style includes both a column that requires a List response from a list that has the Next Appt Time option enabled, and a column that requires a Procedure List response, the information will automatically transfer to your Needs Appointment List.
Treatment Chart & Treatment Sequence Integration - When you create a treatment chart record that includes that includes both a column that requires a response from your Procedure List, and a List Only column that is assigned to a list with the Next Appt Time enabled, the patient's next treatment sequence appointment is entered as the default automatically.See "Treatment Sequence" for details.
Remove a Column - 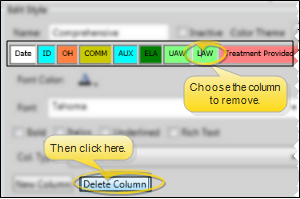
-
Save Changes - Click
 Save in your Quick Access toolbar or File ribbon bar (or press Ctrl+S on your keyboard) to save any changes you have made.
Tooth Chart Integration - The tooth chart / treatment chart integration provides a way for you to add narrative text to a patient's treatment chart as you edit a patient tooth chart. Simply add a new record to a patient's treatment chart, and place your cursor in a text or list and text column. Then enter data into the tooth chart, including adding and removing elastics. The tooth chart data will be translated into a narrative description in the active column of your treatment chart record.. Therefore, you may wish to include at least one column in a treatment chart style that anticipates tooth chart data. See "Patient Tooth Chart" for details.
Needs Appointment Integration - When a treatment chart style includes both a column that requires a List response from a list that has the Next Appt Time option enabled, and a column that requires a Procedure List response, the information will automatically transfer to your Needs Appointment List.
![]()
www.ortho2.com │ 1107 Buckeye Ave. │ Ames, IA 50010 │ 800.346.4504 │ Contact Us
Chat with Software Support │ Chat with Network Engineering │ Chat with New Customer Care
Remote Support │ Email Support │ Online Help Ver. 11/11/2019


