Workflow Conditional Elements
You can use the "If" element of the Workflow editor to evaluate patient data as you run a workflow, to determine how the workflow activities will function when the workflow is triggered for a specific patient. For example, a workflow can trigger a different word processing document, depending on whether a patient is at least 18 years old.
-
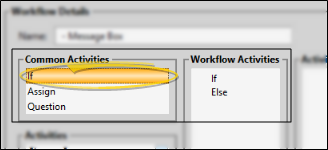
 Add a Condition - Drag the "If" element from the Common Activities list onto your Workflow Activities list. An "Else" element is automatically added, directly below the "If".
-
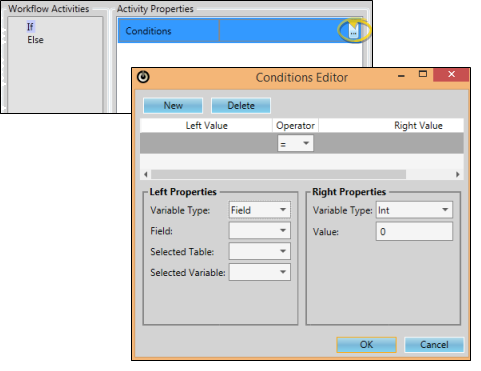
Open Conditions Editor - Click the "If" element in the Workflow Activities list to select it, then click to open the Conditions Editor window.
-
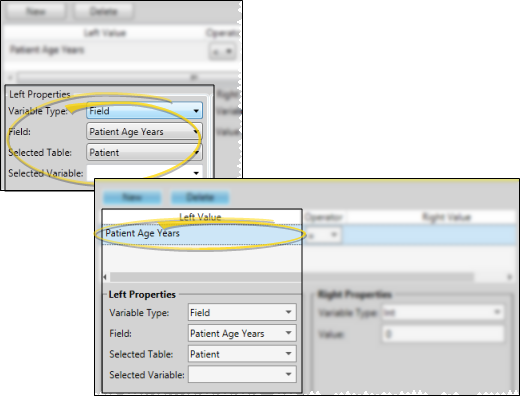
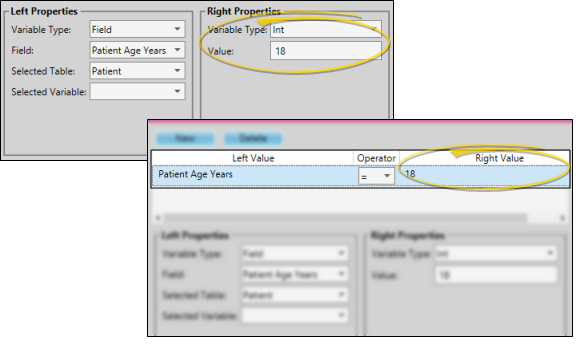
Data to Evaluate - Use the Left Properties section at the bottom of the window to choose the variable type you want to evaluate. First, select the variable type to work with, such as "Field", then select the properties for that variable, such as "Patient Age - Years". Your selected variable appears at the top of the window.
Tell Me About Variable Types,,,
@Variables
Use these variables to evaluate a specific type of static data. For example, variables that you create with the Assign element contain data that is available only for the workflow activity in which they were created.

Bool
Use this variable type to evaluate whether data is "true" (checked), or "false" (unchecked). Enable the Value option if you want the tested data to be "true"; disable the option if you want the tested data to be "false".

Currency
Use this variable type to evaluate a specific dollar amount.

Date
Use this variable type to evaluate a specific date.

DateTime
Use this variable type to evaluate a specific date and time,

Double
Use this variable type to evaluate a number up to two digits past the decimal point (i.e. 18.75 or .99)

Field
Use this variable type to evaluate a specific field in your Edge Cloud database. After selecting this variable type, choose the Field to work with (such as Patient Age Years or Office Abbreviation). Most often, the Selected Table property is updated automatically to reflect the type of field you have chosen. On occasion, you may wish to choose a Selected Variable that will contain this field data for the duration of the workflow activity.

Int
Use this variable type to evaluate an integer, or whole number, such as 18.

Listkey
Use this variable type to evaluate a list response from your Edge Cloud database. After selecting this variable type, you choose the Field to work with, such as Office Abbreviation or Patient Status. The available responses then appear in the Value box, where you can select one or more response to work with.

String
Use this variable to evaluate specific text. After selecting this variable type, enter the exact text you want to evaluate.

Treatment Chart List Response
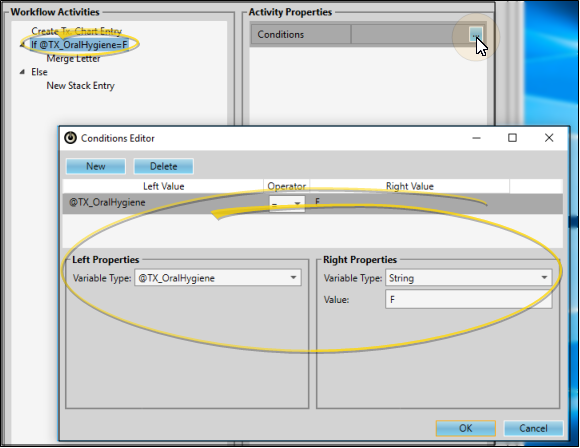
You can use responses from your Treatment Chart lists within a conditional element to evaluate a patient's newly-created treatment chart record. For this to work properly, you must follow a few steps exactly. 1) As you create the conditional statement, select any "@" variable type (or select the String variable type) in the Left Properties, and type the variable in the format @TX_[ColumnName], where [ColumnName] is the exact name of your treatment chart list; 2) You must also trigger the workflow immediately after creating the treatment chart record. (You can do this with the Create Treatment Chart Entry workflow trigger, or with your Workflow Quick Actions.) You might use this feature, for example, to send a "Poor Oral Hygiene" letter when the patient's treatment chart indicates a failing oral hygiene grade.
-
Value to Evaluate - Use the Right Properties section at the bottom of the window to enter the value, or response you are looking to evaluate. Usually, the appropriate Variable Type is already selected, according to the type of data you chose at the left side of the screen, and you only need to enter the details that you want evaluated. For example, if you have selected "Patient Age - Years" at the left, the right side of the screen defaults to the variable type "Integer", and all you have to do is enter the age you want to evaluate, such as "18". Your selected value appears at the top of the window.
Tell Me About Variable Types,,,
@Variables
Use these variables to evaluate a specific type of static data. For example, variables that you create with the Assign element contain data that is available only for the workflow activity in which they were created.
Bool
Use this variable type to evaluate whether data is "true" (checked), or "false" (unchecked). Enable the Value option if you want the tested data to be "true"; disable the option if you want the tested data to be "false".
Currency
Use this variable type to evaluate a specific dollar amount.
Date
Use this variable type to evaluate a specific date.
DateTime
Use this variable type to evaluate a specific date and time,
Double
Use this variable type to evaluate a number up to two digits past the decimal point (i.e. 18.75 or .99)
Field
Use this variable type to evaluate a specific field in your Edge Cloud database. After selecting this variable type, choose the Field to work with (such as Patient Age Years or Office Abbreviation). Most often, the Selected Table property is updated automatically to reflect the type of field you have chosen. On occasion, you may wish to choose a Selected Variable that will contain this field data for the duration of the workflow activity.
Int
Use this variable type to evaluate an integer, or whole number, such as 18.
Listkey
Use this variable type to evaluate a list response from your Edge Cloud database. After selecting this variable type, you choose the Field to work with, such as Office Abbreviation or Patient Status. The available responses then appear in the Value box, where you can select one or more response to work with.
String
Use this variable to evaluate specific text. After selecting this variable type, enter the exact text you want to evaluate.
Treatment Chart List Response
You can use responses from your Treatment Chart lists within a conditional element to evaluate a patient's newly-created treatment chart record. For this to work properly, you must follow a few steps exactly. 1) As you create the conditional statement, select any "@" variable type (or select the String variable type) in the Left Properties, and type the variable in the format @TX_[ColumnName], where [ColumnName] is the exact name of your treatment chart list; 2) You must also trigger the workflow immediately after creating the treatment chart record. (You can do this with the Create Treatment Chart Entry workflow trigger, or with your Workflow Quick Actions.) You might use this feature, for example, to send a "Poor Oral Hygiene" letter when the patient's treatment chart indicates a failing oral hygiene grade.
-
Operator - Use the Operator field that appears between the variable you have selected at the left side of the window, and the value you are looking for at the right side of the window, to choose the mathematical operator to use. Your conditional statement is now complete.

Equal to ( = ) - This operator includes records that exactly match the field value.
Not equal to ( <> ) - This operator excludes records that match the field value.
Greater than (> ) - This operator includes records whose value is more than, but not the same as, the field value.
Greater than or equal to ( >= ) This operator includes records whose value is either more than or the same as the field value.
Less than ( < ) - This operator includes records whose value is less than, but not the same as, the field value.
Less than or equal to ( <= ) - This operator includes records whose value is either less than or the same as the field value.
-
Add / Remove Statements - Click New at the top of the Conditions Editor to add another statement to this "If" element, or click Delete to remove the selected statement. When your workflow is triggered, all statements must be satisfied before the "If" element is considered "true".
-
Exit Conditions Editor - Click Ok at the bottom of the window to close the Conditions Editor and return to your Workflows editor.
-
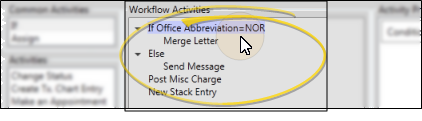
Arrange Workflow Activities - In most cases, you must drag and drop items in the Workflow Activities list to be sure the appropriate activities will be completed, according to whether or not the "If" element has been satisfied.
If you want an activity to occur when the conditional statement is true, drag that activity directly onto the "If" element. The activity will then appear indented below the If. Likewise, if you want an activity to occur when the conditional statement is false, drag that activity directly onto the "Else" element. The activity will appear indented below the Else.
Activities that you want to occur regardless of the conditional statement results can be either above the "If" element, or below the "Else" element. Just be sure the activity is not indented.
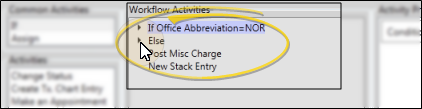
To be sure an activity is not part of the conditional statement, click the VCollapse arrows beside your If and Else statements to hide the conditional activities. Only the activities that will occur in all instances will remain visible.
Workflow Yes/No Questions - You can use the "Question" element of the Workflow editor to add a yes/no question to your workflows. The workflow can then trigger additional activities depending on whether you respond "yes" or "no" as the workflow is being run. For example, you can choose whether or not to post a miscellaneous charge for a patient by asking a workflow question. This is particularly useful for directing workflow activities when there is no patient data you can evaluate to direct the appropriate workflow activity. See "Workflow Questions" for details.


