Scan Patient Images
Use the Scan feature, available from the Single Import or Auto Import window, to add an image or multiple images to a patient record from any scanning device available to your workstation. You can scan images into previously unused image types, or overwrite the patient's existing images. This feature is often used to scan patient x-rays.
Choose the Scanner to Use![]() - (Optional.) You can choose which scanning device or system to launch automatically when you initiate an image scan from this machine. See "Scanner User Options" for details.
- (Optional.) You can choose which scanning device or system to launch automatically when you initiate an image scan from this machine. See "Scanner User Options" for details.
You can open this feature in multiple ways: Use the method that's most convenient for you.
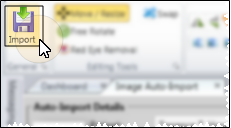
Ribbon Bar![]() - From the Imaging section of the
- From the Imaging section of the  Single Import or
  Auto Import. You can scan an individual image from either import option, but you can only scan multiple images from the Auto Import option..
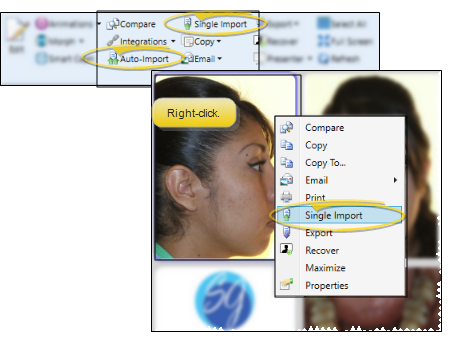
Right-Click Imaging Layout![]() - While viewing a patient's images, right-click an image you want to replace and select Single Import.
- While viewing a patient's images, right-click an image you want to replace and select Single Import.
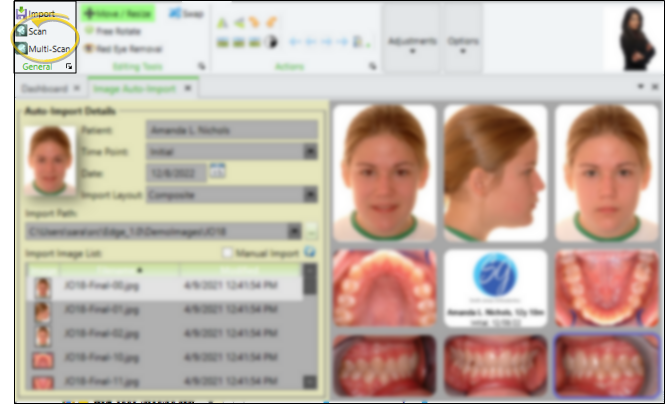
Choose the patient, timepoint, date, and image type or layout to add your image(s) to. Then, if you are using Single Import or Auto Import, select the Import Path where the image(s) are located. If you are scanning the image(s), you can ignore the Import Path.
To change the patient to work with, click in the Patient field to open Fast Find and search for a different patient. This provides an efficient way to work with multiple patients in one session.
Choose the timepoint for this image, or type a new timepoint unique to this patient.
If you are importing into a new timepoint, enter the date the image(s) were taken. This date will be applied to all future images you import into this timepoint. If you cannot enter a date, images have already been imported into this time point.
Timepoint / Image Dates - Although all images in a timepoint have the same timepoint date, you can edit the date an individual image was taken via the Edit > Image Properties tool.
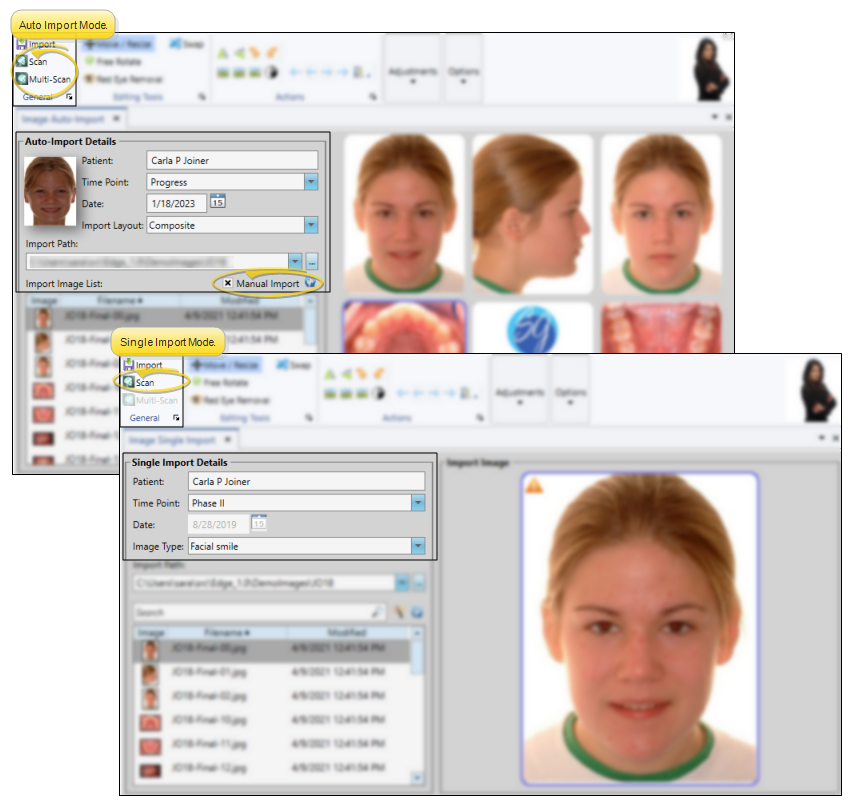
Single Images - When you use Single Import, or Scan to add a single image to the patient folder, you choose the image type you are adding to the layout. If you right-clicked a layout to launch Single Import, that image type is selected by default.
Multiple Images - When you use Auto Import or Multi-Scan to add multiple images to the patient folder, you choose the layout to use to import those images. Note that only the image types specified in the selected layout will be Auto Imported, even if the image list includes other image types.
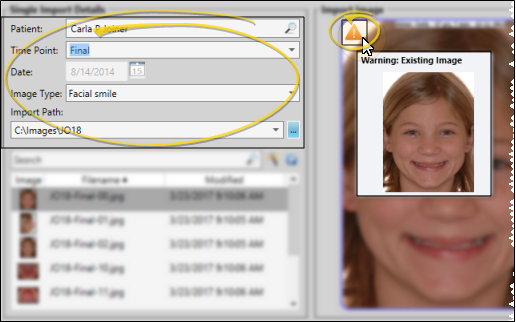
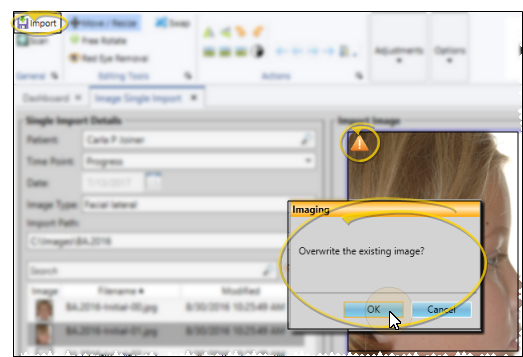
Overwrite Warning - If an image already exists for an image type in this timepoint, you will see a  Warning icon in the preview section of the window. You can hover over the icon to view the existing image.
If you are using Single Import or Auto Import, choose the location of this patient's original images. You can click the dropdown button to select from a list of paths you've used on this workstation, or click [...] to browse to a different location if needed. You then see a list of the images found in that folder. You can ignore the Import Path and list of images when you are using Scan or Multi-Scan to add one or more image(s) to the patient folder.
Enable Manual Import Option (Auto Import Only)![]() - If you are using Auto Import to scan one or more images, enable the Manual Import option, which tells Edge Imaging that you are going to use images other than those in the Image list. (Single Import does not have this option: the image will be scanned into the image type you select.)
- If you are using Auto Import to scan one or more images, enable the Manual Import option, which tells Edge Imaging that you are going to use images other than those in the Image list. (Single Import does not have this option: the image will be scanned into the image type you select.)
Select Image Location (Auto Importing a Single Image Only)![]() - If you are using Auto Import to scan a single image, click in the layout to the right of the window to select the image location you want to scan into.
- If you are using Auto Import to scan a single image, click in the layout to the right of the window to select the image location you want to scan into.
Start Your Scanner![]() - From the General section of the
- From the General section of the
A preview of your selected image(s) appears at the right of the window. You can move, rotate, and edit images before importing them into the patient record.
Edit Images![]() - While editing an image, you can use the icons in the Editing Tools section of the Imaging ribbon bar to move, re-size, manually rotate, and remove red eye from patient images.
- While editing an image, you can use the icons in the Editing Tools section of the Imaging ribbon bar to move, re-size, manually rotate, and remove red eye from patient images.
Image Actions![]() - While editing an image, you can use the tools in the Actions section of the Imaging ribbon bar to change the image orientation, manipulate image resolution, and access image and time point properties. The Actions tools also provide you with a way to reverse or re-apply changes you have made to your images.
- While editing an image, you can use the tools in the Actions section of the Imaging ribbon bar to change the image orientation, manipulate image resolution, and access image and time point properties. The Actions tools also provide you with a way to reverse or re-apply changes you have made to your images.
Image Adjustment![]() - While in imaging Edit mode, you can use the slider bars in the Adjustments section of the Imaging ribbon bar to manually adjust the brightness, gamma, saturation, contrast, and hue values of your images.
- While in imaging Edit mode, you can use the slider bars in the Adjustments section of the Imaging ribbon bar to manually adjust the brightness, gamma, saturation, contrast, and hue values of your images.
Image Options![]() - While in imaging Edit mode, you can use the tools in the Options section of the Imaging ribbon bar to enable / disable viewing tools that are designed to help make editing more accurate.
- While in imaging Edit mode, you can use the tools in the Options section of the Imaging ribbon bar to enable / disable viewing tools that are designed to help make editing more accurate.
Click  Import from the General section of the Imaging ribbon bar to save your selections and begin the import process.
If you are importing an image (or images) that will overwrite an existing image in this time point, you must confirm your action before continuing.
![]() Link X-Ray Image to Tooth Chart
Link X-Ray Image to Tooth Chart
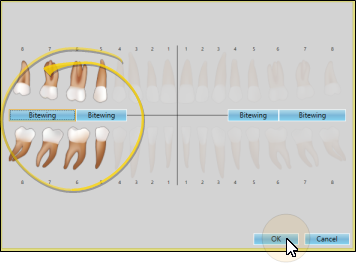
When you Single Import or Scan an image into an image type you have flagged as an X-Ray Location, you will be prompted to select the tooth or teeth to link to the image. You can use the Bitewing buttons on the tooth chart graphic to enable the most commonly included teeth, or click one or more teeth to link to the image. When you are finished, click Ok to continue importing the image into the patient folder.
X-Ray Location Image Type - You can only link the patient 's tooth chart with image types that have the X-Ray Location property enabled: Image types with this property disabled will omit this step of the Single Import process. See "Image Types Editor" for details.
No Overwrite Warning - When you Single Import or Scan an X-Ray Location image to a patient folder, you will not see any overwrite warning, even if an image has already been imported into the image type for this timepoint. Each X-Ray Location image you import is simply added to the patient's Imaging index, as well as linked to the patient's tooth chart.
![]() Keep or Delete Original Images
Keep or Delete Original Images
After images are imported, you see a completion notification dialog. If the "Delete After Import" option in your Imaging User Options is set up to either retain original images or delete original images, you simply see a notice that the process is complete. However, if the "Delete After Import" option is set up to prompt you before deleting original images, select either Yes or No to direct the handling of the original images.