Online Scheduling Editor
Use the Online Scheduling editor to set up how prospective patients can book appointments from your website. The Setup tab and New Patient Links tab work together to first enable office locations and appointment types for Online Scheduling, then assigning doctors and offices, creating website links, and previewing your scheduling forms.
Select Editors from the Tools section of the Home ribbon bar. Then, from the Scheduling section, open the Online Scheduling editor. (You can also use the Search field to look for the editor you want to work with.)
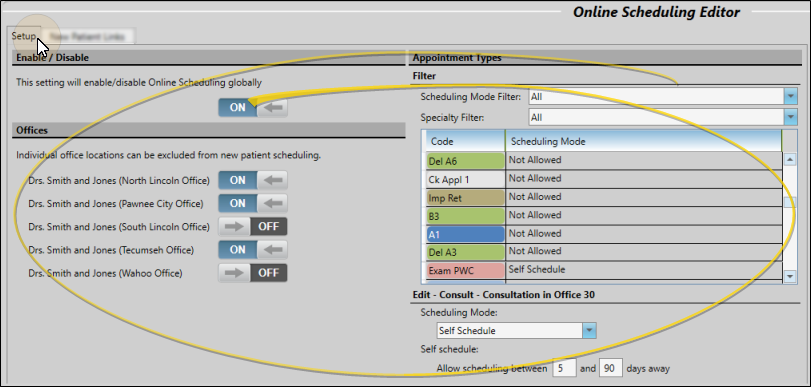
Use the Setup tab of your Online Scheduling editor to select the office locations and appointment types (aka procedures) that can be self-scheduled online.
Enable / Disable - You must have Online Scheduling enabled for your system before the other editor tabs are available to you. If you disable the feature, any self-scheduling links you have on your web site will no longer work.
Offices - Enable each office you want prospective patients to be able to schedule to. (The Scheduler template(s) you plan to use with Online Scheduling MUST have chairs assigned to each office you enable.)
Procedures - Use this section of the Setup tab to choose which procedures prospective patients can schedule. You can use the Scheduling Mode Filter to include all of your procedures in the list, or just include procedures flagged Not Allowed or Self Schedule. Choose a procedure you want to work with, then use the Scheduling Mode field below the list to flag that procedure as either Not Allowed or Self Schedule. If you select Self Schedule, you can then select the number of days out a prospect can schedule that type of appointment. (The Scheduler template(s) you plan to use with Online Scheduling MUST include these procedures, applied to chairs that are assigned to offices you have enabled for Online Scheduling.
Additional Steps Required - Simply enabling a procedure as Self Schedule on this tab of the Online Scheduling editor does not make it available to prospective patients. You must also use the New Patient Links tab of this editor to generate a link, and add that link to your website. In addition, you must have at least one Scheduler template that includes the procedure applied to a chair that is assigned to a specific office.
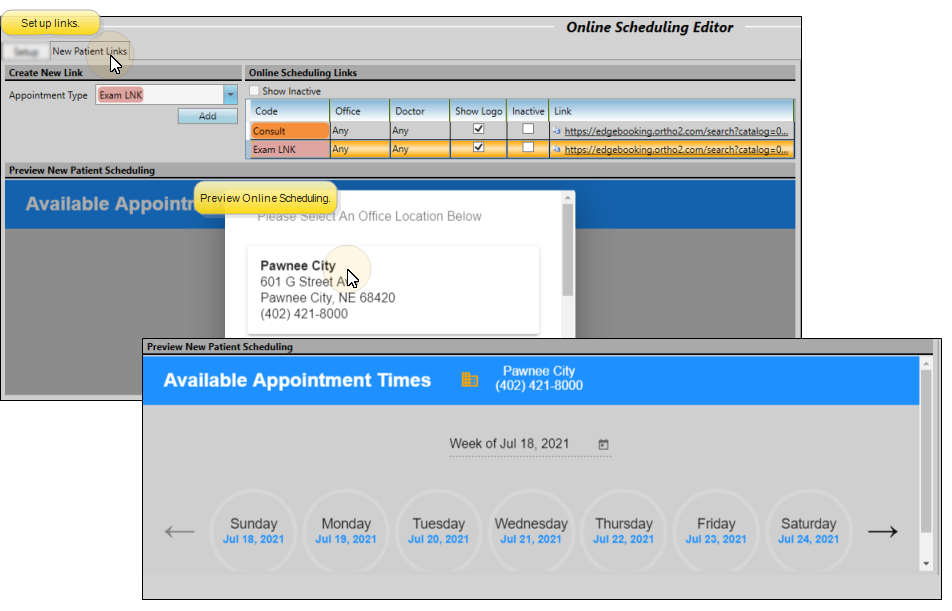
Use the New Patient Links tab of your Online Scheduling editor to assign doctors and offices to the procedures you have enabled for Self Scheduling, create the links to use on your website, and preview your Online Scheduling forms.
Create a Link - To create a new link to use on your website, use the Procedure drop down list to select the procedure you wish to work with. All the procedures you have flagged as Self Schedule on the Setup tab of the editor are included in the list. Click Add to add that procedure to the Online Scheduling Links list at the right.
Assign Doctor / Office / Logo - Select a link to work with in the Online Scheduling Links list. You can then select a specific office and/or doctor for the procedure, and enable or disable the office logo on the form that prospective patients will see. After you click Save in theQuick Access toolbar (or press Ctrl+S on your keyboard), an example appears in the Preview New Patient Scheduling section of the window. If you no longer need a link, enable the Inactive option.
Copy Link - Use the Copy Link button that precedes the link you want to use. You can then paste the link into your website as needed, or email the link to prospective patients. Prospective patients will then be able to click the link to schedule the type of appointment procedure associated with that link.
Link Persistence - The link for a specific procedure will remain the same even if you later go back and change the options, such as specifying a different office.
Cellphone Required Option - If you want to require a cell phone number on your online scheduling forms, you must add "&cellrequired=true" to the end of your scheduling links, like this: https://edgebooking.ortho2.com/search?catalog=xxxxxxx&code=xxxx&cellrequired=true
Click  Save in your Quick Access toolbar or File ribbon bar (or press Ctrl+S on your keyboard) to save any changes you have made.