Classes Editor
Use the Classes editor to maintain your list of scheduling classifications. You assign appointment procedures to these classes, then add classes to your scheduling templates to establish the best scheduling protocol for your practice.
Select Editors from the Tools section of the Home ribbon bar. Then, from the Scheduling section, open the Classes editor. (You can also use the Search field to look for the editor you want to work with.)
Create a New Record - Type a description in the Create New portion of the window. Then click Add. You can then edit your record to complete the details.
Select Existing Record - Your list of existing records appears at the left. Click the record to work with, then review and edit the details at the right. If not all your records appear in the list, use the  Show / Hide Inactive icon at the top of the window to include both active and inactive records.
Select a class to work with, then enter a class name, colors, and other details. If you just created a new record, it is selected automatically. The list of appointment type / procedures already assigned to the selected class, and what the class will look like when it is applied to a Scheduler template appear for your review. If you have Edge Specialist, the same list of classes can be applied to the Scheduler templates and appointment type / procedures for all specialties.
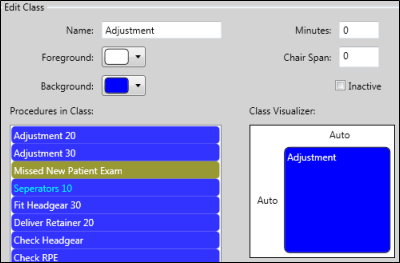
Name - This field should describe the purpose of this class.
Foreground / Background colors - Select the colors that will be displayed in empty appointment slots. Before an appointment is scheduled, your grid template displays the colors of the class assigned to that cell (if any). After an appointment is scheduled, your grid template displays the colors of the appointment type / procedure scheduled to that cell. Thus, you might want to coordinate your classification colors and associated appointment colors.
Class Structure Minutes / Chair Span - Use the Minutes and Chair Span fields to create a Class Structure composed of a specific time length and chair span that you can drag and drop onto your grid templates. See "Grid Template Editor" for details.
Inactive / Active Toggle - Once you create a record, you cannot delete it. You can, however, flag it Inactive. Records you flag as Inactive are not available for general use, but they remain in your system for reporting and other data collection needs. In addition, you can toggle records back to Active whenever needed.
Open Procedure Editor - Double-click a procedure that is assigned to a class to open the editor with that procedure selected.
Click  Save in your Quick Access toolbar or File ribbon bar (or press Ctrl+S on your keyboard) to save any changes you have made.
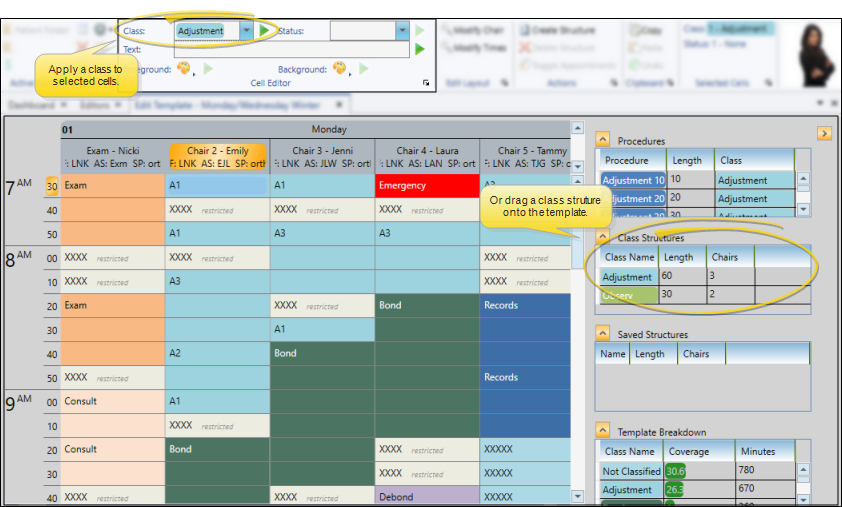
Use the Grid Template Editor to apply classes and class structures (created by assigning a Length and Chair Span to the class) to your scheduling templates. See "Grid Template Editor" for details.
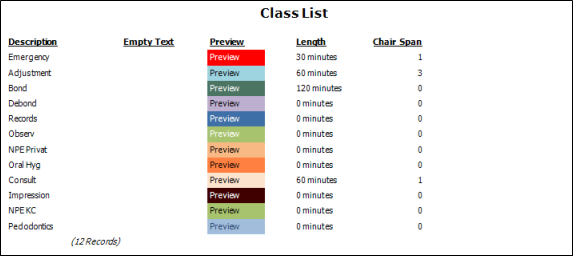
Run the Class List report to obtain a list of the active records in your Class editor that you can use to categorize your appointment procedures and scheduling templates. The report includes the class description and assigned colors, so it is best to print the report with a color printer. The Length and Chair Span fields, if any, indicate the Class Structure that you have created from the class that you can drag and drop onto your scheduling templates. (The Empty Text field is blank: It is for future development.). Only active records are included in the report: Any items flagged Inactive in the editor are omitted. See "Scheduling Class List" for details.