Grid Template Editor
Use
You can use the tools in the Grid Template editor as you create new Scheduler templates, or when editing existing Scheduler templates, or to alter the scheduling cells for a specific date.
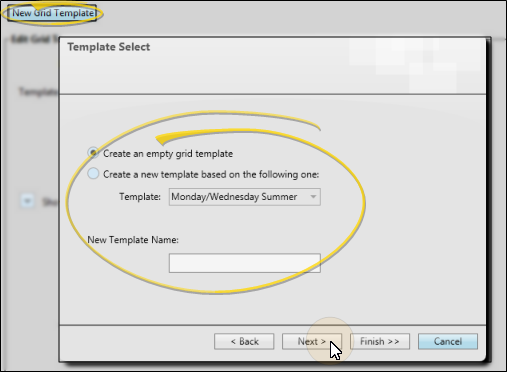
Create a New Scheduler Template - Open the Scheduler Templates editor, and click New Grid Template to create a new template. When you have entered the chair and time settings, the Grid Template Editor opens automatically. See "Scheduler Templates Editor" for details.
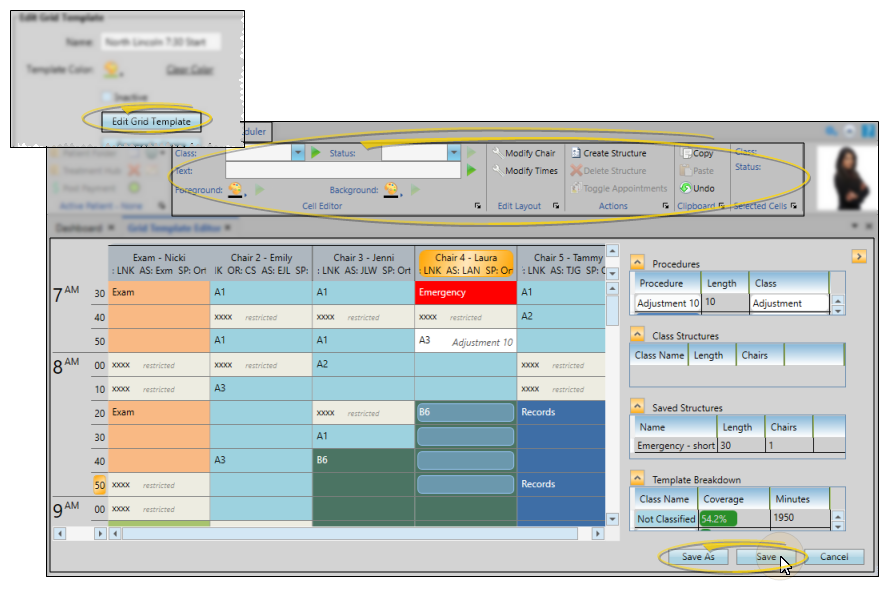
Edit an Existing Scheduler Template - Open the Scheduler Templates editor, and select the template you want to work with. Click Edit Grid Template to open the Grid Template Editor window.
When you edit an existing Scheduler template, only new dates assigned to the template will be affected. If you make changes to the chair assignments (Doctor, Office, Assistant, or Chair Group) of a Scheduler Template, you can use the Reclassify Chairs tool to update the chair assignments of dates that are already assigned to that template. This reclassification occurs without disturbing any currently scheduled appointments. You might use this feature, for example, if you have edited a template to assign chairs to a new orthodontist in your practice,or to reassign chairs among your assistants. See "Scheduler Templates Editor" for details.
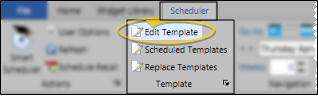
Edit a Specific Date - Open your scheduler to the date you want to work with, then click  Edit Template from the Template section of the Scheduler ribbon bar. (Or, press Ctrl-T on your keyboard.) Changes you make to the template of an individual date in your scheduler do not affect any other date, or your global scheduling templates.
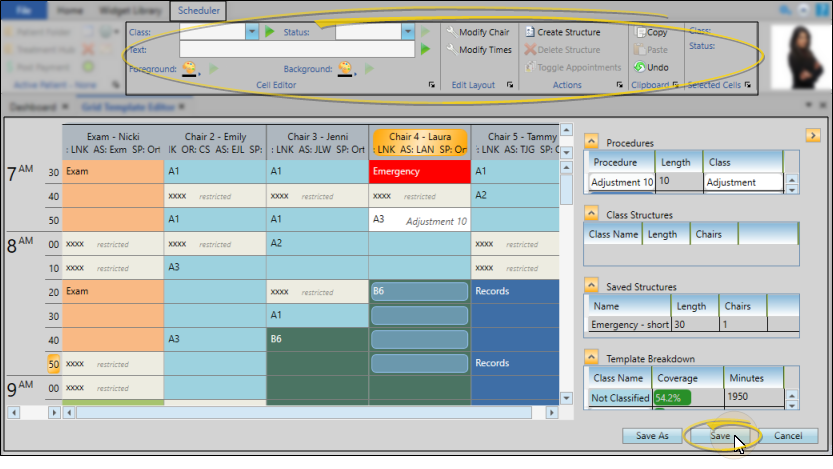
For most Grid Template Editor functions, you will first select the cells you want to work with, then apply the text, class, color, or other feature to your template. When finished, you can either click Save to save and exit the template, or click Save As to leave the original template unchanged and create a template with a new name.
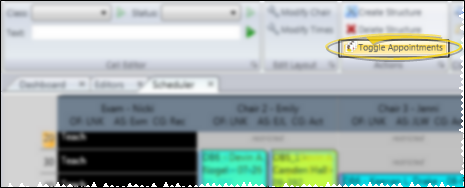
![]() Toggle Appointment Display - (Available only when editing the template for a specific date.) Click
Toggle Appointment Display - (Available only when editing the template for a specific date.) Click  Toggle Appointments in the Actions section of the Scheduler ribbon bar to hide / view appointments already scheduled for that date. (Any scheduled appointments that no longer fit on your modified template will be moved to a Scheduler Bar automatically.)
![]() Cell Editor - Use the tools in the Cell Editor section of the Scheduler ribbon bar to assign the class, status, text, and color of your template cells.
Cell Editor - Use the tools in the Cell Editor section of the Scheduler ribbon bar to assign the class, status, text, and color of your template cells.

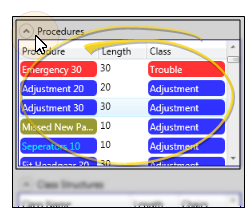
Class - Select the cells to work with, then choose the class you want to assign and click the arrow beside the "Class" field. You create and maintain your scheduling classes with the Classes editor, and specify which appointments should be scheduled to classified time slots with the Appointment Procedures / Types editor. In addition to using the Class tool here, you can drag and drop Class Structures, shown at the right of the window, onto the template.
Click an individual cell you want to work with
Certain Edge Cloud reports, including the Schedule Coverage report, make their calculations based on the classes you have assigned to your scheduling cells, not the classes assigned to the
![]() Status - Select the cells to work with, then choose the status you want to assign
Status - Select the cells to work with, then choose the status you want to assign
Click an individual cell you want to work with
Open Start - Apply the Open Start status if you want appointments to begin with this cell. When you use
Restricted - Apply the Restricted status if you prefer not to schedule in this cell. If you select a Restricted cell for a patient appointment, you must confirm the choice to continue.
Prohibited - Apply the Prohibited status to cells that cannot be scheduled with patient appointments. You might apply the Prohibited status to cells that occur during a weekly meeting, or to chairs that are not available during a portion of your working day.
Text - You can change the text that appears in unscheduled time slots. You might do this, for example, to identify the time of staff meetings or inservice presentations. Select the cells to work with, then use the "text" field to type whatever you want to see in the cell(s)
Click an individual cell you want to work with
Colors - Select the cells to work with, then choose the colors you want to assign
Click an individual cell you want to work with
![]() Copy, Paste, Undo Cell Properties - After applying one or more properties to grid cells, you can copy / past those properties to other cells.
Copy, Paste, Undo Cell Properties - After applying one or more properties to grid cells, you can copy / past those properties to other cells.
Select the cells to work with, the, then use the icons
When you paste a group of cells to a new location or a new template, the upper-left cell that you copied is placed at your cursor location, and the remaining cells that you copied are placed correspondingly. If you have selected a location that cannot accommodate all the cells you copied, none of the cells are pasted.
Click an individual cell you want to work with
![]() Edit Layout - Use the Edit Layout section of the Scheduler ribbon bar to change the number of columns, chair assignments (i.e. doctor, office, assistant), time interval, and time ranges.
Edit Layout - Use the Edit Layout section of the Scheduler ribbon bar to change the number of columns, chair assignments (i.e. doctor, office, assistant), time interval, and time ranges.
![]() Modify Chairs - Click the
Modify Chairs - Click the  Modify Chair icon from the Edit Layout section of the ribbon bar to open the Chair Creation window. Specify the number of chairs, or columns, to have in the template. If you change values, click Update to refresh the screen. You can then optionally click in each field to name the chair, and assign a specific doctor, office, assistant
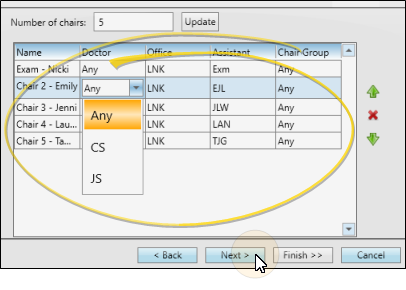
Online Scheduling Requirement - Chairs must be assigned to a specific office for Online Scheduling to function.
Reclassify Option - If you make changes to the chair assignments (Doctor, Office, Assistant, or Chair Group) of a Scheduler Template, you can use the Reclassify Chairs tool to update the chair assignments of dates that are already assigned to that template. This reclassification occurs without disturbing any currently scheduled appointments. You might use this feature, for example, if you have edited a template to assign chairs to a new orthodontist in your practice,or to reassign chairs among your assistants. See "Scheduler Templates Editor" for details.
![]() Modify Times - Click the Modify Times icon from the Edit Layout section of the ribbon bar to open the Template Time Coverage screen. Enter the time interval, or number of minutes, allotted for each scheduling cell. (Many offices schedule by 5, 10, or 15 minute intervals), and the time zone to use for this template. If you change values, click Update to refresh the screen. Then, click [ + ] to enter the starting and ending times for this template. If you have a large break during the day, you can create multiple time ranges that omit that time period. If you create a time range in error, click [ - ] to remove it. (You cannot edit an existing time range: You must instead delete an erroneous time range, and create a new one with the correct times.) When finished, click Next to continue.
Modify Times - Click the Modify Times icon from the Edit Layout section of the ribbon bar to open the Template Time Coverage screen. Enter the time interval, or number of minutes, allotted for each scheduling cell. (Many offices schedule by 5, 10, or 15 minute intervals), and the time zone to use for this template. If you change values, click Update to refresh the screen. Then, click [ + ] to enter the starting and ending times for this template. If you have a large break during the day, you can create multiple time ranges that omit that time period. If you create a time range in error, click [ - ] to remove it. (You cannot edit an existing time range: You must instead delete an erroneous time range, and create a new one with the correct times.) When finished, click Next to continue.

Time Interval - Enter the number of minutes to assign to each time slot in your schedule. If you change the time interval, click Update to save that change. If you change the time interval as you edit an individual scheduling template, any appointments already scheduled keep their number of minutes, and are adjusted to cover the number of time slots required by the new time interval.
Time Zone - Use this field to specify which time zone to use with this template. This field must be correct for Online Scheduling to function correctly.
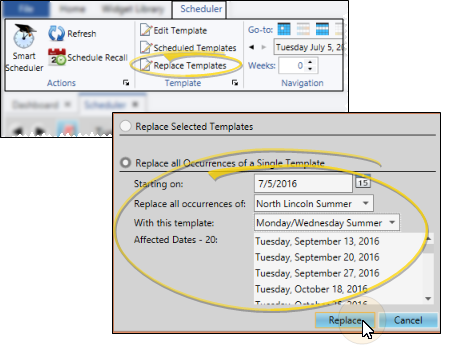
Template Replacement Required - If you change a template's timezone, you have to replace that template on each date of the Scheduler that uses the template for that change to take effect. The easiest way to do this is to use the Replace All Occurrences option of the Replace Template feature, replacing the old template with the updated template. (See "Replace a Scheduling Template" for details about using this feature.)
Time Ranges - Click [+] to create a time range, then enter the starting and ending times. If you have an extended break during the day, you can create multiple time ranges that omit that period of time. For example, you might have a time range from 8:00 AM - 11:00 AM and another time range from 1:00 PM - 6:00 PM. Your schedule will then not permit you to appointment patients during the hours of 11:00 AM - 1:00 PM. You can also select an existing time range, then click [ - ] to delete it from the template. You cannot edit an existing time range, you must instead create a new range and delete the original as needed. (If you delete time ranges as you edit an individual scheduling template, any appointments scheduled to those ranges remain active, but can no longer be seen on your screen.)
![]() Procedure Classes and Structures - You can quickly classify areas of your template by using the procedure classes and structures options at the right side of the window.
Procedure Classes and Structures - You can quickly classify areas of your template by using the procedure classes and structures options at the right side of the window.
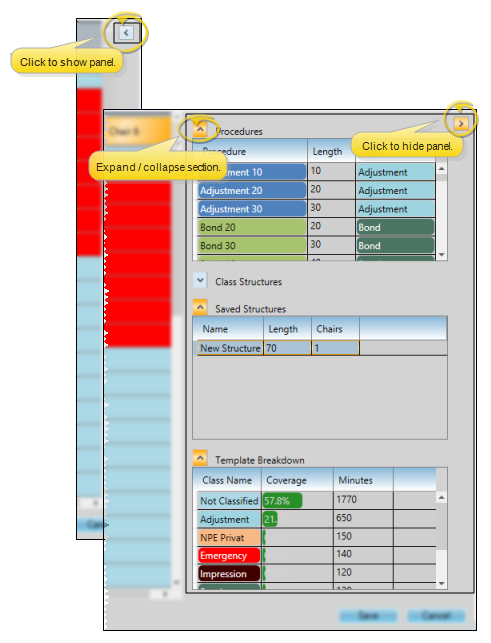
![]() Show / Hide Panel - To use these features, the Structures panel at the right of the template window must be visible, and the section you want to work with must be expanded. If you cannot see the panel, toggle the Show / Hide arrow. You can then use the open / close arrows beside each section to expand / collapse them as needed.
Show / Hide Panel - To use these features, the Structures panel at the right of the template window must be visible, and the section you want to work with must be expanded. If you cannot see the panel, toggle the Show / Hide arrow. You can then use the open / close arrows beside each section to expand / collapse them as needed.
![]() Procedure Classes - Use the Procedure Classes list to quickly classify areas of your template. Drag and drop an
Procedure Classes - Use the Procedure Classes list to quickly classify areas of your template. Drag and drop an
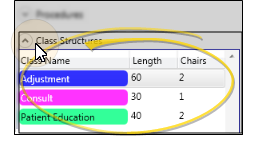
![]() Class Structures - In addition to using the Classes tool from the ribbon bar to apply classes to selected cells, you can drag a Class Structure onto a template to apply a class to a specific length of time and chair span to that area of the template. You create Class Structures by assigning the Length and Chair Span in the Classes editor. If you drag to a location that cannot accommodate the length of time or number of chairs in the structure, your action is ignored. (See "Classes Editor" for details about creating Class Structures.)
Class Structures - In addition to using the Classes tool from the ribbon bar to apply classes to selected cells, you can drag a Class Structure onto a template to apply a class to a specific length of time and chair span to that area of the template. You create Class Structures by assigning the Length and Chair Span in the Classes editor. If you drag to a location that cannot accommodate the length of time or number of chairs in the structure, your action is ignored. (See "Classes Editor" for details about creating Class Structures.)
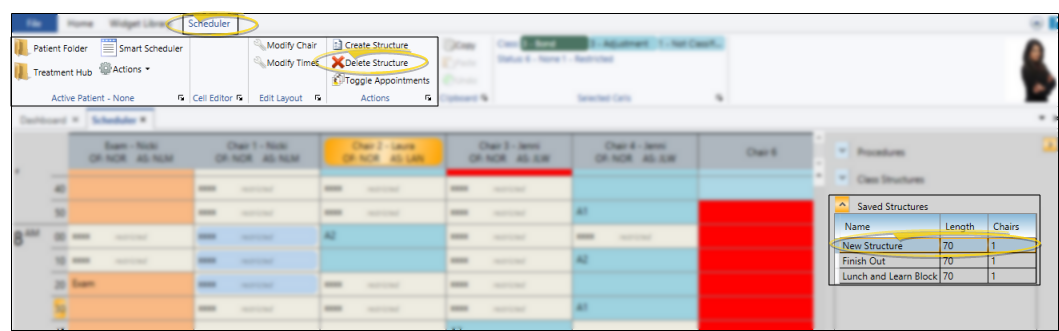
![]() Saved Structures - You can create sets of grid cells that are assigned to specific classes, procedures, and statuses, then save those cells as template structures. The structures can then be dragged onto other areas of your template, or even dragged onto other templates to quickly assign cell properties. This is particularly useful for applying the specific procedure sequence required for your Procedure Chains.
Saved Structures - You can create sets of grid cells that are assigned to specific classes, procedures, and statuses, then save those cells as template structures. The structures can then be dragged onto other areas of your template, or even dragged onto other templates to quickly assign cell properties. This is particularly useful for applying the specific procedure sequence required for your Procedure Chains.
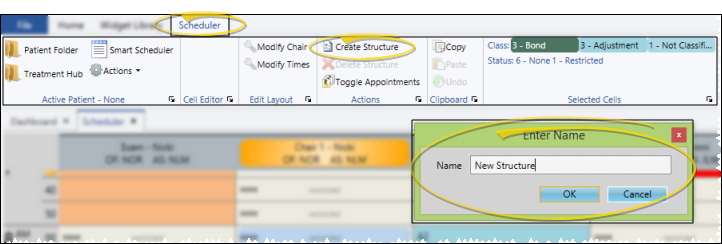
Create a Structure - First, apply properties (such as classes, procedures, statuses, and text) to a set of template cells. Then, select that set of cells and click Create Structure from the Actions section of the Scheduler ribbon bar. Enter a descriptive name and click Ok. Saved structures can be used on any template, not just the one you are currently working with.
Click an individual cell you want to work with
Apply a Structure - Drag and drop a structure from the Saved Structures list on the right side of the window to your template to apply all the properties assigned to those cells. If you drag to a location that cannot accommodate the length of time or number of chairs in the structure, your action is ignored.
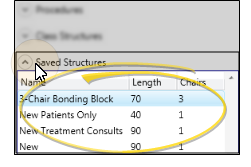
Delete a Structure - Click the structure you want to remove. Then click Delete Structure from the Actions section of the Scheduler ribbon bar. This action does not affect any template cells that contain the structure's properties.
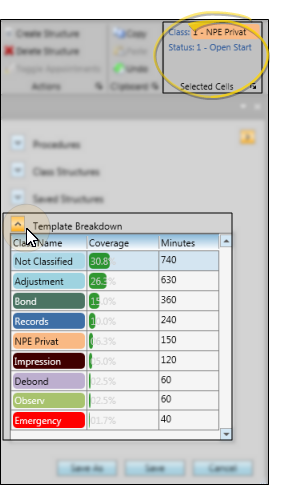
![]() Template Review - The assigned class and status of the cell(s) you are working with appear in the Selected Cells section of the Scheduler ribbon bar. In addition, you can review the template stats, including the class name, percentage of the template that is covered by the class, that the total number of minutes assigned to each class, in the Template Breakdown section on the right side of the window.
Template Review - The assigned class and status of the cell(s) you are working with appear in the Selected Cells section of the Scheduler ribbon bar. In addition, you can review the template stats, including the class name, percentage of the template that is covered by the class, that the total number of minutes assigned to each class, in the Template Breakdown section on the right side of the window.
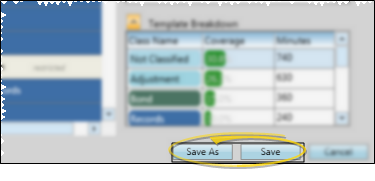
![]() Save Changes - Click Save at the bottom of the window to save changes you make to your template. Or, if you ware working with global templates, you can click Save As to create a new template from the changes, leaving the original template unchanged. If you were working with a template you created or edited from the Scheduler Templates editor, you return to the editor after saving your changes. If you were working with the template for a specific date, you return to your scheduling screen after saving.
Save Changes - Click Save at the bottom of the window to save changes you make to your template. Or, if you ware working with global templates, you can click Save As to create a new template from the changes, leaving the original template unchanged. If you were working with a template you created or edited from the Scheduler Templates editor, you return to the editor after saving your changes. If you were working with the template for a specific date, you return to your scheduling screen after saving.
Existing Appointments - If previously scheduled appointments do not fit onto your modified template, they will be moved to your Scheduler Bar automatically to await re-scheduling. See "Scheduler Bar" for details. OR