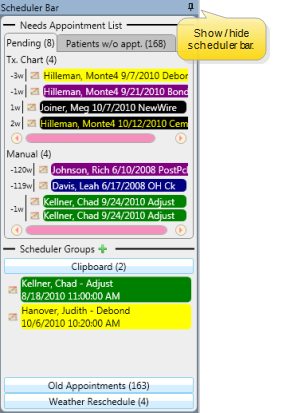
Scheduler Bar
Needs Appointment List; Scheduler Group Clipboards; Sooner if Possible List; Old Appointments List
The
Watch the movie. (A valid Ortho2 customer login is required to run video tutorials, webinars, and training programs.)
The Scheduler bar appears on either the right or left side of your Scheduler window, depending upon your Visuals Scheduler User Options: If you don't see it, hover over the scheduler bar header to slide it into. You can then click the pin icon to toggle whether to keep the scheduler bar on your screen. Edge Cloud will remember your most recent setting when you exit and re-open the Scheduler.
![]() Apply / Remove Appointment Filters
Apply / Remove Appointment Filters
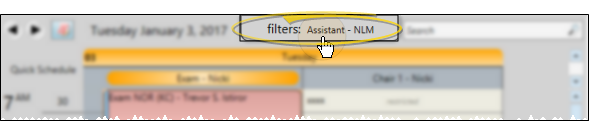
If you have applied one or more filters to your Scheduler bar, only the appointments and patients that match those filters will appear. Your Scheduler bar can use either the same filters as your Scheduler grids, or you can choose different filters for it.
Click the filter bar at the top of your scheduling grid to show your choices.
Choose whether to sync the filters with the Scheduler bar.
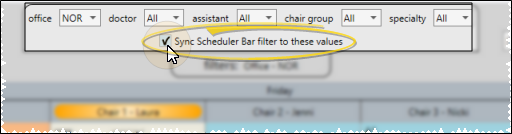
Select the filter(s) to use for your Scheduler grids.
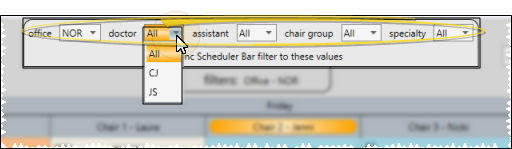
If you do not sync filters, you can choose different filters for the Scheduler bar.

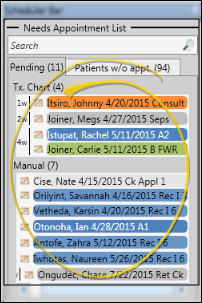
The Needs Appointment
Click the Clipboard scheduler group heading to open your appointment clipboard. You can use the clipboard to temporarily store appointments that you need to reschedule. You can add and reschedule patients from this board as needed, as well as activate patients, open patient folders, and review and edit appointment details.
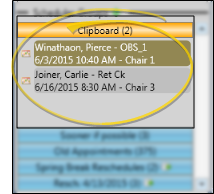
Add a Patient - Drag and drop a patient appointment from your Scheduler onto the board. You have the option of recording the change in the patient's appointment history. If you choose not to record the change, the appointment will appear on the scheduler bar board, but will not appear anywhere in the patient's appointment history until you reschedule or remove the appointment.
Search for New Appointment - Right-click a patient name in the board and select Search for Appointment, or click the  Scheduler icon beside the patient name, to open the Smart Scheduler for that patient.
Drag & Drop to Schedule - You can drag and drop a patient from the board onto an appointment time slot in your schedule. Any related
Activate a Patient - Double-click a patient name, or right-click and select Activate to activate the patient in your Scheduler. You can then use any of the tools listed in the Active Patient section of the Scheduler ribbon bar, such as open the patient folder, post a payment, or review the appointment history. (See "Your Scheduler" for details about using the Active Patient ribbon bar options.)
Review Appointment Properties - Hover over a patient name in the board to display patient and appointment details, including the patient name, original appointment procedure, date, and time, and contact information.
Edit Appointment Details - Right-click a patient name in the board and select Edit to update the appointment details, including the procedure, appointment length, and reminder. You can also enable / disable the Sooner if Possible option to add / remove the patient from your Sooner if Possible scheduler board.
Open a Patient Folder / Treatment
Go to Scheduler Date - Right-click a patient name in the board, and select Go To Date to open your Scheduler to the date of the patient's original appointment.
Remove an Appointment - Right-click a patient name and select Remove from Scheduler Group to remove the appointment from the board; the appointment will be added to the Deleted section of the patient's appointment history.
Click the Old Appointments scheduler bar heading to open your Old Appointments list. Patients are placed on the Old Appointments list automatically whenever they have an unprocessed appointment in the past. You can activate patients, open patient folders, review appointment details, and process appointments directly from this board.
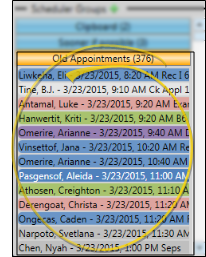
Adding Patients - You cannot manually add patients to the Old Appointments list: Patients with unprocessed appointments are added automatically.
Review Appointment Properties - Hover over a patient name in the board to display patient and appointment details, including the patient name, original appointment procedure, date, and time, and contact information. You cannot change appointment details from the Old Appointments scheduler bar..
Activate a Patient - Double-click a patient name, or right-click and select Activate to activate the patient in your Scheduler. You can then use any of the tools listed in the Active Patient section of the Scheduler ribbon bar, such as open the patient folder, post a payment, or review the appointment history. (See "Your Scheduler" for details about using the Active Patient ribbon bar options.)
Process the Appointment - Right-click a patient name in the board, and select the appropriate appointment processing status (i.e. missed or kept). The patient will be removed from the board automatically.
Go to Scheduler Date - Right-click a patient name in the board, and select Go To Date to open your Scheduler to the date of the patient's original appointment.
Open a Patient Folder / Treatment
Click the Sooner if Possible scheduler bar heading to open your Sooner if Possible list. As you schedule a patient appointment, you can enable the Sooner If Possible option to place the patient on your Sooner if Possible list, making it easier for you to fill appointment slots that become open due to cancellations. You can activate patients, open patient folders, review and edit appointment details, and remove patients from the Sooner if Possible list directly from this board.
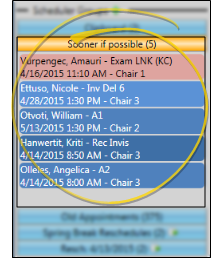
Add a Patient - You add patients to this board by enabling the Sooner if Possible flag as you schedule the patient appointment. You can also enable / disable the Sooner if Possible option by right-clicking an appointment in another scheduler bar, or in your Scheduler, Patient Information Panel, Treatment
Go to Scheduler Date - Right-click a patient name in the board, and select Go To Date to open your Scheduler to the date of the patient's original appointment.
Activate a Patient - Double-click a patient name, or right-click and select Activate to activate the patient in your Scheduler. You can then use any of the tools listed in the Active Patient section of the Scheduler ribbon bar, such as open the patient folder, post a payment, or review the appointment history. (See "Your Scheduler" for details about using the Active Patient ribbon bar options.)
Review Appointment Properties - Hover over a patient name in the board to display patient and appointment details, including the patient name, original appointment procedure, date, and time, and contact information.
Edit Appointment Details - Right-click a patient name in the board and select Edit to update the appointment details, including the procedure, appointment length, and reminder. You can also enable / disable the Sooner if Possible option to add / remove the patient from your Sooner if Possible scheduler board.
Open a Patient Folder / Treatment
Remove a Patient - To remove a patient from the Sooner if Possible board without deleting the scheduled appointment, right-click the patient and choose Remove From Sooner if Possible, or choose Edit and disable the Sooner if Possible option. The patient is automatically removed from the board when you re-schedule or process the scheduled appointment.
When you replace a template for a date that already has appointments scheduled, and the Scheduler is unable to re-schedule certain appointments onto the new template, those appointments are automatically placed on a Rescheduled Appointment board in your scheduler bar. The board heading includes the original appointment date. You can reschedule patients from this board as needed, as well as activate patients, open patient folders, review and edit appointment details, and remove patients from the board. In addition, you can attempt to reschedule all appointments on the board to the currently selected Scheduler date. When all patients have been removed from the board, it is deleted automatically.
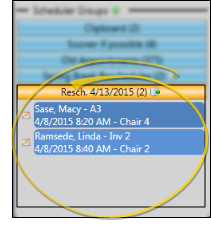
Adding Patients - Patients are added to this list automatically when you replace a template for a scheduled date.
Search for New Appointment - Right-click a patient name in the board and select Search for Appointment, or click the Scheduler icon beside the patient name, to open the Smart Scheduler for that patient.
Drag & Drop to Schedule - You can drag and drop a patient from the board onto an appointment time slot in your schedule. Any related
Activate a Patient - Double-click a patient name, or right-click and select Activate to activate the patient in your Scheduler. You can then use any of the tools listed in the Active Patient section of the Scheduler ribbon bar, such as open the patient folder, post a payment, or review the appointment history. (See "Your Scheduler" for details about using the Active Patient ribbon bar options.)
Review Appointment Properties - Hover over a patient name in the board to display patient and appointment details, including the patient name, original appointment procedure, date, and time, and contact information.
Edit Appointment Details - Right-click a patient name in the board and select Edit to update the appointment details, including the procedure, appointment length, and reminder. You can also enable / disable the Sooner if Possible option to add / remove the patient from your Sooner if Possible scheduler board.
Open a Patient Folder / Treatment
Go to Scheduler Date - Right-click a patient name in the board, and select Go To Date to open your Scheduler to the date of the patient's original appointment.
Remove an Appointment - Right-click a patient name and select Remove from Scheduler Group to remove the appointment from the board; the appointment will be added to the Deleted section of the patient's appointment history.
Reschedule All Appointments - Click the  Reschedule icon in the scheduler group header to attempt to reschedule all of the appointments on the board onto the currently selected Scheduler date. Only appointments that can find a time slot that exactly fits the time, length, and chair will be reappointed. Any appointments that cannot find a suitable time slot will remain on the scheduler group board.
In addition to using the clipboard, you can create additional scheduler group boards to temporarily store appointments. You can add and reschedule patients from this board as needed, as well as activate patients, open patient folders, and review and edit appointment details. In addition, you can attempt to reschedule all appointments on the board to the currently selected Scheduler date, and delete empty user-created boards.
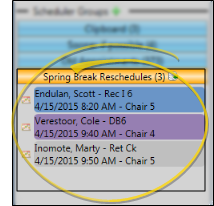
Add a User-Created Board - Click the  Add icon in the Scheduler Groups header. Then type a name for your board and click Save.
Delete a User-Created Board - You can only delete empty user-created grid bar boards. To do so, click the  Delete icon in the board heading, then click Yes to confirm your action.
Add a Patient - Drag and drop a patient appointment from your Scheduler onto the board. You have the option of recording the change in the patient's appointment history. If you choose not to record the change, the appointment will appear on the scheduler bar board, but will not appear anywhere in the patient's appointment history until you reschedule or remove the appointment.
Search for New Appointment - Right-click a patient name in the board and select Search for Appointment, or click the Scheduler icon beside the patient name, to open the Smart Scheduler for that patient.
Drag & Drop to Schedule - You can drag and drop a patient from the board onto an appointment time slot in your schedule. Any related
Activate a Patient - Double-click a patient name, or right-click and select Activate to activate the patient in your Scheduler. You can then use any of the tools listed in the Active Patient section of the Scheduler ribbon bar, such as open the patient folder, post a payment, or review the appointment history. (See "Your Scheduler" for details about using the Active Patient ribbon bar options.)
Review Appointment Properties - Hover over a patient name in the board to display patient and appointment details, including the patient name, original appointment procedure, date, and time, and contact information.
Edit Appointment Details - Right-click a patient name in the board and select Edit to update the appointment details, including the procedure, appointment length, and reminder. You can also enable / disable the Sooner if Possible option to add / remove the patient from your Sooner if Possible scheduler board.
Open a Patient Folder / Treatment
Go to Scheduler Date - Right-click a patient name in the board, and select Go To Date to open your Scheduler to the date of the patient's original appointment.
Remove an Appointment - Right-click a patient name and select Remove from Scheduler Group to remove the appointment from the board; the appointment will be added to the Deleted section of the patient's appointment history.
Reschedule All Appointments - Click the Reschedule icon in the scheduler group header to attempt to reschedule all of the appointments on the board onto the currently selected Scheduler date. Only appointments that can find a time slot that exactly fits the time, length, and chair will be reappointed. Any appointments that cannot find a suitable time slot will remain on the scheduler group board.
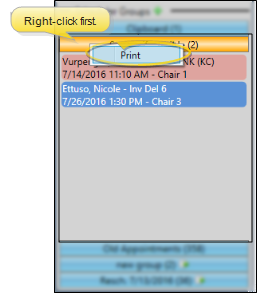
Right-click the scheduler bar heading, or right-click a blank space within the scheduler bar panel to print the contents of that list. (You cannot print the Needs Appointment list in this way: Instead, print the Needs Appointment report. (See "Needs Appointment Report" for details.)
Clicking the  Print icon from your Quick Access toolbar prints the currently displayed scheduling grid, not the scheduler bar.