Use the Allocation tab of the Contract Structure editor to specify the amount each billing party and insurance member is responsible for. Note that this tab is available only when two or more responsible parties and/or insurance details are assigned to the contract.
How to Get Here
Open patient finance page - Open patient > Finance page.
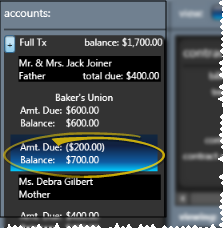
Choose contract - Select a contract from the list at the left of the window. If the contract group you want is collapsed, click the [+] button to expand it so you can see all the billing names. (See "View Patient Finances" for details.)
Launch Contract Structure editor - Choose Contract Structure from the Patient ribbon bar.
(This option is not available when you have selected to work with a partial contract, that is, a treatment phase that has charge and/or payment transactions but no formal contract created.)
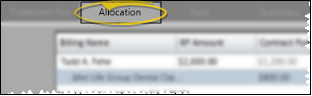
Open Allocation tab - Click the Allocation tab at the top of the Contract Structure editor.
Use This Feature
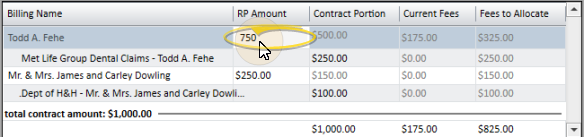
Manually adjust allocation amounts - You can manually adjust the total contract obligation among all contract members by entering the amounts in the billing grid at the top of the window. Click the name of the contract member you want to work with, then enter the appropriate amounts.
RP Amount - Enter the amount the billing party is responsible for in the RP Amount field for that billing party, including any associated insurance allowance.
Contract Portion - If the party does not have insurance, the RP Amount field will equal the Contract Portion field. If the party has insurance, enter that amount in the Contract Portion field of the insurance detail. The Contract Portion field of the billing party adjusts automatically so that the sum of the Contract Portion fields equal the RP Amount field.
Current Fees / Fees to Allocate - The Current Fees column shows you how much money has already been allocated to a payment plan for this party. The Fees to Allocate column shows you how much money still needs to be allocated to a payment plan. The sum of the Current Fees column and the Fees to Allocate column equals the Contract Portion column for that party. See "Adjust Contract Fees & Schedules" for details about setting up payment plans.
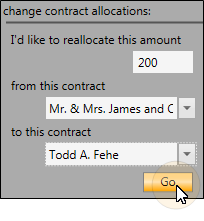
Use reallocation tool - Instead of manually entering allocation amounts, you can use the allocation tool at the left of the window to adjust the financial obligations of your contract members.
Enter reallocation amount - Enter the amount you want to move from one party to another.
Select where to take the money from - This is the contract from which you want to subtract the reallocated amount. You can select any billing party or insurance detail associated with the contract.
Select where to put the money - This is the contract to which you want to add the reallocated amount. Again, you can select any billing party or insurance detail associated with the contract.
Apply changes - Click Go at the bottom of the reallocation tool to apply the changes. The amounts in the billing grid at the top of the window will be updated to the new amounts.
Review & save - The right side of the Allocation window displays the changes you are making to the contract. In addition, you can go to the Summary tab to compare the details of the original payment schedule with your proposed changes. Once you click Save at the bottom of the Contract Structure editor, your changes become permanent and the summary is reset so that your new payment schedule is considered the "original". See "Review & Save Contract Structure" for details.
More Information
These transactions appear in the Changed Treatment Fees section of your Transaction report.
 Open patient >
  Finance page.