After selecting the electronic insurance forms you want to submit, use the Electronic Insurance integration to review and upload the claims.
Flag Claims to be Re-Submitted - If you have insurance claims that were uploaded, but then rejected by the clearinghouse or insurance company and need to be sent as re-submissions, go to the Insurance detail page of the patient folder, and set the Claim Submission Reason field in the Electronic Submission section of the window to Corrected. The claim will then be marked as a re-submission, rather than a first-time submission.
Accumulate Electronic Insurance Forms to Upload - Depending on your office protocol, you may accumulate electronic insurance claims throughout the day or week. You then choose to upload the pending claims to the processing clearinghouse as described below. See "Electronic Insurance Forms" for details
Home Ribbon Bar![]() -
-  Electronic Claims. In addition, the Electronic Insurance window opens whenever you initiate an electronic insurance form for a patient.
Enable Submit Electronic Claims Option![]() - Click to enable the Submit Electronic Claims option at the top of the Electronic Insurance window, if needed.
- Click to enable the Submit Electronic Claims option at the top of the Electronic Insurance window, if needed.
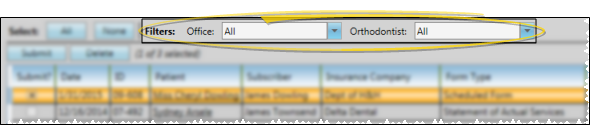
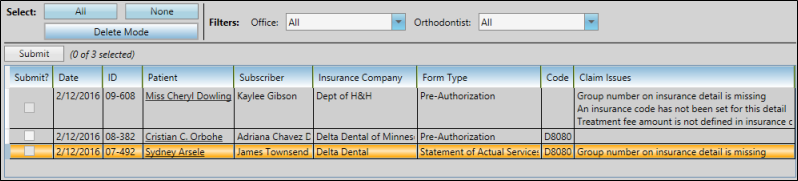
Filter Claims to Review![]() - Use the Office and Orthodontist filters to review only certain claims, or select to view all pending claims.
- Use the Office and Orthodontist filters to review only certain claims, or select to view all pending claims.
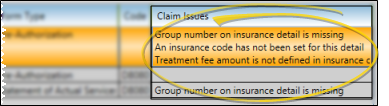
Claim Errors![]() - To avoid rejections, you cannot submit claims that are missing required information. The Claim Issues column lists the corrections you must make before the claim would be accepted. You will need to correct the information, delete this claim from the list (as described below), and re-select it for submission before uploading the claim to the processing clearinghouse.
- To avoid rejections, you cannot submit claims that are missing required information. The Claim Issues column lists the corrections you must make before the claim would be accepted. You will need to correct the information, delete this claim from the list (as described below), and re-select it for submission before uploading the claim to the processing clearinghouse.
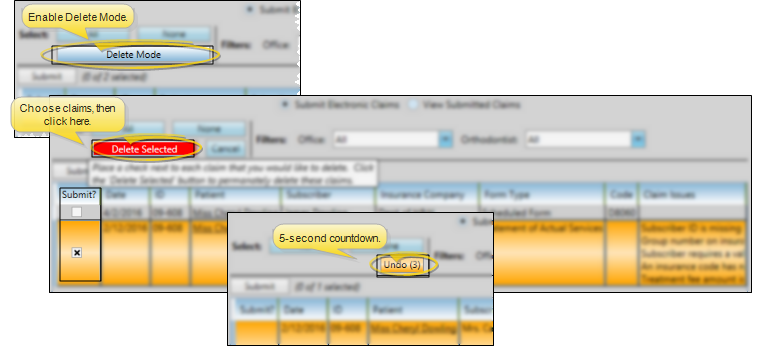
Delete Claims![]() -
-  Delete beside an individual claim you want to remove from the list (such as claims with errors in the Claim Issues column). Or, click to select multiple claims, and click the Delete button at the bottom of the window to remove them all from the list.
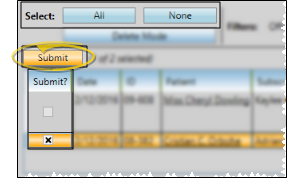
Select Claims ![]() and Submit - You can select claims individually by checking the box beside the claim, or choose Select All or Select None.
and Submit - You can select claims individually by checking the box beside the claim, or choose Select All or Select None.
Electronic Insurance Notices - As your insurance claims are being uploaded, You will see messages pop up in your system tray to indicate that the claims were successfully received, and that they have been added to each patient's Correspondence History.
DentalXChange Web Site - Submitting electronic claims also opens the DentalXChange web site. You may log into the web site if you wish, or simply close your browser: Your electronic claims are uploaded either way.
Verify Transmission - It is important to verify that your claims have been submitted successfully. Twenty four hours is usually required for feedback on your claims to be posted.See "Review Electronic Claims Online" for details.
Correct Errors and Resubmit - After submitting electronic claims, be sure to clean up any transmission or records errors, and re-submit if needed. See "Correct and Resubmit Electronic Claims" for details.
 │
│
Ortho2.com │1107 Buckeye Avenue │ Ames, Iowa 50010 │ Sales: (800) 678-4644 │ Support: (800) 346-4504 │ Contact Us
Remote Support │Email Support │New Customer Care │ Online Help Ver. 8/3/2015