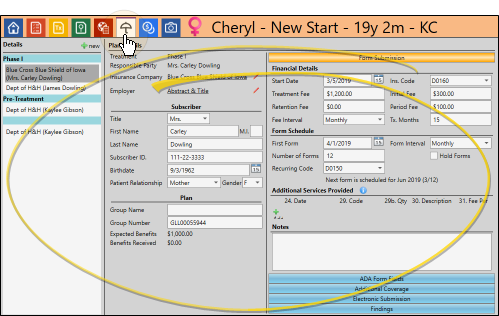
The Insurance detail page of the patient folder contains information about the patient's insurance coverage for each treatment phase and contract.
Get Started
Assign Insurance Plans - You assign insurance plans to the patient on the Responsible Party page of the patient folder. See "Responsible Party Page" for details.
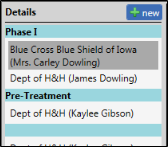
Choose Record to Work With - Your list of existing records appears at the left. Click the record to work with. The details for that record appear at the right. Since each insurance detail record is associated with a single treatment phase and contract, it is very common for a patient to have multiple records.
Create a New Record - Generally, you do not need to create insurance detail records manually. Whenever you include a responsible party's insurance plan as a member of a financial contract, a new insurance detail record is created automatically. You must, however, open the insurance detail record to complete the form submission fields as needed. However, if you assign all insurance benefits directly to the patient, you will not include insurance companies as contract members, and you will need to create Insurance Detail records manually. This will provide a way for you to submit insurance forms on behalf of the patient.
To create an Insurance Detail record, first confirm the patient's treatment phase is correct.
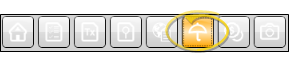
Click New at the top of the Details list, and select the responsible party, contract, or insurance company to assign to the record. (Note that the contract option appears only when the patient's current treatment phase has multiple active contracts.) You can then enter the plan details, described below.
You can alternately click the File ribbon bar, then select New, (or press Ctrl-N on your keyboard) and choose New Insurance Detail. From there, you choose the patient to work with.
Delete Empty Insurance Details - If you create an insurance detail record in error, you can remove it by clicking Del at the top of the records list. For an insurance detail to be available for removal, no charges or receipts can ever have been posted to the associated contract, and no electronic submissions can ever have been submitted against the detail. When you delete the insurance detail, the associated contract (if any) is deleted also. Note that the Del option is available only when you have selected an insurance detail that is available for removal.
Plan Details
After choosing the record to work with, you can review and edit the company, subscriber, and benefits details on the left-hand side of the insurance detail record.
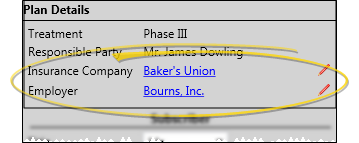
Company & Employer - Choose the insurance company and employer for this insurance detail. The treatment and responsible party are selected when you create the plan, and cannot be changed.
Static data - You cannot change the treatment phase or responsible party associated with the record.
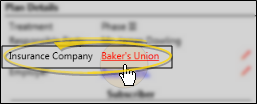
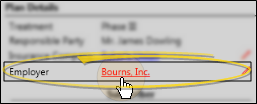
Open Editors - Click the insurance company or employer name to open the corresponding editor, where you can make changes to the address and other company information, as well as view associated correspondence.
Change Assignment - Click the Edit icon to change the insurance company and/or employer associated with this insurance detail record. This does not change the employer assigned to the Responsible Party page of the patient folder.
Electronic Insurance Requires Employer - If you submit insurance forms electronically, the Employer field must have a valid response. For this purpose, you might want to create a Self record in your Employer table.(See "Set Up Employer Records" for details.)
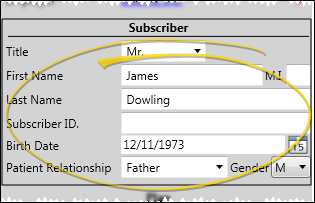
Subscriber Details - Identify the relationship among the patient, responsible party, and insurance company.
Subscriber - Enter the Subscriber name as it should appear on insurance forms. Initially, this field defaults to the responsible party name. However, you may change it as needed without changing the responsible party name, and vice versa.
Subscriber
ID - Enter the identifying number the insurance company has assigned
to the subscriber. In the past, the social security number was the standard identifier. However, more
and more companies are assigning an alternate, unique number. When you create an Insurance Detail record for a new treatment phase, and the responsible party already had an Insurance Detail record from a previous treatment phase, the subscriber ID and birthdate are copied to the new record automatically.
Birthdate - Enter the subscriber's birthdate, not the patient's birthdate here. This date is often a required field, and is used for determining the primary coverage when multiple insurance companies are involved in the patient's care. When you create an Insurance Detail record for a new treatment phase, and the responsible party already had an Insurance Detail record from a previous treatment phase, the subscriber ID and birthdate are copied to the new record automatically.
Relationship - Select the relationship between the subscriber and the patient from the available responses. Note that this
field is not linked to the relationship field on the Responsible tab of the patient folder. Electronic insurance requirement - If the relationship is Self, the subscriber name and the patient name must match exactly.
Gender - Indicate the subscriber's gender, not the patient's gender, in this field.
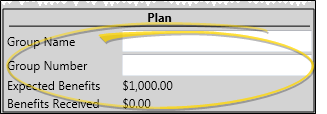
Insurance Page-Specific - Changing these fields does not change the insurance plan details on the Responsible Party page of the patient folder, or in the Insurance or Employer editors.
Electronic Insurance Requirement - If you submit insurance forms electronically, the Group No. field must have a valid response. If no group number is available, enter 999999 in this field.
Benefits - The Expected Benefits and Benefits Receivedamounts come directly from the financial contract associated with this plan, and any payments that have been posted to it, and cannot be changed.
Form Submission Details
Click the Form Submission bar to view and change the financial data, additional services provided, and notes regarding this insurance coverage.
Financial details - Enter the dates and amounts to appear on insurance forms submitted for this financial contract. Note that the dates and amounts are not linked to the contract, and must be entered manually. Only certain fields are required for certain types of insurance forms.
Start date (Not required for miscellaneous charge, pretreatment or partial forms) - Enter the date the patient began treatment at your office. This field is not linked to the start date field in the patient contract or the patient findings.
Insurance code - Select the appropriate ADA code for this patient's treatment. See "Set Up Insurance Codes" for details. Note that you can override this code with the Recurring Code field in the Form Schedule section of this window (described below), for scheduled continuation of treatment forms. All other insurance forms will include the code you select here.
Contract details - Enter the treatment fee, initial fee, retention fee, and period fee amounts, as well as the payment period and expected number of treatment months as you want them to appear on insurance contracts. These fields are not linked to the contract and must be entered manually.
Forms schedule - Set up the interval at which this insurance plan should receive periodic continuation of treatment forms. You can also suspend form generation if needed.
Schedule forms (Required for generating Scheduled insurance forms) - Use the First Form date, Form Interval, and Number of Forms fields to schedule regular continuation of treatment forms for this insurance plan.
Recurring code (Optional.) - Choose the insurance code to use specifically for the scheduled continuation of treatment forms. If you enter a code in this field, it will override the Insurance Code field in the Financial Details section of this window (described above).
Hold forms - Enable this option to suspend generating Scheduled Forms for this insurance plan. Be sure to uncheck the box when you are ready to re-instate the schedule.
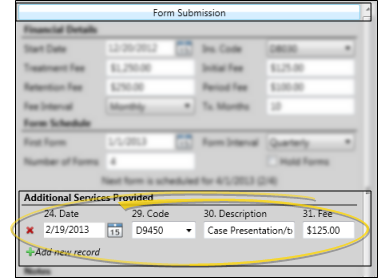
Additional services provided - Specify additional services and fees you have provided for the patient, without charging the fees to a patient contract. You can then generate a Statement of Actual Services insurance form to bill the insurance company for the service.
Add new service - Click Add new record to add a new record of service. You then enter the date of service, insurance code (from your Insurance Codes editor), and fee. The description is entered automatically, according to the code you supply, but you can edit it if needed.
Delete a service - Click Delete beside the services record you want to remove.
Special considerations - Since all existing Additional Services Provided records are included whenever you generate a Statement of Actual Services insurance form for this insurance plan, you will want to delete the records once the insurance form has been generated. (If there are no Additional Services Provided records, the Statement of Actual Services form will print for the contract data found in the Financial Details section of the insurance detail page, described above.)
Because copies of insurance forms are saved in the patient's Correspondence History, a record of the additional services provided will remain available to you, even after the service record has been deleted, as long as you have generated an insurance form for that service.
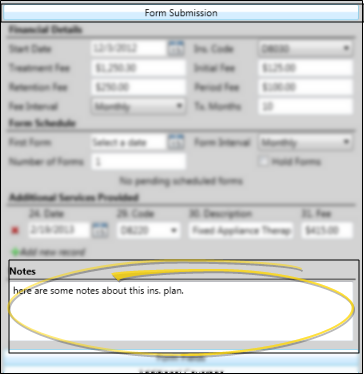
Notes - Type notes specific to this insurance record in this box. This text is for internal-use only, and does not appear on any forms.
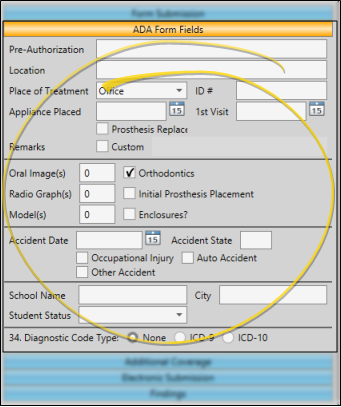
Form Field Details
Click the Form Fields bar to view and change the additional fields required to submit a claim for orthodontic services.
Pre-Authorization - Enter the pre-authorization number for this claim, if any.
Location - (AAO forms only.) Enter the information you would like printed in field 12 Location
(Local) of the AAO insurance form.
Place of treatment / ID# - Select the type of facility where treatment occurs, and enter the identification number of that facility.
First visit / appliances placed dates - These fields are used for insurance forms only, and are not linked to any other patient folder field.
Prosthesis replacement / prior placement date - If you enable the Prosthesis Replacement option, the prior placement date will appear. This information prints in fields 43 and 44 of the ADA 2012 insurance form.
Custom remarks - If you enable the Custom Remarks option, you can type a unique response that will print in box 35 of your ADA insurance forms.
Claim options - Enable the Orthodontics option, and any other option appropriate for this claim, indicating the number of radiographs, models, or images you are sending with this form, if any. Note that the Enclosures option links to line 39 of the ADA 2012 insurance form.
Accident information - Complete these fields if applicable.
School fields - Enter the patient's current academic situation, if applicable. These fields are not linked to any other School fields in the patient folder.
Diagnostic code type - Select the type of diagnosis code to include on line 34 of insurance forms generated for this patient, or choose None to omit the code from the form. (See "Set Up Insurance Codes" for details.) If you enable either ICD-9 or ICD-10, additional fields become available for you to enter up to four codes.
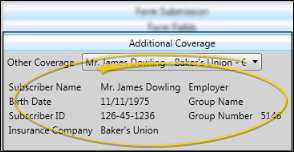
Additional Coverage Information
Click the Additional Coverage bar to identify the patient's other insurance coverage, if any. This field is available only when multiple Insurance Detail records are assigned to the same contract as the Insurance Detail record you are working on.
Other coverage - Select the other insurance coverage for this contract. Edge will auto-fill the subscriber details from the Insurance Detail record of the insurance plan you select.
Edit corresponding insurance detail - Note that you will also need to assign this Insurance Detail record to the Other Coverage field of the Insurance Detail record you selected.
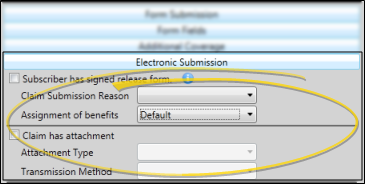
Electronic Submission Details
Click the Electronic Submission bar to enter details about filing electronic claims for this insurance plan. If you print and mail paper forms, you can ignore this tab.
Subscriber has signed release form - Enable this option when you have a signed copy of the release form that allows you share information about the patient in order to submit the claim. You cannot submit electronic claims until this field has been enabled.
Claim submission reason - Select the reason for generating this insurance form, specifying whether it is an original submission, a corrected claim, a replacement, or void. Be sure to flag this field as corrected before re-submitting a rejected insurance form. See "Correct and Resubmit Electronic Claims" for details.
Assignment of benefits - Select whether the proceeds from the insurance should come to the doctor, or go directly to the patient. If you select the Default response, the assignment of benefits is determined by your Insurance Setup editor. (See "Set Up Insurance Submission Defaults" for details.)
Claim Attachment - Enable the Claim has attachment option, then select the type of attachment you are sending, such as dental models, films, referral forms, or certain reports, and the method you will use to send the attachment, such as mail, e-mail, or fax. Note that the attachments are not sent automatically: You must manually send them as needed.
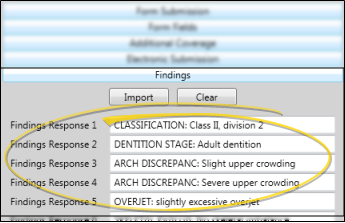
Findings Information
Click the Findings bar to enter details to be included in the Narrative Description fields of your Pre-treatment Estimate and Statement of Actual Services insurance forms, as well as electronic submissions. Generally, these fields are used to provide a treatment narrative, but you may enter any additional information required by the insurance company as needed.
Manually add text - You may click in a field and type a unique response.
Import treatment findings - (Warning: This function will overwrite existing responses on this page!) Click Import to import data from the Findings tab of the patient folder into the fields on this page. This function imports the findings responses assigned to the phase that matches the phase assigned to this insurance detail record. Only categories flagged as Include on Insurance Forms in your Findingseditorare imported. If the patient has more than 14 flagged findings responses, additional responses are ignored.
Clear - Click Clear to erase all responses on this page. As a precaution, you must confirm your action before continuing.
Canadian Pre-Authorization form - When you generate Canadian Pre-Authorization forms, enable the Use Insurance Detail Data to print the fields on this page, or disable the option if you want to type the treatment narrative as the forms print.
More Information
Save Changes Click Save in your Quick Access toolbar or File ribbon bar (or press Ctrl+S on your keyboard) to save any changes you have made.
Insurance Data Links - Insurance plan details are linked in your Employer editor, Insurance Company editor, and the Responsible Party page of your patient folders. When you make a change in one place, the change affects the others automatically. However, Insurance Detail records in your patient folders are not linked: Changes to Insurance Detail records do not affect the other records, and vice-versa.
Submit Insurance Claims - Run Insurance forms to generate and submit your patients' insurance claims either on plain paper with an approved laser printer, or electronically. Choose from a variety of formats and form types.
Work with Patient Folders Edge includes several tools for working within your patient folders, regardless of which page is currently selected.
View Patient Information Panel - The Patient Information Panel contains patient treatment, biographical, and contact information. You can personalize the panel to include additional widgets you refer to most often. The panel always appears on the left side of the patient's Home page. You can optionally hide / show the panel on all other patient folder pages. See "Patient Information Panel" for details.
Resize Header - Click the bar between the patient folder header and the information panel to change the space allotted to each section.
Reposition / Close Tabs - Right-click the page header to close, reposition, rearrange, or resize the window. Tell me more...
Re-Open Patient Folder - Click Other Actions then select Reopen from the Patient ribbon bar to open a second session of the patient folder. If you have multiple screens, you can then drag one of the folder tabs to another screen. This feature is particularly useful for systems with dual monitors that want to keep the patient folder information available while viewing images (or any other page of the patient folder) on another screen.
Refresh - Click Refresh on the Quick Access toolbar (or press F5 on your keyboard) to refresh the data on your screen.
 Insurance page. (See "Open Patient Folders" for details about opening a patient folder.)
 Del at the top of the records list. For an insurance detail to be available for removal, no charges or receipts can ever have been posted to the associated contract, and no electronic submissions can ever have been submitted against the detail. When you delete the insurance detail, the associated contract (if any) is deleted also. Note that the Del option is available only when you have selected an insurance detail that is available for removal.
 Save in your Quick Access toolbar or File ribbon bar (or press Ctrl+S on your keyboard) to save any changes you have made.
 │
│


 New at the top of the Details list, and select the responsible party, contract, or insurance company to assign to the record. (Note that the contract option appears only when the patient's current treatment phase has multiple active contracts.) You can then enter the plan details, described below.
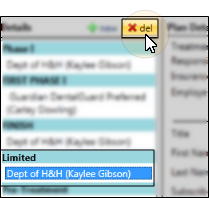
 Edit icon to change the insurance company and/or employer associated with this insurance detail record. This does not change the employer assigned to the
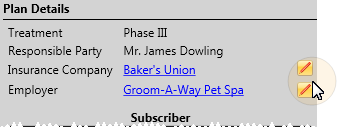


 Other Actions then select
  Reopen from the Patient ribbon bar to open a second session of the patient folder. If you have multiple screens, you can then drag one of the folder tabs to another screen. This feature is particularly useful for systems with dual monitors that want to keep the patient folder information available while viewing images (or any other page of the patient folder) on another screen.
 Refresh on the