Findings Panel - (History only.)You can also view the findings history from the Findings panel of the patient folder Home page. See "View Findings History " for details.
Use This Feature
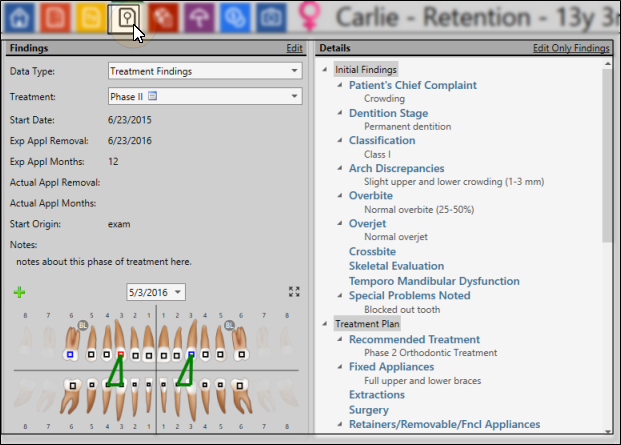
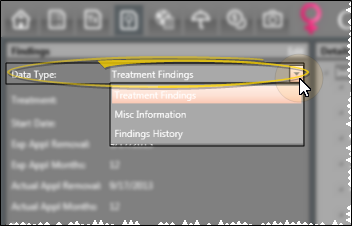
Data Type Select to review the patient's Treatment Findings, Miscellaneous Information, or Findings Historyresults. The fields at the right change to reflect the type of data you have selected.
Treatment Findings - Use the Treatment Findings data type to track your patients' medical and orthodontic findings.
Misc. Information - Use the Miscellaneous Information data type to track additional non-medical information about the patient.
Findings History - Select the Findings History data type to view a side-by-side comparison of the patient's treatment findings so far. You can also click an image link from within the history to open the patient's Imaging page, with the selected image maximized. You cannot edit responses from this data type. (You can also view this data from the Findings panel of the patient folder Home pager. See "View Findings History " for details.)
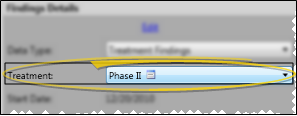
Treatment Phase (Treatment Findings data only) Your patients' findings are stored by treatment phase to more accurately track treatment progress. Click the Treatment field to select the phase to work with. Only phases that have been previously assigned to the patient are available to you. Note that an icon (i.e. Phase I ) indicates treatment phases that contain responses.
Treatment Dates & Notes ( Treatment Findings data type only.) Each phase of treatment includes a treatment start date, number of expected treatment months, expected appliance removal date, and finally the actual appliance removal date. Although treatment dates appear on the patient's Treatment Hub, you cannot edit them from that page. You can also use workflow activities to automate entering the start date and actual appliance removal date for the patient's current treatment. See "Set Up Workflow Activity Properties" for details.While editing the findings, you can type additional information about this treatment phase in the Notes section at the bottom of the window.
Expand Tooth Chart To expand the tooth chart to full-screen, click the Expand button in the upper-right corner of the chart. Click the button again to minimize the chart. s. See "View & Edit Tooth Chart" for details. about using the tooth chart.
Open Patient Images (Findings History data type only.) While viewing the Findings History, click an image name to maximize the image. (See "Maximize Images" for details about viewing maximized images.)
Copy Data - Click a field in this window, then use the Copy option from the Clipboard section of the Home ribbon bar (or, press Ctrl-C on your keyboard) to copy the data to your clipboard. You can then paste it into another area of Edge, or any text editor (i.e. Notepad or Word). Note that this copies all of the findings and responses, not just the currently selected heading or response.
Edit Patient Findings Click the Edit link at the top of the Findings window to enable editing mode. You can then add and edit the treatment dates, findings responses, and tooth chart for the selected phase of treatment. Alternately, if the Touch Friendly Tx. Findings option of your Visual User Options is enabled, an Edit Only Findings link will also appear at the top-right of the window. You can use the Edit Only Findings link to remove the treatment date and notes section while editing a patient's Findings, which provides more screen space so the findings categories and responses appear larger. This makes it easier to add and edit patient findings with a touch screen device.See "Add / Edit Findings in Patient Folder" for details.
More Information
Work with Treatment Findings Your Edge system includes several reports and tools to help you manage your patient findings.
Print Available Responses Run the Treatment Category report to review the list of responses you have available for inputting into the Findings page of your patient folders. The report includes all headings, categories, short responses, and long descriptions in your Treatment Findings editor. See "Treatment Category Report" for details.
Print Current Patient Findings Run the Patient Findings report to obtain the data you have recorded on the Findingspage of the patient folder for the patient's current treatment phase. You can generate the report for an individual patient or a subgroup, and select which findings to include. See "Patient Findings Report" for details.
Add Findings to Mail Merge Documents You can insert both the short and long descriptions of your patients' treatment findings into your mail merge documents, and print them in either list or paragraph form.See "Insert Findings Variables" for details.
Work with Patient Folders Edge includes several tools for working within your patient folders, regardless of which page is currently selected.
View Patient Information Panel - The Patient Information Panel contains patient treatment, biographical, and contact information. You can personalize the panel to include additional widgets you refer to most often. The panel always appears on the left side of the patient's Home page. You can optionally hide / show the panel on all other patient folder pages. See "Patient Information Panel" for details.
Resize Header - Click the bar between the patient folder header and the information panel to change the space allotted to each section.
Reposition / Close Tabs - Right-click the page header to close, reposition, rearrange, or resize the window. Tell me more...
Re-Open Patient Folder - Click Other Actions then select Reopen from the Patient ribbon bar to open a second session of the patient folder. If you have multiple screens, you can then drag one of the folder tabs to another screen. This feature is particularly useful for systems with dual monitors that want to keep the patient folder information available while viewing images (or any other page of the patient folder) on another screen.
Refresh - Click Refresh on the Quick Access toolbar (or press F5 on your keyboard) to refresh the data on your screen.
 Treatment
 Expand button in the upper-right corner of the chart. Click the button again to minimize the chart. s. See "View & Edit Tooth Chart" for details. about using the tooth chart.
 Copy option from the Clipboard section of the Home ribbon bar (or, press Ctrl-C on your keyboard) to copy the data to your clipboard. You can then paste it into another area of Edge, or any text editor (i.e. Notepad or Word). Note that this copies all of the findings and responses, not just the currently selected heading or response.
 │
│


 Other Actions then select
  Reopen from the Patient ribbon bar to open a second session of the patient folder. If you have multiple screens, you can then drag one of the folder tabs to another screen. This feature is particularly useful for systems with dual monitors that want to keep the patient folder information available while viewing images (or any other page of the patient folder) on another screen.
 Refresh on the