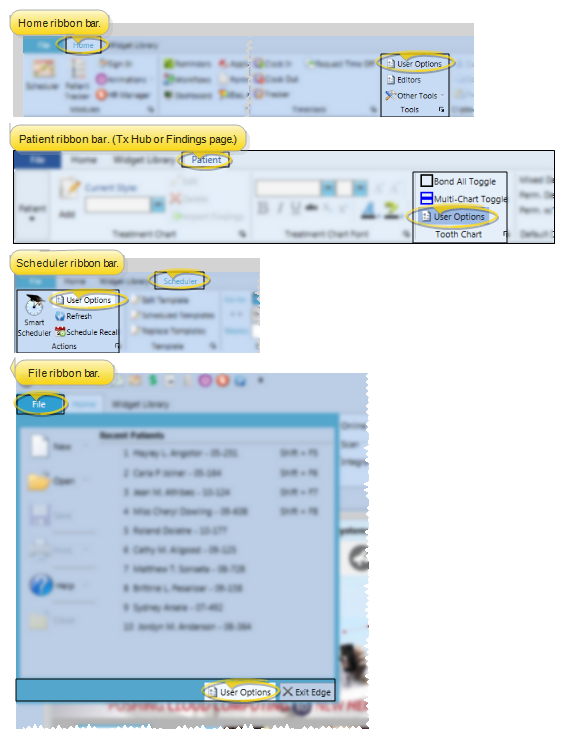
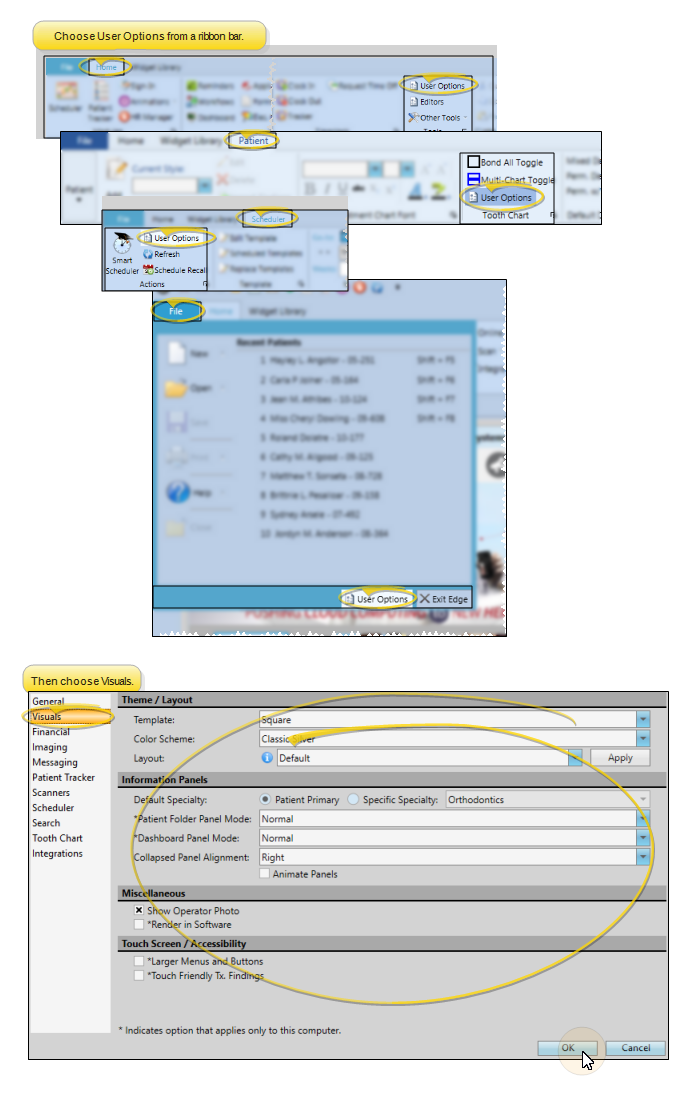
Use the Visuals tab of your User Options to personalize the graphics and colors of your screens, and optimize using Edge on a standard computer monitor, tablet, or touch screen device. Note that certain options may be selected for you automatically when Edge detects that you are using a touch screen.
The options marked with an asterisk ( * ) are specific to this workstation: The remaining options are specific to you - other users that log onto this computer may have other settings. In addition, when Edge detects a system with minimal performance capability, certain visual options may be set automatically to bring performance to an acceptable level.
Theme / Layout Section - Use the Theme / Layout settings of your Visual User Options to set up the graphic design and color scheme for your Edge screens, and apply a layout that optimizes the Edge experience for the type of device you are using.
Template - Choose a graphic design for your Edge screens.
Color scheme - Choose the colors to use with your selected template. Note that if you selected the Default template, you do not have a color scheme choice.
Layout - Use the drop down menu to apply the layout that matches the type of device you are using: A standard computer monitor (Default mode), a Tablet, or a Touch Screendevice. After making your selection, click Apply to save your layout choice, and optimize the remaining Visual option settings for the selected layout. Any settings you have modified are overwritten by the layout's settings. Note that if you select a layout, then click Ok to exit the Visual User Options window without clicking Apply, the layout changes will not take effect.
Information Panels Section - Use the Information Panels settings of your Visual User Options to optimize your Dashboard and patient folder Home page for standard monitors, tablets, and touch screen devices.
Patient Folder Panel Mode - Use this option to determine how the information panels of your patient folder Home page look and behave.
Normal - With this mode enabled, you use the Panels section of the Patient ribbon bar to select which information appears on the patient folder Home page: The more panels you select, the smaller the space available for each panel. You double-click panel headings to toggle expanded / normal view as needed. This mode is enabled by default when you apply either the Default or Touch Screen layout.
Single Expanded - With the Single Expanded panel mode enabled in your Visual User Options, one information panel is always expanded on your screen, and all remaining panels are listed as buttons at the side of the screen. You click or tap to choose the panel to expand. This mode is enabled by default when you apply the Tablet layout.
Dashboard Panel Mode - Use this option to determine how the widget panels of your Dashboard look and behave.
Normal - With Normal mode enabled, your selected widgets appear as panels on your Dashboard: The more widgets you have enabled, the smaller the space available for each panel. You double-click panel headings to toggle expanded / normal view as needed. This mode is enabled automatically when you apply either the Default or Touch Screen layout.
Single Expanded - With Single Expanded mode enabled, one widget panel is always expanded on your Dashboard, and the remaining active widgets are listed as buttons at the side of the screen. You then click or tap to choose the widget panel to expand. This mode is enabled automatically when you apply the Tablet layout.
Collapsed Panel Alignment - Use this option to specify whether the minimized panel buttons on your Dashboard and patient folder Home page appear at the top, bottom, right, or left of the maximized panel. Applying a layout does not affect this option.
Animate Panels - Use this option to enable / disable animation of your Dashboard and patient folder Home page panels. When enabled, the information panels seem to glide into place as you add, remove, expand, or collapse them. Applying a layout does not affect this option.
Miscellaneous Section - Use the Miscellaneous settings of your Visual User Options to enable / disable the operator identification photo and render in software settings.
Show Operator Photo - Choose whether to include a photo of the current operator on your Edge screen. See "Set Up Operator Accounts" for details about uploading photos. Applying a layout does not affect this option.
Render in Software - (Machine setting.) If your Compliance Animations and Edge Animations videos have a strange look to them, such as garbled artifacts showing on an image, enable the Render in Software option. This will render your videos directly in the software, rather than on your monitor's video card, and produce a cleaner-looking result. However, when this option is enabled, you may have a choppier video presentation. Applying a layout does not affect this option.
Touch Screen / Accessibility Section - Use the Touch Screen / Accessibility settings of your Visual User Options to enable / disable features designed to optimize the Edge experience on touch screen devices. All of these options are enabled automatically when you apply either the Tablet or Touch Screen layout, and disabled automatically when you apply the Default layout.
Larger Menus and Buttons - With either the Tablet or Touch Screen layout active, enable this option to apply the Touch Screen ribbon bar template, as well as enlarge the font size of certain drop down menus to make viewing and tapping the screen easier. If the Default layout is active, enabling this option enlarges certain menu fonts, but does not change the ribbon bar. (Note that you can apply the Touch Screen ribbon bar template separately, without enlarging the drop down menu font size, by using the Customize Ribbon tool instead.)
Touch Friendly Tx. Findings - With any layout active, enable this option to include the Edit Only Findings link on the Findings page of the patient folder. You can use the Edit Only Findings link to remove the treatment date and notes section while editing a patient's Findings, which provides more screen space so the findings categories and responses appear larger. This makes it easier to add and edit patient findings with a touch screen device.
Save Your Settings - Click Ok to save any changes to your user options and exit the window.
More Information
User Settings / Assign Options Tool - The settings you choose here are specific to you; Other operators that log into Edge with a different username and password may have different settings. However, you can use the Assign Options tool to copy your settings to other operators (and vice-versa) if needed. (See "Assign Your Settings to Other Users" for details.)
 User Options > Visuals.
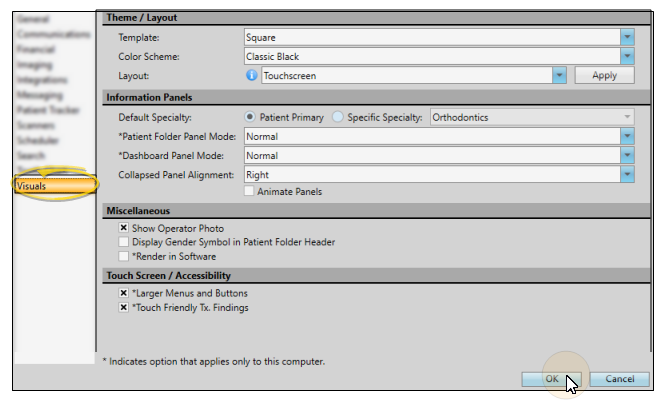
 │
│


 Render in Software option. This will render your videos directly in the software, rather than on your monitor's video card, and produce a cleaner-looking result. However, when this option is enabled, you may have a choppier video presentation. Applying a layout does not affect this option.