You can use subgroups to select the records to include in reports, stacks, mailmerge print jobs, and other tasks. You use your Subgroup Editor to create templates that determine which criteria will be used for including or excluding records.
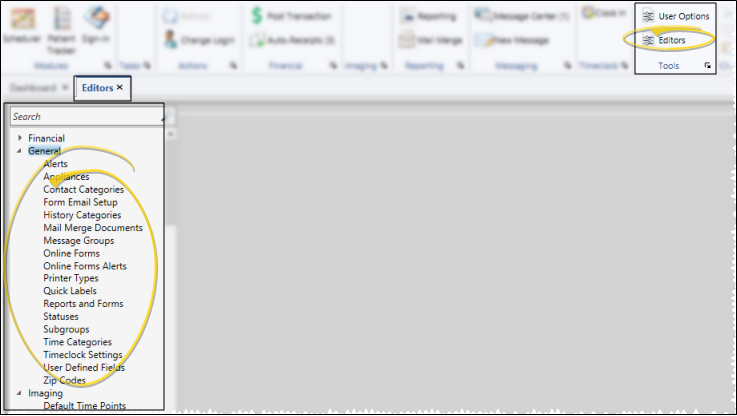
Home ribbon bar > Editors > General > Subgroups. (You can also search for the editor you want to work with.)
Choose subgroup to work with- Generally, you arrange subgroup templates into folders to help you categorize their use. Click the arrow beside a folder name to open / close the folder so you can select the subgroup to work with. The details for the selected subgroup appear at the bottom of the window.
Add a new subgroup - Click a folder in your list to select the location of your new subgroup. If no appropriate folder exists, you can create a new folder (described below). After selecting a folder, click New Subgroup (or right-click and select New Subgroup). Type a name for your subgroup and click Ok. You can now edit the Subgroup Details, described below.
Add a new folder - Click New Folder (or right-click and select New Folder). Type a name for your folder and click Ok. You can drag your folder to a different location in your list, if needed.
Move / copy a subgroup or folder - Click a subgroup or folder name and drag it to a new location in the list. When you release, you can choose to move the item from its old location to the new location, or copy/paste the item, which leaves the original folder or subgroup in tact while creating a new folder or subgroup at the new location.
Delete a subgroup or folder - Click a subgroup or folder name, then click Delete (or, right-click and select Delete). If you delete a folder, all subgroup templates in that folder are deleted as well. (Note that you cannot edit or delete default subgroups that come pre-configured with your system; you can, however, copy then edit them as needed for your situation. Default subgroup names are displayed in italics so you can identify them.)
Edit a subgroup or folder name - Click a subgroup or folder name, then click Edit (or, right-click and select Edit). Use your backspace, delete and arrow keys to position your cursor, then type a new name. (Note that you cannot edit or delete default subgroups that come pre-configured with your system; you can, however, copy then edit them as needed for your situation. Default subgroup names are displayed in italics so you can identify them.)
Edit subgroup details - Your subgroup templates are comprised of details that determine how Edge will evaluate patient records for inclusion / exclusion. Select the subgroup to work with, then add, remove, and change the details at the bottom of the window. (Note that you cannot edit or delete default subgroups that come pre-configured with your system; you can, however, copy then edit them as needed for your situation. Default subgroup names are displayed in italics so you can identify them.)
Add a new subgroup detail - Click New to add a new detail to your subgroup. Scroll through the Subgroup Field list, and select the one you want to work with (You can also search for a subgroup field ). Your new detail is added to the bottom of your subgroup. You can now select this detail to add the evaluation operator and value criteria, as described below.
Delete a subgroup detail - Click the subgroup detail to remove from the template and click Delete. This only deletes the detail you selected, it does not delete the entire subgroup. (See Delete a Subgroup or Folder above to remove a subgroup from your system.)
Copy/paste a subgroup detail - Click the subgroup detail you want to work with, then click Copy/Paste to add a copy of the detail to the bottom of the list. You can now edit that subgroup detail as needed.
Choose field to evaluate - You can change the subgroup field that a detail is evaluating, if needed. Click [...] in the Subgroup Field column and scroll through the list of choices, or search for the field you want to work with.
Operator - Choose how to evaluate the subgroup field against the data in the patient folder. Select " =" if you want your subgroup to include records that exactly match the subgroup field value; or " <> " if you want your subgroup to exclude records that match the field. You can also choose to evaluate whether the patient data is " > greater than"; " < less than"; " > = greater than or equal to" or " < = less than or equal to" the value of the subgroup field.
Value - Enter the response you are testing for inclusion in your subgroup. Depending on the type of field you are working with, you may select the response from a list, or type a specific response.
Select from a list - If you are working with a subgroup field whose response is from a list, you may select one or any number of responses from that list to evaluate. To select a single response, click the Value field, and select the response you want to evaluate. To select multiple responses, click the [...] button beside the Value field and place a checkmark beside each response you wish to evaluate.
Select a date - If you are evaluating a date, you may either type a specific date in the Value column (in one of these formats: July 6, 2012; 7/6/1; or 7-6-12) or select the Smart Value column, and choose from values such as Last Week , This Week, and Today.
Type a specific response - If you are evaluating a field that contains a typed response (such as a User-Defined field), enter the response you are looking for exactly as it appears in your patient folders, including spaces, and punctuation. Any differences will prevent the response from being evaluated as a match.
Prompt for a value - If you want to enter the value at the time you run the subgroup, enable the 
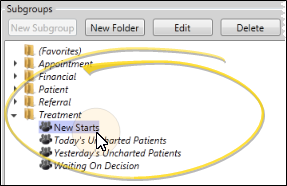
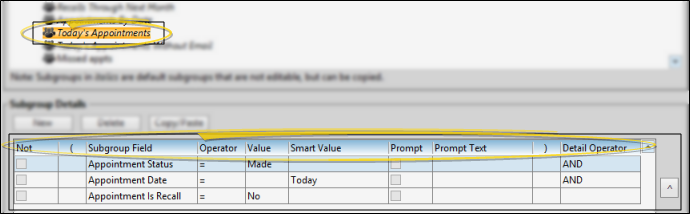
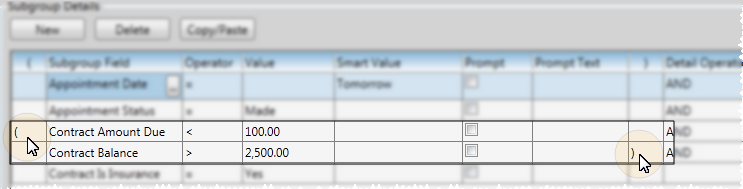
Prompt option. Then, type the question to display in the Prompt Text box. Whenever you use this subgroup, the question you typed will pop onto your screen, waiting for you to enter the appropriate value to use for this subgroup job.
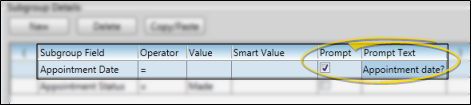
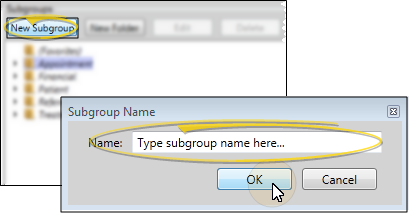
Detail operator - When your subgroup contains multiple details, you use the Detail Operator to define whether a patient record must satisfy the current detail AND the next, or whether the record must satisfy either the current detail OR the next in order to be included in the group. If you subgroup contains only one detail, the detail operator is not needed. In addition, the final detail of a multiple-detail subgroup does not require a detail operator, because its inclusion in the group is dependent upon the detail operator just above it.
Re-order details - Click a subgroup detail, then click the up or down arrows at the right of your list to re-order the details as needed. Note that Edge evaluates a record for inclusion in a subgroup by testing each detail from the top down, with the exception of precedence groups (described below), that are tested together as a unit.
Precedence - You can modify the order of operation for certain subgroup fields by enclosing them in parentheses, thereby creating a "precedence group" that is tested first as a unit. To do so, use the parentheses column at the left of the subgroup fields to mark the beginning of your group, and the parentheses column at the right of the subgroup fields to mark the ending of the group.
Save Changes Click
Save in your Quick Access toolbar or File ribbon bar (or press Ctrl+S on your keyboard) to save any changes you have made.
Ortho2.com │1107 Buckeye Avenue │ Ames, Iowa 50010 │ Sales: (800) 678-4644 │ Support: (800) 346-4504 │ Contact Us
Remote Support │Email Support │New Customer Care │ Online Help Ver. 8/3/2015