Post Adjustments to Miscellaneous Charges
Use the Adjust Charge feature to reduce or reverse miscellaneous charges you previously posted.
Use the Adjust Charge tool, either from the post transaction window or the patient ledger, to reduce miscellaneous charges you posted to a patient account. You can adjust posted charges by any amount, up to a maximum of the total original charge amount, effectively reversing the entire charge.
-
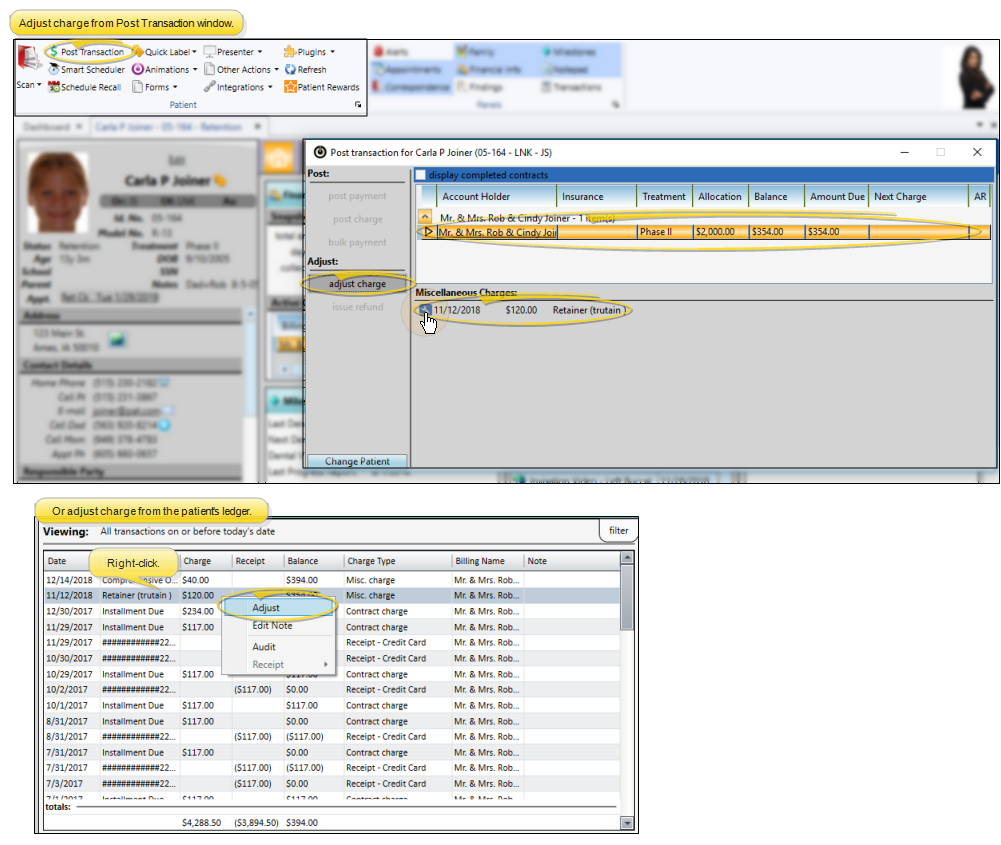
 Choose the Miscellaneous Charge to Adjust - You can either open the post transaction window for the patient and select the Adjust Charge action, then click the
  icon beside the charge you want to adjust, or, open the patient's transaction ledger, right-click the charge, and select Adjust.
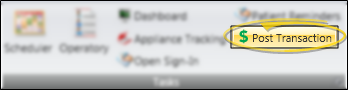
Open the Post Transaction Window - From the Home or Patient or Patient Finances or Scheduler ribbon bar, select the  Post Transaction icon.
The placement of the icon depends upon which ribbon bar you are using. If a patient record is already active, that patient's information will be loaded automatically. Otherwise, you use Fast Find (either typing information or swiping a registered reward card) to search for the patient to work with. (You can also post transactions from the Quick Access toolbar at the top of your Edge Cloud screen, and by right-clicking a patient's appointment in your Scheduler.)
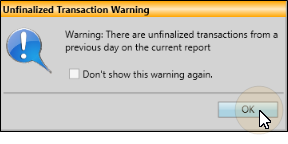
You can set up Edge Cloud so that when you attempt to post a transaction before you finalize the Transaction Report for the previous day, you see a warning message before the Post Transaction window will open. You must then confirm your action before continuing. This feature helps you maintain the integrity of daily transaction postings. After you have seen the message once, you can select not to see it again that day, if you choose. (See "Financial User Options" for details.)
Select Patient and Billing Party - Choose the account to work with. If needed, you can use the Change Patient button at the bottom of the window to launch Fast Find and choose a different patient. If the patient has multiple responsible parties and / or contracts, select the account holder and contract to use. Insurance contracts are listed directly below the associated subscriber.
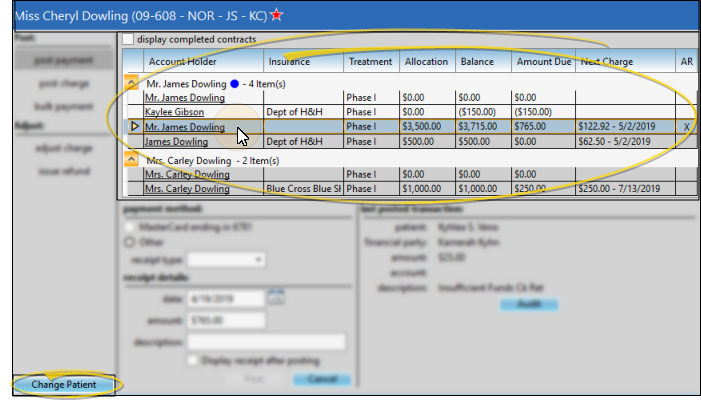
Display Current or Completed Contracts - By default, only currently active contracts appear in the list. If the contract you want
does not appear, enable the Display Completed Contracts option to be sure you are viewing all accounts associated with this patient.
Next Charge - The far right edge of the contract list at the top of the post transaction screen includes the next scheduled payment date and amount. You might use this information to ask the responsible party for their next payment amount in addition to any miscellaneous charges incurred during the day's visit.
Auto Receipt Contract - The AR column at the right of the post transactions window indicates whether the contract is set up with an Auto Receipts agreement.
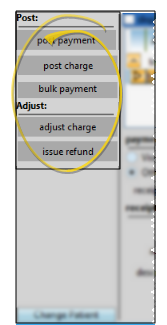
Select Action - At the left side of the window, choose the posting action you want to take: Post Payment, Post Charge, Post Bulk Payment, Adjust Charge, or Issue Refund.
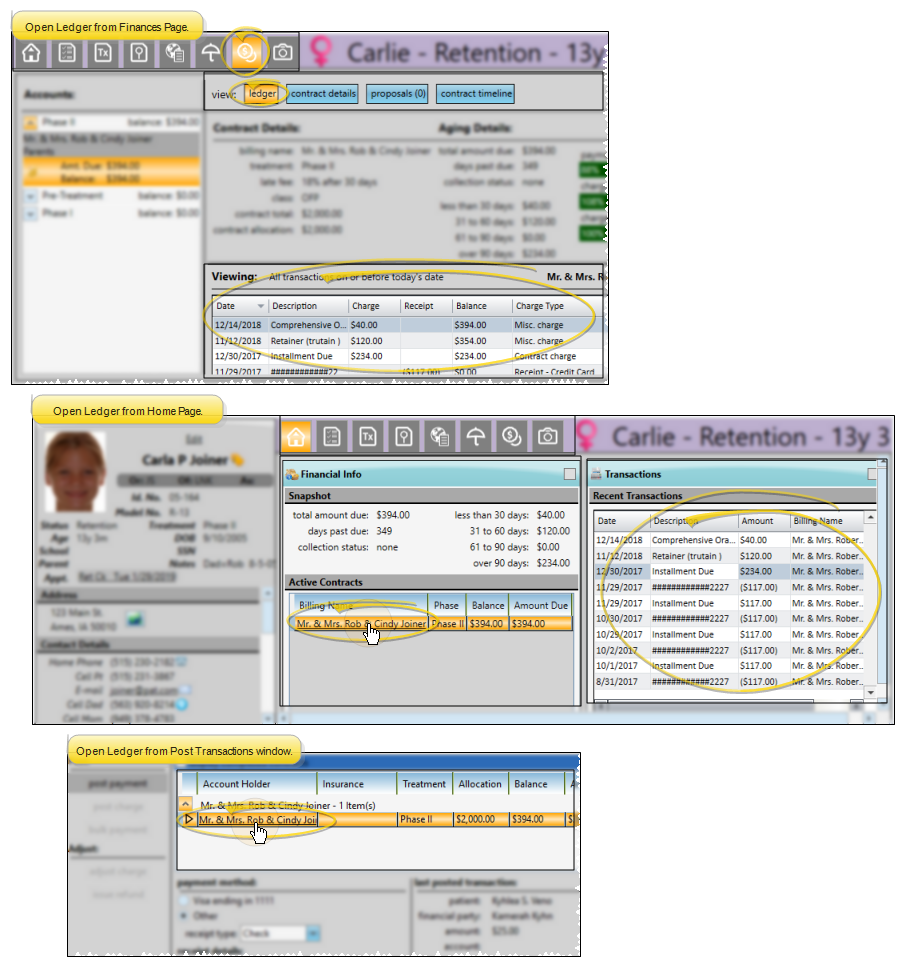
Open the Patient's Ledger - You can open the patient's transaction ledger by selecting the Ledger tab on the patient folder Finances page, by viewing / expanding the Transactions panel on the patient folder Home page, or by clicking a billing name from either the Financial Info panel of the patient's Home page or the Post Transactions window.
-
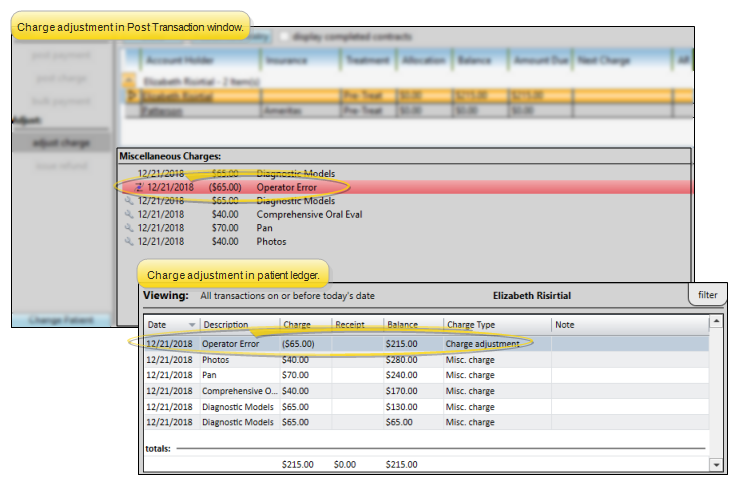
Enter Adjustment Details - The Adjust Charge window prompts you for the adjustment amount and description. Enter the amount you want subtracted from the original charge. For example, to reduce a $50 Initial exam charge by half, enter the adjustment amount of $25. Then, select a description from your Charge Adjustments list, or type a description. All descriptions with classifications other than "Operator Error" will appear on the patient's statement. Typed descriptions are not added to your list, but used for this transaction only. (See "Set Up Transaction Adjustment Types" for details about creating your descriptions.)
-
Post the Transaction - Click Post at the bottom of the adjustment window. Edge Cloud calculates the new account balance and amount due, and asks you to confirm the transaction. Click Yes to complete the process, or click No to exit without posting the transaction.
Finish - When completed, the adjustment will appear in the Post Transaction window, and in the patient's ledger. If you posted an adjustment in error, you can click the icon in the Adjust Charge section of the Post Transaction window, or right-click the adjustment in the ledger, and choose Adjust. This effectively removes the adjustment transaction. Once you remove an adjustment transaction, you cannot reapply it. You can, however, apply another charge adjustment to the original charge, if needed.
Use the Adjust Charge tool from the post transaction window to reduce miscellaneous charges that were posted as part of a charge group. With this tool, you can reduce all of the charges by a certain percentage, and / or reduce individual charges in the group by specific amounts. You can adjust posted charges by any amount, up to a maximum of the total original charge amount, effectively reversing the entire charge.
-
Choose the Miscellaneous Charge to Adjust - Open the post transaction window for the patient and select the Adjust Charge action, then click the icon beside one of the charges in the charge group.
Open the Post Transaction Window - From the Home or Patient or Patient Finances or Scheduler ribbon bar, select the Post Transaction icon.
The placement of the icon depends upon which ribbon bar you are using. If a patient record is already active, that patient's information will be loaded automatically. Otherwise, you use Fast Find (either typing information or swiping a registered reward card) to search for the patient to work with. (You can also post transactions from the Quick Access toolbar at the top of your Edge Cloud screen, and by right-clicking a patient's appointment in your Scheduler.)
You can set up Edge Cloud so that when you attempt to post a transaction before you finalize the Transaction Report for the previous day, you see a warning message before the Post Transaction window will open. You must then confirm your action before continuing. This feature helps you maintain the integrity of daily transaction postings. After you have seen the message once, you can select not to see it again that day, if you choose. (See "Financial User Options" for details.)
Select Patient and Billing Party - Choose the account to work with. If needed, you can use the Change Patient button at the bottom of the window to launch Fast Find and choose a different patient. If the patient has multiple responsible parties and / or contracts, select the account holder and contract to use. Insurance contracts are listed directly below the associated subscriber.
Display Current or Completed Contracts - By default, only currently active contracts appear in the list. If the contract you want
does not appear, enable the Display Completed Contracts option to be sure you are viewing all accounts associated with this patient.
Next Charge - The far right edge of the contract list at the top of the post transaction screen includes the next scheduled payment date and amount. You might use this information to ask the responsible party for their next payment amount in addition to any miscellaneous charges incurred during the day's visit.
Auto Receipt Contract - The AR column at the right of the post transactions window indicates whether the contract is set up with an Auto Receipts agreement.
Select Action - At the left side of the window, choose the posting action you want to take: Post Payment, Post Charge, Post Bulk Payment, Adjust Charge, or Issue Refund.

-
Enter Adjustment Details - The Adjust Charge window prompts you for the adjustment description and amount, and lists all of the charges included in the group at the bottom of the window.
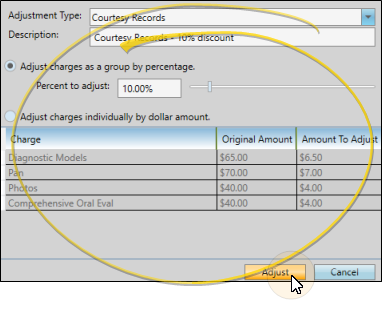
Adjustment Type / Description - You can choose a description from the Adjustment Type list, or type a description in the Description field. All descriptions with classifications other than "Operator Error" will appear on the patient's statement. Typed descriptions are not added to your list, but used for this transaction only. (See "Set Up Transaction Adjustment Types" for details about creating your descriptions.)
Adjustment Amount - To reduce all of the charges in the group by a percentage, enable the Adjust Charges by Percentage option, You can then type a percentage amount in the text field, or use the slider to select a percentage to use. The charges listed at the bottom of the window show how much will be subtracted from the original charge amounts.
In addition, you can enable the Adjust Charges Individually option, and enter the amount to subtract from individual charges in the Amount To Adjust column. You can adjust charges individually after applying a percentage, retaining the percent reduction for all other charges. However, if you adjust charges individually, then apply a percentage, any individual adjustments are overwritten by the calculated percentage.
-
Post the Transaction - Click Adjust at the bottom of the adjustment window. Edge Cloud calculates the new account balance and amount due, and asks you to confirm the transaction. Click Yes to complete the process, or click No to exit without posting the transaction.
Finish - When completed, the adjustment will appear in the Post Transaction window, and in the patient's ledger. If you posted an adjustment in error, you can click the icon in the Adjust Charge section of the Post Transaction window, or right-click the adjustment in the ledger, and choose Adjust. This effectively removes the adjustment transaction. Once you remove an adjustment transaction, you cannot reapply it. You can, however, apply another charge adjustment to the original charge, if needed.
Print Report - Run an Adjustment Audit report to review receipt adjustments, miscellaneous charge adjustments, treatment fee adjustments, and receipts you have flagged as excluded from your deposit slip (by right-clicking the transaction in the patient's ledger), for any range of dates or Transaction reports. See "Adjustment Audit Report" for details.
Apply Treatment Fee Adjustments - Use the Fees tab of the Contract Structure editor to work with the initial fees, periodic fees, and retention fees for each member of the contract. You can also change fee descriptions, and apply non-production adjustments such as family discounts, from the Fees tab. See "Modify Payment Schedules and Apply Adjustments" for details.
Omit Adjustments on Electronic Insurance Claims - You can optionally omit adjustments you apply to miscellaneous charges from your electronic insurance form submissions. See "Electronic Insurance Forms" for details.