You can submit Ortho specialty insurance forms electronically through Edge
You can also print paper insurance forms. See "Print ADA and Canadian Insurance Forms" for details.
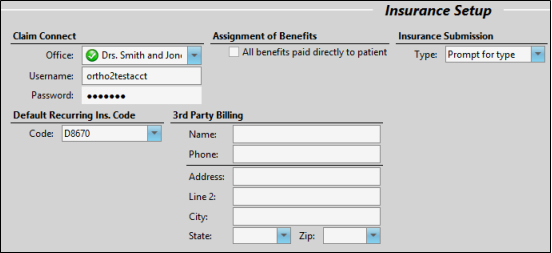
Set Up Insurance Submission Defaults - Use the Insurance Setup editor to specify whether insurance benefits are paid to the patient, as well as select your default insurance submission method, and default recurring insurance code. You can also specify a third-party billing name and address for insurance claims, and enter your Claim Connect credentials for electronic submissions in this editor. See "Set Up Insurance Submission Defaults" for details.
Select Default Insurance Form Format - Use the Default Forms section of your Reports and Forms editor to select the default format to use for your forms. This is the format that will be used when you run the form from the Forms option of the Home or Patient ribbon bar. If you have purchased customized forms, you may choose your form as the default. See "Set Up Reports and Forms" for details.
Canadian Insurance Options - The additional information fields required for Canadian insurance forms are only available in the patient folder when the Default Insurance field of your Reports and Forms editor is assigned to a Canadian insurance form.

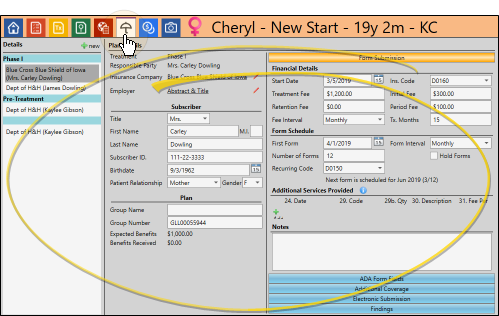
Enter Insurance Data in Patient Folders - Use the Insurance
To prevent errors, review the electronic insurance submission details in your patient folders. In particular, confirm that the patient has released the information to be sent, and note the response in the Claim Submission Reason field. See "Patient Insurance Details" for details.
![]() Run Electronic Insurance Forms Form
Run Electronic Insurance Forms Form
-
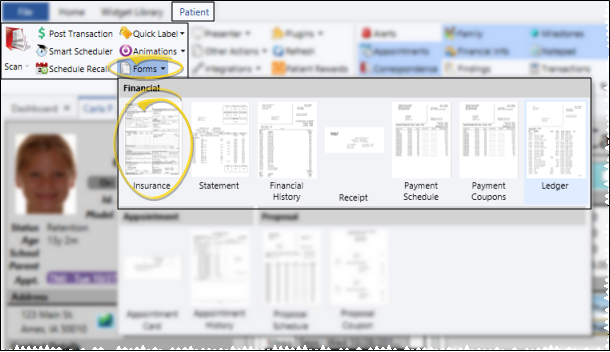
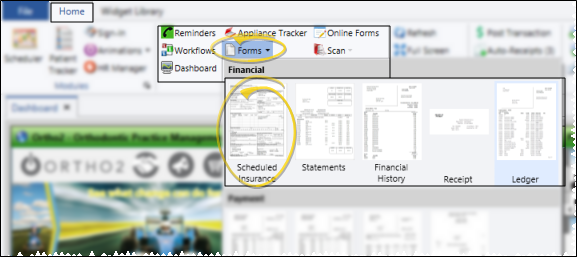
 Open the Form - To generate an insurance form for a specific patient, open the form from the Patient ribbon bar; to generate forms for a subgroup (such as all scheduled insurance forms), open the form from the Home ribbon bar.
You cannot generate electronic insurance forms from the Reporting tab of the Home ribbon bar.
Patient Ribbon Bar - Patient section > Forms > Insurance. (An Edge

Home Ribbon Bar - Tasks section > Forms > Scheduled Insurance. The first time you initiate this form, you will set your Quick Report settings for scheduled insurance forms. From then on, the form is loaded with those settings automatically. In addition, the insurance form format that will be generated (i.e. ADA 2019 or Canadian Insurance Form) is set up in the Reports & Forms editor, and cannot be changed here. See "Set Up Reports and Forms" for details.

-
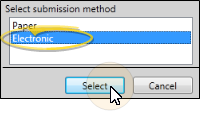
Specify Electronic Forms - When you initiate an insurance form, you may be asked whether you want to generate paper or electronic claims. Select the Electronic option to continue with the instructions below.If you always submit insurance forms electronically, you can set up Edge
-
Form Settings - Select the options to use for generating this form. Not all options are necessary for all insurance forms: Only those required by the form you have selected will be available to you. Form Type - Choose the type of insurance form to generate. The Scheduled Forms option is designed to function when you initiate insurance forms from the Home ribbon bar; All the other insurance forms are designed for initiate from the Patient ribbon bar. Additionally, initial claim forms and dental procedure forms are not available here: See "Print ADA and Canadian Insurance Forms" for details about generating these types of forms.
Partial form - The Partial Form option is a minimally-completed insurance form used for special purposes. It is filled out with the patient, subscriber, and doctor information but does not contain any actual claim, so that you can fill in the rest of the information if a special need arises.
Pre-Treatment Statement / Pre-Authorization - You submit this form prior to services to obtain pre-authorization.
Statement of Actual Services - The Statement of Actual Services insurance form bills for the entire contract, as shown on the Insurance
Scheduled forms - This format generates this month’s scheduled continuation of treatment forms, as determined by your patient folder Insurance
The insurance code included on this form can be different from the insurance code that appears on all other insurance forms for a patient. See "Patient Insurance Details" for details about the Insurance Code and Recurring Code fields.
Run a Scheduled Insurance report to obtain a list of the patients for whom insurance forms are due to be generated. See "Scheduled Insurance Reports" for details.
Miscellaneous Charge form - The Misc.Charges option generates an insurance form for any range of dates to bill for charges you have posted in addition to the contract fees, such as diagnostic records charges. You can print the form on plain white paper or submit the claim electronically.
Form Date - Enter the date you want printed as the form generation date, generally today. You can also use the smart date options to select today's date, or to advance the date by a week or a month.
Billing Entity Address - Choose whether the billing address to include on this insurance claim should be your general practice address (from your Practice editor), the address of the office assigned to the patient folder, or the 3rd party billing address from your Insurance Setup editor.
Treatment Location - Choose whether the patient's treatment location is your general practice address, or the address of the office assigned to the patient folder.
Scheduled Form Month - (Scheduled Forms only.) Select which month's fees to include on the form. You can choose between last month's fees and the current month's fees. When you initiate this form from the Home ribbon bar, all insurance details that are due for an insurance form for the month you selected will receive an electronic claim. When you initiate this form from the Patient ribbon bar, only the active patient will receive a claim.
Run a Scheduled Insurance report to obtain a list of the patients for whom insurance forms are due to be generated. See "Scheduled Insurance Reports" for details.
Split Submissions for Multiple Months - (Scheduled Forms only.) When you submit insurance claims electronically, and have patients for whom the insurance claim interval spans multiple months (i.e. quarterly), you can choose to "split" the submission, listing each period fee individually on the insurance claim, or lump them together as a single fee. (See "Patient Insurance Details" for details about scheduling insurance forms.)
Ignore Charge on Insurance Details - (Misc. Charge forms only.) Enable this option to prevent miscellaneous charges that were posted directly to an insurance detail (and not the responsible party) from appearing on the electronic claim.
Ignore Adjustments to Miscellaneous Charges - (Misc. Charge forms only.) Enable this option to always include the full amount of posted miscellaneous charges on the insurance form, even if an adjustment has been made to the transaction. (See "Post Adjustments to Miscellaneous Charges" for details about applying adjustments to miscellaneous charges.)
Misc. Charge First & Last Sates - (Misc. Charge forms only.) Miscellaneous charges posted between and including the first and last dates will be included. If a miscellaneous charge was not posted within the date range, it will not be included. You can also use the smart date options to select today's date, or to advance the date by a week or a month, or use the Smart Value field to select a standard date range, such as "Last Month".
-
Subgrouping - (Home ribbon bar only.) Select the subgroup to use for choosing patients that should get an insurance form. Only records that fit your selected subgroup will be included. In addition, if you have selected to generate Scheduled Insuranceforms, only patients that fit your subgroup AND are due for a scheduled insurance form will be included. (See "Patient Insurance Details" for details about scheduling insurance forms.)
When you initiate an insurance form from the Patient ribbon bar, the form will print for that patient only.
-
Submit Claims - When you have finished selecting the electronic insurance form options, click Ok at the bottom of the options window. The
![]()
www.ortho2.com │ 1107 Buckeye Ave. │ Ames, IA 50010 │ 800.346.4504 │ Contact Us
Chat with Software Support │ Chat with Network Engineering │ Chat with New Customer Care
Remote Support │ Email Support │ Online Help Ver. 11/11/2019


