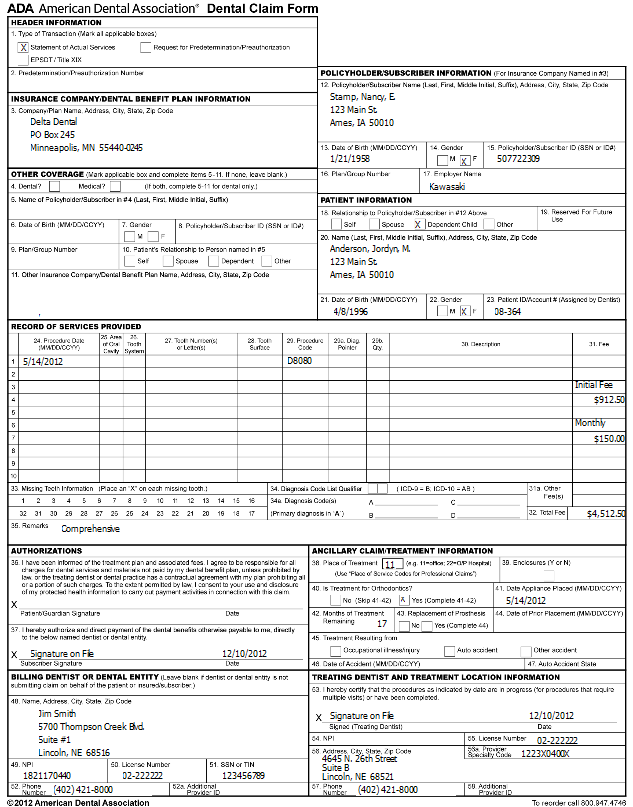
You can print ADA 2006, ADA 2012, ADA 2019, and Canadian insurance forms on plain paper with an approved laser printer. Choose from a variety of formats.
You can also submit insurance claims electronically through Edge
Get Started
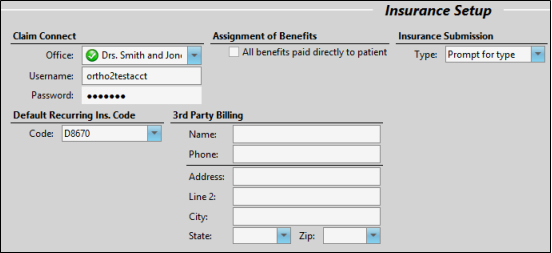
Set Up Insurance Submission Defaults - Use the Insurance Setup editor to specify whether insurance benefits are paid to the patient, as well as select your default insurance submission method, and default recurring insurance code. You can also specify a third-party billing name and address for insurance claims, and enter your Claim Connect credentials for electronic submissions in this editor. See "Set Up Insurance Submission Defaults" for details.
Select Default Insurance Form Format - Use the Default Forms section of your Reports and Forms editor to select the default format to use for your forms. This is the format that will be used when you run the form from the Forms option of the Home or Patient ribbon bar. If you have purchased customized forms, you may choose your form as the default. See "Set Up Reports and Forms" for details.
Canadian Insurance Options - The additional information fields required for Canadian insurance forms are only available in the patient folder when the Default Insurance field of your Reports and Forms editor is assigned to a Canadian insurance form.

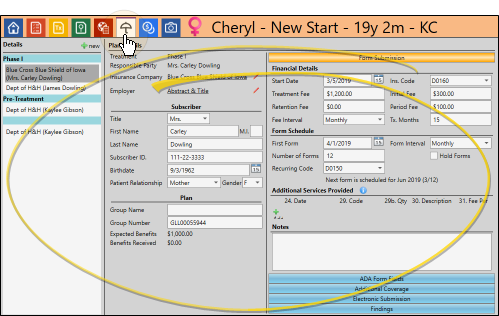
Enter Insurance Data in Patient Folders - Use the Insurance
Assign Email Merge Document - If you will be emailing this form to your patients and parents, you must use your Reports and Forms editor to assign the mail merge document to use as the text of your email message. See "Set Up Reports and Forms" for details.
Run This Form
-
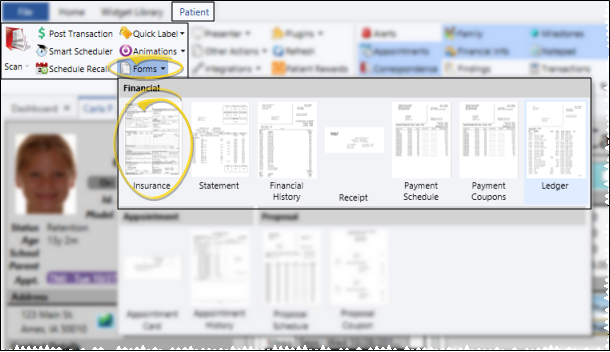
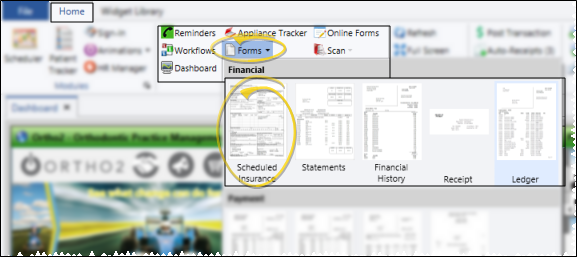
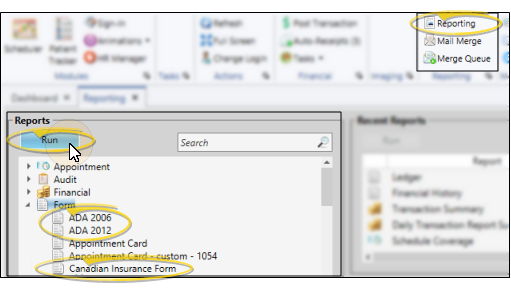
 Open the Form - You can open this feature in multiple ways: Use the method that's most convenient for you. Be aware that if you open insurance forms from the Patient or Home ribbon bar Forms icon, the insurance form format that will be generated (i.e. ADA 2019 or Canadian Insurance Form) is set up in the Reports and Forms editor, and cannot be changed here. See "Set Up Reports and Forms" for details.)
 -
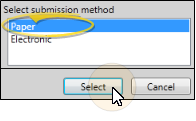
Specify Paper Forms - (From Home or Patient ribbon bar > Forms option only.) When you initiate an insurance form from the Forms option on the Home or Patient ribbon bar, you may be asked whether you want to generate paper or electronic claims. Select the Paper option to continue with the instructions below.If you always print paper insurance forms, you can set up Edge
-
Form Settings - (You choose and save default form settings the first time you initiate an insurance form from the Forms option of the Home or Patient ribbon bar, but you can change them for an individual printing job as needed. ) Select the options to use for generating this form. Note that not all options are necessary for all insurance forms: Only those required by the form you have selected will be available to you. A number preceding an option indicates the insurance form field that will be filled in with that information. (If the settings panel is not visible, click the
 Show/Hide icon in the upper left corner of the Reporting window.)
 -
Subgrouping - (From Home ribbon bar or Reporting tab only.) Select the subgroup to use for choosing patients that should get an insurance form. Only records that fit your selected subgroup will be included. In addition, if you have selected to generate Scheduled Insuranceforms, only patients that fit your subgroup AND are due for a scheduled insurance form will be included. (See "Patient Insurance Details" for details about scheduling insurance forms.)
When you initiate an insurance form from the Patient ribbon bar, the form will print for that patient only; If you attempt to apply a subgroup, and the active patient does not fit the subgroup, no form will be generated.
-
View Results - If needed, click View at the top of the report settings panel to view the results on your screen. When you run a report or form from your Recent Report list, or when you run a Quick Report, the initial results are sent to your screen immediately, with one exception: A Quick Report that has the Print Only option enabled will not show your results on the screen at all, but continue with the printing options.
-
Manage Options and Output - With the results on your screen, you can choose different report settings from the left side of the screen and click View again to obtain different results. In addition, you can manage the output with the toolbar at the top of the report window. See "Use Report Results" for details.
More Information
Form Saved in Correspondence History - After you print or export a paper insurance form, or successfully submit an electronic insurance form, it is recorded in the patient’s correspondence history. See "Patient Correspondence History" for details.
![]()
www.ortho2.com │ 1107 Buckeye Ave. │ Ames, IA 50010 │ 800.346.4504 │ Contact Us
Chat with Software Support │ Chat with Network Engineering │ Chat with New Customer Care
Remote Support │ Email Support │ Online Help Ver. 11/11/2019


