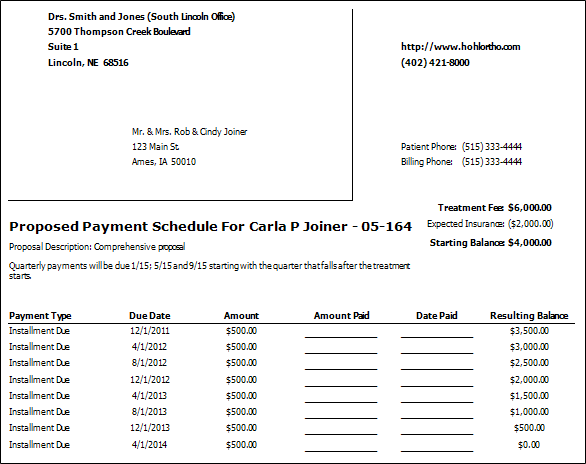
Proposal / Payment Schedules
Run a Payment Schedule
Get Started
Choose Default Formats - Use the Default Forms section of your Reports and Forms editor to select the default format to use for your forms. This is the format that will be used when you run the form from the Forms option of the Home or Patient ribbon bar. If you have purchased customized forms, you may choose your form as the default. See "Set Up Reports and Forms" for details.
Assign Email Merge Document - If you will be emailing this form to your patients and parents, you must use your Reports and Forms editor to assign the mail merge document to use as the text of your email message. See "Set Up Reports and Forms" for details. This option is available only for Payment Schedules: Proposal Schedules cannot be emailed.
Run This Form
-
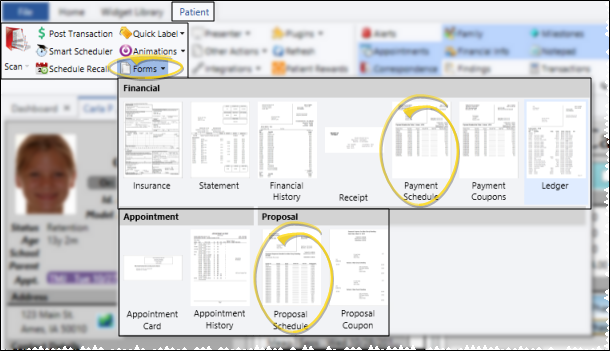
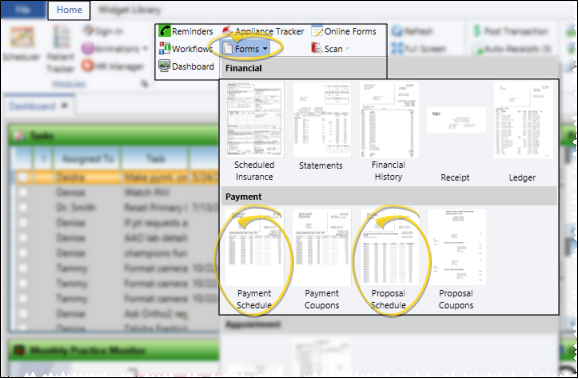
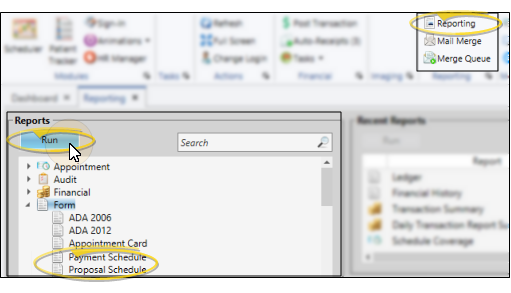
 Open the Form - You can open this feature in multiple ways: Use the method that's most convenient for you.
 -
Report Settings - Select the options to use for choosing records and generating this report. Choose carefully, as your selections will affect which data is included in the report.
 Show/Hide icon in the upper left corner of the Reporting window.)
When you open a patient folder, then initiate this form from the Patient ribbon bar Forms icon, your Quick Reports settings take effect, and the form is immediately generated for the active patient. To use different settings, click the
Slider icon at the upper left edge of the report to open the report settings window, if available, or edit the Quick Report settings. See "Quick Reports" for details. -
Subgroup - Select the subgroup to use when generating this report or form. Only records that fit your selected subgroup as well as all other report parameters will be included.
-
View Results - If needed, click View at the top of the report settings panel to view the results on your screen. When you run a report or form from your Recent Report list, or when you run a Quick Report, the initial results are sent to your screen immediately, with one exception: A Quick Report that has the Print Only option enabled will not show your results on the screen at all, but continue with the printing options.
-
Manage Options and Output - With the results on your screen, you can choose different report settings from the left side of the screen and click View again to obtain different results. In addition, you can manage the output with the toolbar at the top of the report window. See "Use Report Results" for details.
More Information
Consider Payment Coupons as an Alternative - Run Payment Coupons
Correspondence History Entry - After you generate this form, it is recorded in the patient’s correspondence history.
Emailed Payment Schedules - When you email a form, the name of the assigned mail merge document will be the email subject, the text of the mail merge document will be the email message, and the form will be sent as a PDF attachment. In addition, the mail merge document and the form will be entered as separate items in the patient's correspondence history. See "Set Up Reports and Forms" for details about setting up this option. (This option is available only for Payment Schedules; Proposal Schedules cannot be emailed.
![]()
www.ortho2.com │ 1107 Buckeye Ave. │ Ames, IA 50010 │ 800.346.4504 │ Contact Us
Chat with Software Support │ Chat with Network Engineering │ Chat with New Customer Care
Remote Support │ Email Support │ Online Help Ver. 11/11/2019


