Use your Light Bar widget to monitor the doctor's involvement with patient appointments once they have been processed as "seated" in your Patient Tracker. The light bar notifies you about who the doctor is currently attending, directs the doctor to the next patient that should be seen, and alerts you to patients that have been waiting an extended period of time. Your Practice Monitor widget can use the data collected by the light bar to help you analyze and evaluate the efficiency of your treatment routines.You can open the light bar as a Dashboard or Application widget multiple times, each with its own display settings, so you can look at the individual appointment flow of multiple orthodontists or offices,
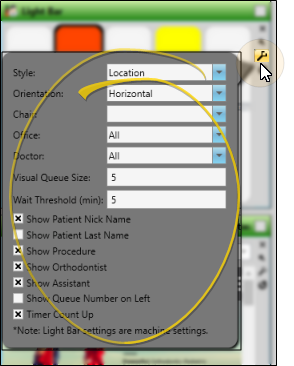
Edit Settings - Click the Settings option on the light bar tool panel to select which orthodontist / office to view, and to set up how the light bar appears on your screen. Light bar settings are machine-specific.
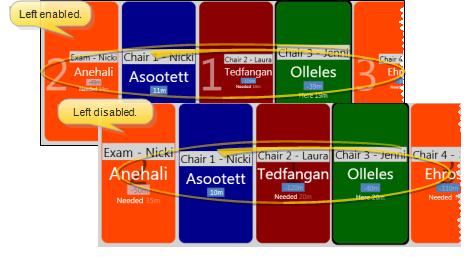
Style- Choose to show patients in Location format, or Queue format.
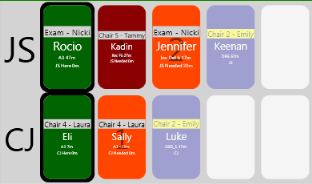
Location - This style shows patients according to the chair to which they are assigned, You cannot change the order of appointments, since they are displayed according to chair number. Also note that if multiple patients are seated in the same chair, location style will display only the first-appointed patient. Once that patient is placed in checkout in your Patient Tracker, the next-appointment patient assigned to that chair will appear in your light bar.
Queue - This style shows patients in the order they should be seen, separated by doctor or office (as determined by the Single Doctor Queue Per Office option, in your Patient Tracker editor) While viewing the light bar in queue format, you can re-order the appointments, as described below, to easily identify which patient should be seen next. If you choose to queue by office, the seating details window will appear when an appointment is flagged Doctor is Here so that the appropriate doctor can be chosen. And, if you queue by orthodontist, a separate column will include patients assigned to the Any orthodontist seating detail.
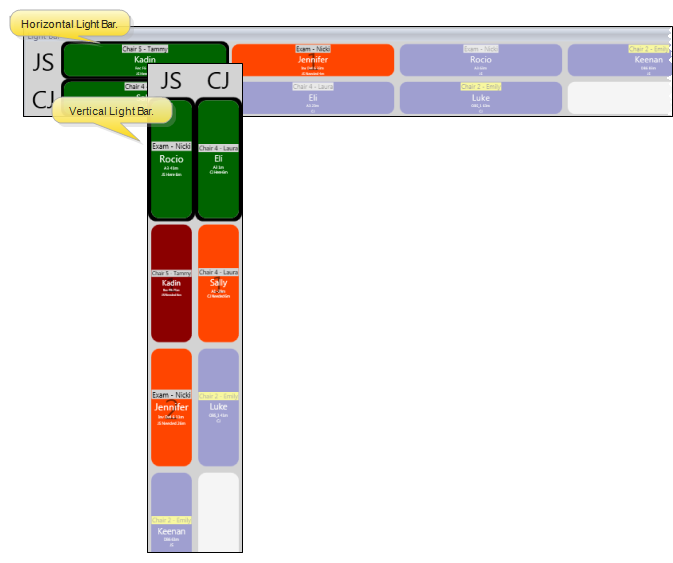
Orientation - Select whether to show the seated patients horizontally (in a row), or vertically (in a column). Generally, when you view your light bar as an application widget, the horizontal orientation works best when your light bar is docked to the top of your Edge window, while the vertical orientation works best when your light bar is docked to one side of the window.
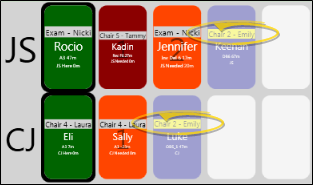
Chair - Select the chair to monitor. Although all chairs display in your light bar, the selected chair appears with yellow highlighting. (See Chair 2 in the example below.) Note that you can use hot-keys as well as right-clicking to update the appointment activity for the selected chair, as described below.
Office / Doctor - Select which office and / or doctor's patients to display, or include all patients that are flagged as seated in your Patient Tracker. The light bar uses the doctor and office assigned to the appointment, not those assigned to the patient folder.
Visual Queue Size - Enter the number of appointment spaces you want to reserve for display when viewing the light bar in queue format. Note that all seated patients appear in the light bar, even if that number exceeds the visual queue value. In our example below, the visual queue size is 5; so 5 spaces are always reserved. However, when more than 5 patients are seated, additional spaces are added to that doctor's section of the light bar.
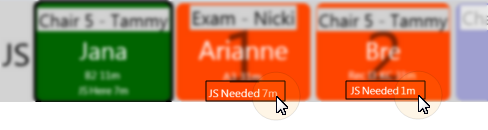
Wait Threshold - Enter the number of minutes a patient can be in Doctor is Needed mode (described below) before the waiting time begins to flash in the light bar. The length of time a patient has been in Dr is Needed mode appears in the light bar. This number begins to flash when the wait threshold value is exceeded.
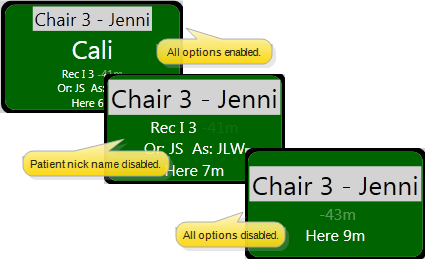
Show Information - Enable each type of information ( Patient Nickname, Patient Last Name, Procedure, Orthodontist, and Assistant) that you want included in the light bar display.
Show Queue Number on Left - Enable this option to show the doctor's queue number to the left of the patient information, rather than behind it.
Use This Feature
Seat Patients - Patients must be signed into your office and flagged as Seated before they show up in your light bar. You can seat patients from your Patient Tracker or your Scheduler, or simply drag a signed-in patient from either the Waiting section of your Patient Tracker, or from your Scheduler onto an empty light bar chair to flag them as seated. This feature is especially useful when your light bar is displayed as an application widget.
Interpret Light Bar Display - Your light bar widget uses colors, numbers, labels, and flashing to indicate the current status of a patient's appointment activity, and to direct the doctor to the next patient. In addition, when viewing the light bar in queue format, the priority of the appointment determines its place in the list.
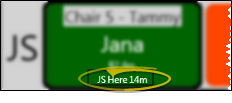
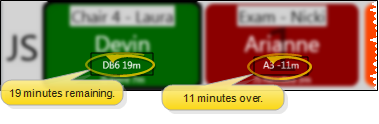
Each box includes the chair the patient is assigned to, and the number of scheduled minutes remaining for the appointment. In addition, if the patient is flagged as "Doctor is Needed" or "Doctor is Needed - High Priority", a number appears to indicate that patient's place in the queue. The box can optionally include the patient's nickname, the appointment procedure code, the orthodontist, and the assistant assigned to the appointment. (See above to choose which optional information to display.)
Colors - Each color indicates the patient's appointment status. If you changed your light bar colors in thePatient Tracker editor, the color descriptions below may not match the colors you see in your light bar. (See "Set Up Patient Tracker" for details about modifying your light bar colors.)
Seated (Default = Blue)- The patient is seated, but no action has been taken or is currently required. When viewing the light bar in Queue mode, these appointments appear at the end of the list.
Dr. is Here (Default = Green) - The patient has been flagged as Doctor is Here. When viewing the light bar in Queue mode, the appointment appears at the beginning of the list. Also, the light bar notes the number of minutes the doctor has spent with the patient.
Dr. is Needed (Default = Orange)/Dr, Needed - High Priority (Default = Red)- The patient has been flagged as Doctor is Needed, or Doctor is Needed - High Priority. When viewing the light bar in Queue mode, these appointments appear after the Dr. is Here appointment, in the order the patients should be seen. In addition, the patient's place in the queue is indicated by a large number, whether you are viewing the light bar in Queue mode or in Location mode. To change a patient's place in the queue, right-click and select to move them up or down in the list. While in Queue mode, you can also change patient priority by dragging and dropping them. The light bar notes the number of minutes the patient has been waiting. That number begins to flash when your wait threshold setting has been exceeded. In addition, if the doctor is not attending any appointment, the box around the appointment that the doctor should see next flashes.
Appointment Time Remaining - The number of minutes scheduled for an appointment appears in the light bar. Once the end of the scheduled appointment time has passed, that number becomes negative and begins to flash, indicating the appointment is taking longer than anticipated.
Update Appointment Activity - Right-click an appointment in your light bar, and select an activity to change the color and position of the appointment, as well as accurately track the amount of time patients have spent in each status. (You can also right-click an appointment in your Patient Tracker, or use the keyboard shortcuts to update the appointment activity for the chair you have selected to monitor in your settings window.) If you choose to queue by office, the seating details window will appear when an appointment is flagged Doctor is Here so that the appropriate doctor can be chosen. (See "Set Up Patient Tracker" for details about your queue setting.)
Doctor Here (Ctrl+Shift+H) - Use this activity to indicate which patient is currently attended by the doctor. When you process a patient as Dr is Here, the orthodontist is automatically logged out of any previous appointment. This helps calculate the amount of time a doctor spends with each patient more accurately..
Doctor Away (Ctrl+Shift+A) - Use this activity to indicate the appointment is in progress, but the doctor is not currently attending the patient.
Doctor Needed (Ctrl+Shift+N) - Use this activity to indicate that the doctor is required before the appointment can continue.
Doctor Needed - High Priority (Ctrl+Shift+P) - Use this activity to indicate the doctor is needed to attend the patient as soon as possible, regardless of other patients that may beve been waiting longer.
Move Up / Down - (Dr is Needed and Dr is Needed - High Priority appointments only.) The patient's place in the doctor's queue is indicated by a large number: You can use the Move Up or Move Down options to move a patient's appointment up or down in priority. When viewing the light bar in Queue mode (and not Location mode), you can also drag and drop to change appointment priority.
Open Patient Folder - Right-click the appointment, then select Open Patient Folder to open the selected patient's Home page.
Update Seating Status - Right-click the appointment, then select to Unseat or Checkout the patient. This action results in removing the appointment from your light bar as well as updating your Patient Tracker.
Change Seating Details - If you enable the Change Seating Details When Seating Patient option of your Patient Tracker editor, the seating details dialog pops up as soon as you seat a patient in the Patient Tracker. (Seating details include the chair, assistant, and doctor attending the patient.) Note that you can also right-click a patient in the Seated section of your Patient Tracker or in the Light Bar widget to change the details at any time.
Exit - Click X in the light bar settings panel to close the light bar.
More Information
Icon Notice - When someone on your network flags a light bar appointment with Doctor is Needed or Doctor is Needed - High Priority, any other workstations with Edge minimized will get an icon and notification pop-up in their system tray. Once the notification is gone, you can hover over the system tray icon to read the message.
Remove Appointments From Light Bar - Appointments are automatically removed from the light bar when they are placed in checkout, or exited in your Patient Tracker. (See "View & Update Patient Tracker" for details.)
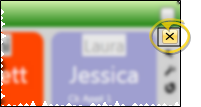
Widget Panel Options - Depending on your device and panel format, you can expand and minimize widget panels, move the widget location on your screen, float them in their own windows, refresh and print data, and close the widget when you no longer need it. See Application widgets or Your Dashboard for details about using these features.
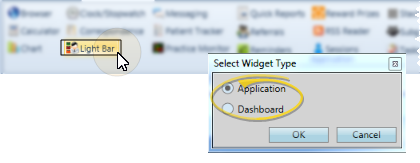
 Light Bar > Dashboard or Application widget.
 Settings option on the light bar tool panel to select which orthodontist / office to view, and to set up how the light bar appears on your screen. Light bar settings are machine-specific.
 │
│


 Single Doctor Queue Per Office option,