Your Scheduler shows you your scheduled patient appointments as well as other pertinent data about your day, week, and month.
(Windows Media Player, an active Internet connection, and a valid Ortho2 customer login are required to run video tutorials, webinars, and training programs.)
Set up your Scheduler - The way your Scheduler looks, including colors, time intervals, chair headings, and other viewing options depends on how you set it up. See "Get Started Scheduling" for details.
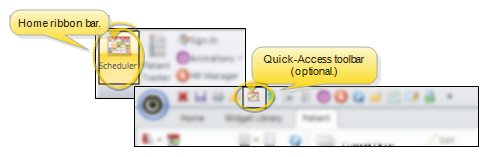
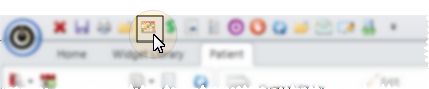
Home ribbon bar / Quick Access Toolbar -  Scheduler.
Clicking the Scheduler icon from either the Home ribbon bar or your Quick Access toolbar while a Scheduler session is already active can either bring the open Scheduler tab to the front of your Edge window, or open another Scheduler tab. See "Set Up General Scheduler Options" for detailsabout setting up this option.
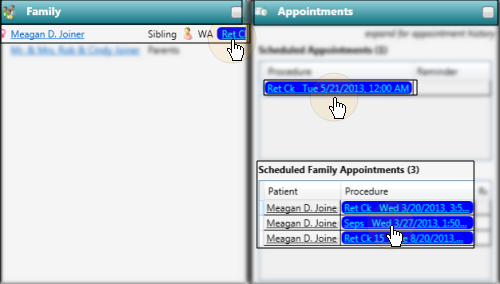
Patient folder - You can also open your Scheduler to a specific appointment by clicking the appointment link wherever it appears in the patient folder, such as on the Patient Information Panel, the Family panel, or the Appointments panel of the patient folder Home page, on the Treatment Hub page, or by hovering over the patient name in your Stacks widget.
If you have multiple Scheduler tabs open, clicking a patient appointment link will bring the left-most tab to the front of your Edge window. Note that before you click the link, you can reorder your tabs by simply dragging them into place, thus selecting which Scheduler tab you want to work with. See "Set Up General Scheduler Options" for details about enabling/disabling the multiple Scheduler option.)
From the Patient Information Panel:
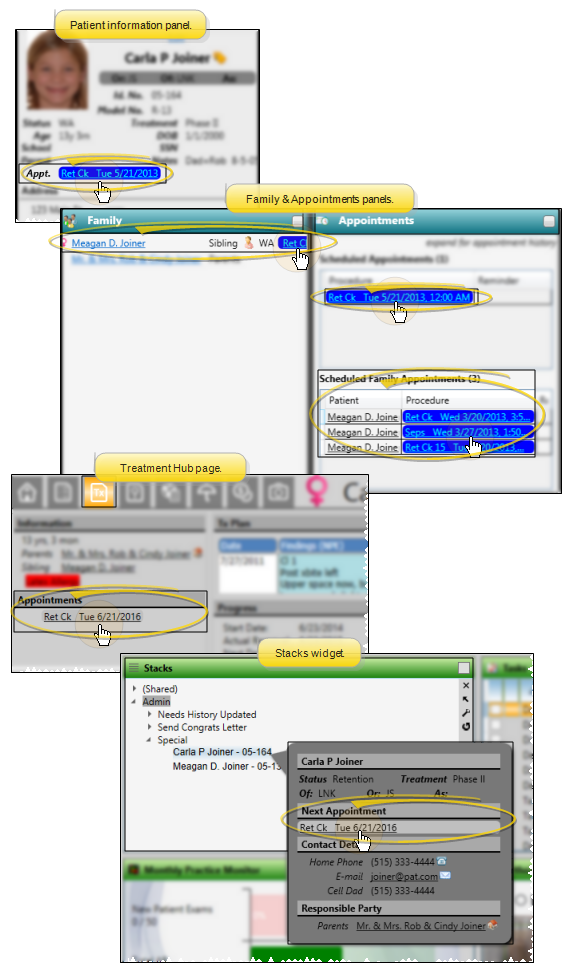
From the patient folder Home page:
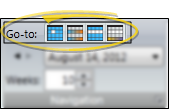
Choose viewing mode - Click a viewing mode in the Scheduler

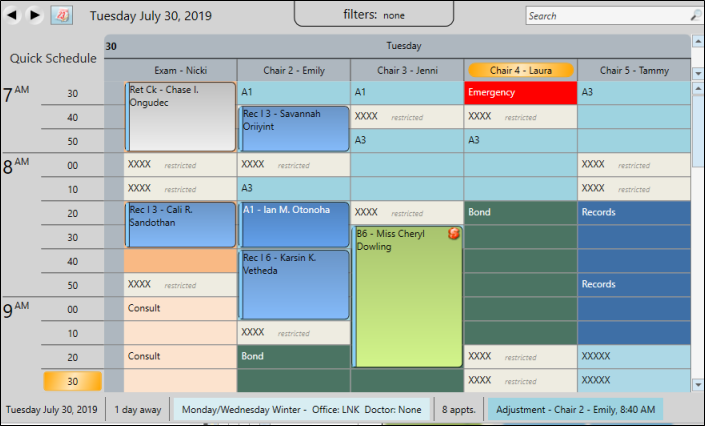
 Day view - Day-view mode shows you a single day's appointments. All appointment activities and events are available from this view.
 Week view - Week-view mode shows a 7-day schedule
 Month view - View your schedule in Month View mode to see a monthly calendar that includes template assignments and scheduling statistics. See "View Monthly Schedule" for details.

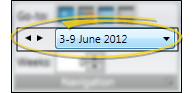
Select date(s) - The date you are viewing is noted near the top of the Scheduler window. You can
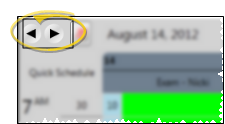
Previous / next date - Use the arrows at the top-left of your scheduling window to view days prior to / following the current date. If you are in week-view mode, the buttons reverse or advance your week, beginning with the prior or following Sunday. If you are viewing a series of dates, but not in week-view mode, the Scheduler returns to day-view mode, showing only the date prior to or following the first or last date of your series.
Choose date(s) from calendar - Click the  Calendar icon in the top-left of your scheduler window to use a calendar to go to a specific date or series of dates in your Scheduler. You define the number of months shown with the calendar settings in your General Grid Options.
Open the Calender to choose the date to work with.

Click one or more dates to display.
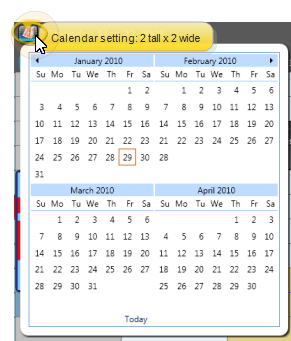
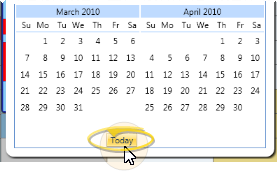
Click Today to go to today's schedule.
Quick navigation - Click an icon in the Navigation section of the Scheduler ribbon bar to go to that date.
 Today - Shows you today's schedule.
 Jump day - Shows you the schedule one "jump" from today. You also see this schedule when you first open the Scheduler. (See "Set Up General Scheduler Options" for details about setting your "jump".)
 Week - Shows you the schedule for this week.
 Jump week - Shows you the schedule for the week that is one "jump" from today.
Go to recently navigated date - Choose a date you recently viewed from a list, or use the arrow keys beside the recent date field to toggle through the dates.
Jump ahead - Enter a number in the Weeks field to jump ahead that far into your schedule.
Navigate using keyboard shortcuts - You can also use several keyboard shortcuts to navigate within your Scheduler. See "Keyboard Shortcuts" for details.
Apply initial template - The first time you open a new date in your Scheduler, you select the template to apply.
Apply scheduled template - Select
Apply a different template - Choose a template, then click Apply to assign a different template to this date.
Edit template - Once the date has been opened, you can
Remove template - You can also remove a template entirely from a date, moving any scheduled appointments to the Scheduler bar, by right-clicking the date from the Month View calendar. See "View Monthly Schedule" for details.
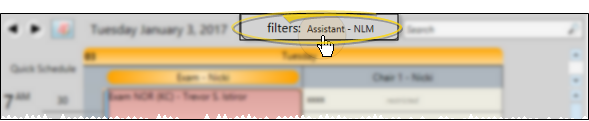
Search your schedule - (Day and Week viewing modes only.) Use the search box in the upper right corner of your scheduling window to locate a scheduled appointment or a Scheduler note. You can type any information you have, including all or part of the patient name, id number, procedure, appointment time, chair, or note text. The search tool will only look for scheduled appointments that appear on the currently displayed date or dates, but will search Scheduler note text for all dates. See "Search Your Schedule" for details.

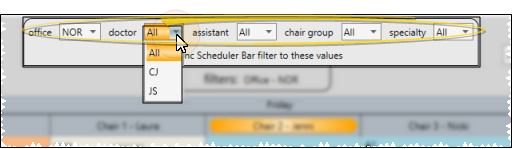
Filter by doctor, office, assistant
Click the filter bar first to show your choices.
Select the filter(s) to use.
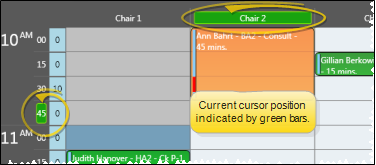
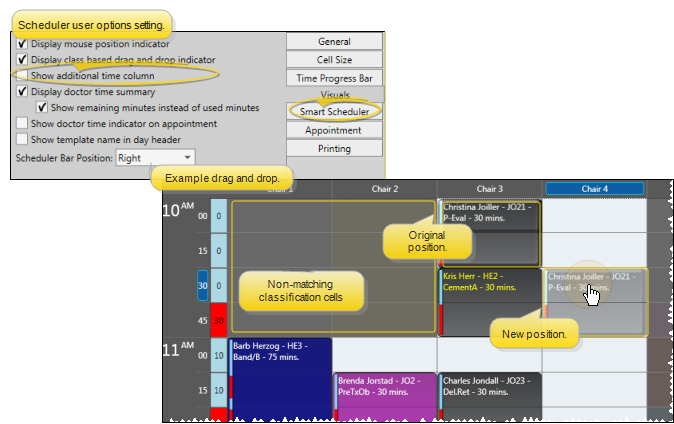
Mouse position indicator - (Optional.) As you move your cursor around the appointment cells, the Scheduler can highlight your current row and column position along the edges of your schedule, helping you pinpoint your cursor location. (You can enable / disable this feature with your Grid Visuals Options.)
Doctor time - (Optional.) Your schedule can show you how many minutes of doctor time is scheduled for each time slot, and exactly where that time is located. This feature is controlled by several settings.
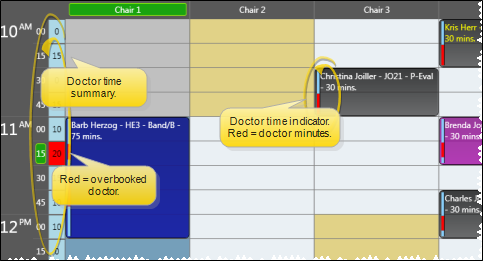
Doctor time summary - The narrow column at the left edge of each day's schedule indicates the amount of doctor time currently scheduled in all columns for that time slot. (You can enable / disable this feature with your Grid Visuals Options.)
Doctor time on appointment - Each patient appointment can include a colored bar that indicates exactly which minutes throughout the time slot requires the orthodontist. (You can enable / disable this feature with your Grid Visuals Options.)
If your General Grid Options have enabled the Display Kept Appointments feature, and your Visual Options have enabled the Display Doctor Time Summary feature, the amount of doctor time assigned to each time slot remains on your schedule even after appointments have been processed as Kept.
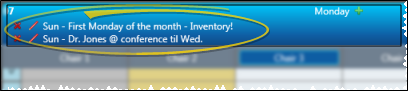
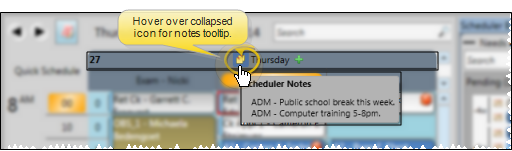
Scheduler Notes - You can add, edit, and delete notes about your schedule. The notes appear under the day of the week header at the top of your schedule. You can choose to show the notes at all times, or collapse them into a ToolTip. In addition, you can use the Search tool at the top of your Scheduler window to search for both appointment data and note text for the currently visible grid. See "Scheduler Notes" for details.
Expanded scheduler notes:
Collapsed scheduler notes:
Display kept appointments - (Optional.) Appointments that have been processed as Kept can appear dimmed on your schedule, or can be removed from your schedule entirely. If the appointments appear on the schedule, you can hover over them to view the details and open the patient folder, just as you can with currently scheduled appointments. In addition, the amount of doctor time assigned to that appointment remains visible on your Scheduler
Notifications - Special icons appear on your patients' appointments to notify you of certain situations and events. Disable the consolidate notification icons option to include all icons on the patient's appointment, or enable option to display a single red box, indicating notifications are available, and displaying individual icons only on the appointment hover window.See "Set Up Appointment Display Options" for details about enabling/disabling this feature. Note that you can toggle the display of Edge Reminders notifications at any time, described below.
Financial status notifications:
 - Payment past due - You can optionally include a past-due notification icon on your scheduler.
Patient Tracker status notifications:
 - Patient Tracker status is Waiting.
 - Patient Tracker status is Seated.
 - Patient Tracker status is Check Out.
 - Patient Tracker status is Exited.
Appointment confirmation / Edge Reminders notifications: (See "Review Sent Messages" for details.)
 - Patient confirmed appointment.
 - Patient canceled appointment.
 - Phone reminder was answered by a person or answering machine, but no confirmation choice was made. (It is likely that your office left a message for the patient).
 - Phone reminder was not answered.
 - Patient left a voice message via Edge Reminders. Click the icon to hear the message. You can also hear the message directly from the Edge Reminders Sent Messages window. See "Review Sent Messages" for details.
 - Patient has appointment reminder. (You can assign reminders as you schedule appointments, or right-click to edit patient appointments.)
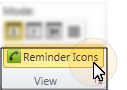
You can quickly toggle the display of Edge Reminders notifications by clicking  Reminder Icons on the Scheduler ribbon bar.
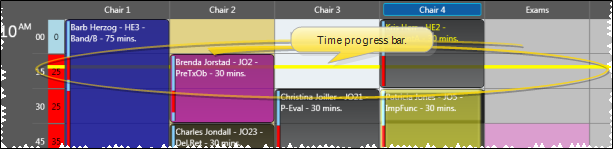
Time progress bar - (Optional.) The time progress bar places itself across your schedule at the current time, so you can see how far ahead or behind you are with your scheduled appointments. This feature is controlled by several settings. (See "Set Up Time Progress Bar Options" for details.) To consider yourself "on time", appointments that appear above the bar should be completed. You are "ahead of schedule" when appointments below the bar have already been completed.
In our example, the yellow time progress bar is set not to overlay appointments, so it appears dimmed wherever an appointment is scheduled.
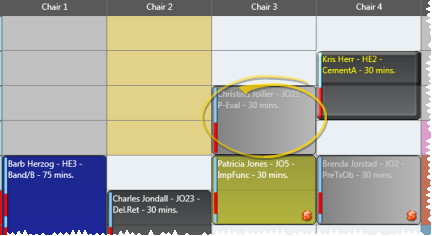
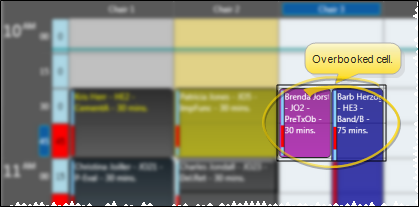
Overbooked cells -
Drag & drop appointments - You can quickly reschedule an appointment by dragging
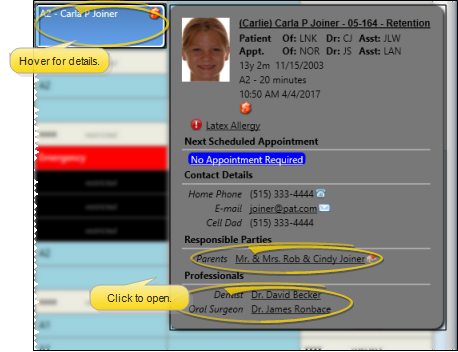
Hover for tooltip - Hover over a scheduled cell to see a tooltip that includes the details about that appointment, such as the patient name,
If the Next Scheduled Appointment details are enabled for the tooltip in your Scheduler User Options, you can hover over the link to view the doctor and office assigned to that appointment. (See "Set Up Appointment Display Options" for details.)
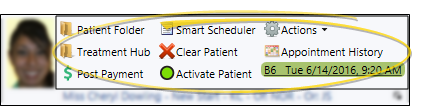
Activate a patient - Click the appointment you want to work with, then click Activate Patient from your Scheduler ribbon bar. (You can also right-click an appointment and select Activate, or press F2 on your keyboard, to activate the currently selected appointment). You can then work with the active patient directly from the Scheduler ribbon bar. (Use your General Grid Options to enable / disable the Patient Thumbnail Photo that can appear with the selected appointment and active patient.)
Click Activate Patient.

Then select an action.
 Open chart - Activate a patient in your Scheduler and click Open Chart
 Treatment hub - Right-click an appointment and select Treatment Hub, or activate a patient and select the Treatment Hub icon from the Scheduler ribbon bar to open the patient's Treatment Hub page.See "View Treatment Hub" for details
 Post Payment -
 Schedule - Activate a patient in your Scheduler and click
 Clear Patient - Click Clear Patient to remove the active patient from the Schedule ribbon bar. The patient is also cleared automatically when you activate a different patient. (You can also press your Esc key to clear the patient.)
 Actions - Print Appointment Card - Select Actions, then Appointment Card to generate an appointment card for the active patient. See "Appointment Cards" for details.
Actions - Print a payment receipt - Select Actions, then Receipt to print a payment receipt for the active patient. See "Receipt of Payment" for details.
Actions - Add patient to a stack - Select Actions, then Add to Stack to add the active patient to an operator's Stack. See "Stacks Widget" for details.
Actions - Patient Rewards - Select Actions, then Patient Rewards to open the Patient Rewards Management window. See "Manage Patient Reward Points" for details.
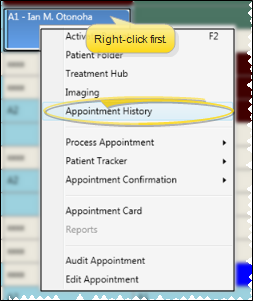
 Appointment History - Click Appointment History to view the patient's Appointment History or Arrival Log. See "Appointment History" for details.
Scheduled Appointment - Hover over the scheduled appointment to view the date, time, orthodontist, and office assigned to the appointment. You can also click to go to the appointment in your Scheduler.
Open patient folder / treatment hub - You can right-click a patient appointment and select to open the Patient Folder or the patient's Treatment Hub.

Open Imaging page - Right-click an appointment in your Scheduler and select Imaging to open the patient's Imaging page. See "View Patient Imaging Page" for details.

Appointment history - Right-click an appointment in your schedule, and select Appointment History to view the patient's appointment history or arrival log. See "Appointment History" for details.
Process appointment - Right-click an appointment in your schedule and select Process Appointment. See "Process Appointments" for details. Appointments that have been processed as Kept can appear dimmed on your schedule, or can be removed from your schedule entirely. If the appointments appear on the schedule, you can hover over them to view the details and open the patient folder, just as you can with currently scheduled appointments. In addition, the amount of doctor time assigned to that appointment remains visible on your Scheduler

Sign patient in / update Patient Tracker from Scheduler - Right-click an appointment in your schedule and select Patient Tracker. You can then sign a patient into your office, as well as update the patient's current appointment progress. See "View & Update Patient Tracker" for details. The current Patient Tracker status is displayed at the bottom of the patient's appointment for your reference. (See "Notifications" details, above.)
![]()
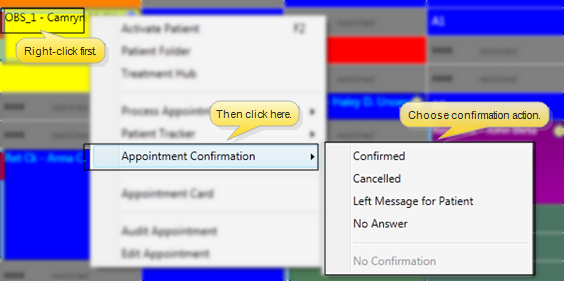
Manual appointment confirmation status - If you do not use Edge Reminders, you can right-click an appointment in your schedule and select Appointment Confirmation. Then choose whether the patient confirmed or cancelled the appointment
Print appointment card - Right-click an appointment in your schedule and select Appointment Card to generate an appointment card form for the patient.

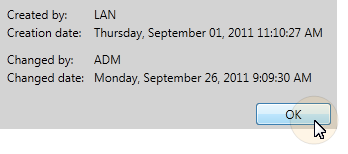
Audit appointment - Right-click an appointment and select Audit to see who and when the original appointment was scheduled, as well as the operator, date, and time it was changed. You can audit both currently scheduled and kept appointments.
Right-click an appointment and select Audit.
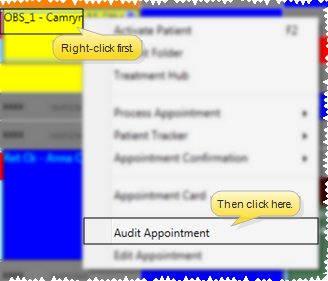
Review the audit information, then click Ok to return to your Scheduler.
Listen to voice message - When a patient leaves a voice message in response to an Edge Reminders appointment reminder call, you can click the icon to listen to the message(s). You can also listen to all messages directly from the Edge Reminders Sent Messages window. See "Review Sent Messages" for details.)

Send an e-mail message - Hover over a patient appointment, then click the patient or responsible party e-mail address to send a Quick Message.
Schedule an appointment - In addition to using Drag & Drop (described above), you can use
Review schedule status - The bottom of the Scheduler displays the status of the currently selected grid, including the date, how many days/until today's date, name of the scheduling template that's in use, how many appointments are scheduled, how many remain to be completed, and details of the currently selected cell.

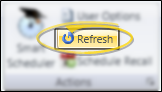
 Refresh - If you leave the Scheduler open for any length of time, click
HR Manager Integration - The number of scheduled patient appointments appears at the top of your HR Manager office calendar for a quick overview of your day. See "View HR Manager Calendar" for details.
Reposition / Close Tabs - Right-click the page header to close, reposition, rearrange, or resize the window. Tell me more...
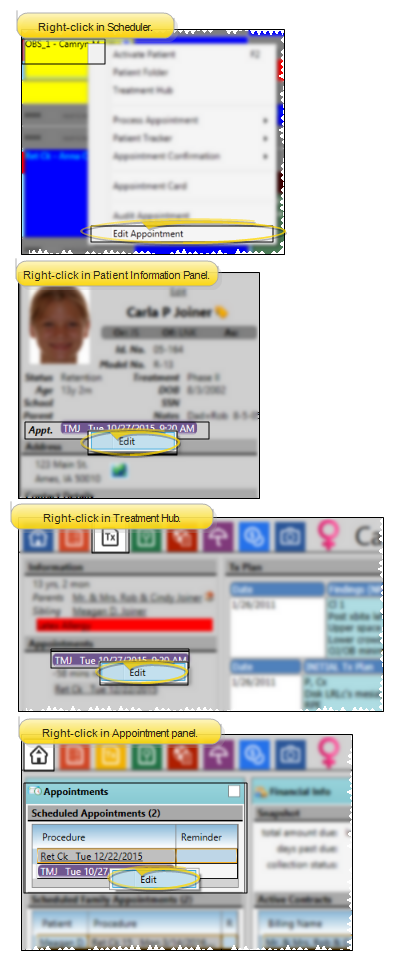
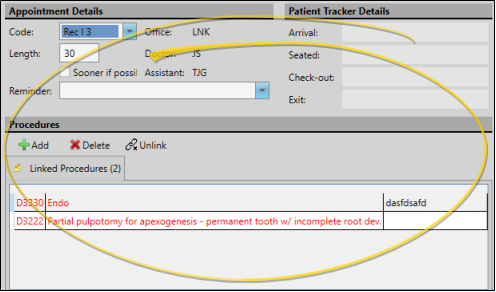
Edit Appointment Details![]() - Right-click an appointment in your schedule, from the patient information panel, or from the expanded Appointment panel of the patient folder Home page, and select Edit Appointment to change the appointment details, including the procedure, appointment length, reminder, and Patient Tracker times. You can also enable / disable the
- Right-click an appointment in your schedule, from the patient information panel, or from the expanded Appointment panel of the patient folder Home page, and select Edit Appointment to change the appointment details, including the procedure, appointment length, reminder, and Patient Tracker times. You can also enable / disable the  Sooner if Possible option to add / remove the patient from your Sooner if Possible scheduler board.
 │
│
Ortho2.com │1107 Buckeye Avenue │ Ames, Iowa 50010 │ Sales: (800) 678-4644 │ Support: (800) 346-4504 │ Contact Us
Remote Support │Email Support │New Customer Care │ Online Help Ver. 8/3/2015