The Needs Appointment section of your scheduler bar lists the patients that should have a next appointment scheduled, but don't. You can place patients on the list manually, or automatically track patients that need appointments by enabling the Appointment Required option for certain status descriptions, and entering treatment chart records that include next appointment criteria. Patients are placed in different sections of your needs appointment list depending upon how they were added to the list, and the available details of the next needed appointment.
Get Started
Flag Statuses that Require Appointments - Enable the Appointment Required status option if every patient in the status should have an appointment scheduled with your office. When you process an appointment for a patient in a status that requires an appointment, you are given rescheduling opportunities, including placing the patient on your needs appointment list. See "Set Up Status List" for details.
Set Up Needs Appointment Patient Folder Link - Enable / disable the Launch Smart Scheduler user option to choose whether to open the Smart Scheduler for a patient when you click on a Needs Appointment link in the Patient Information Panel of a patient folder, or whether clicking the link opens the Scheduler date with the patient activated. See "Set Up General Scheduler Options" for details.
Enable / Disable Group by Status Option - Enable the Group Needs Appointment by Status user option to group patients in the Patients Without Appointments list by status, or disable the option to display the list alphabetically by patient last name. Note that grouping by status may be disabled when the list includes more than 150 patients, to prevent undue system slow-downs.See "Set Up General Scheduler Options" for details.
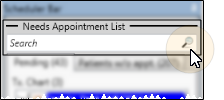
Scheduler - Scheduler Bar. If you cannot see it, hover over the Scheduler Bar pin (most often at the right edge of your screen) until it slides into place. Your Needs Appointment List is at the top of the Scheduler Bar. (See "View & Navigate Your Schedule" for details about how to open your Scheduler.)
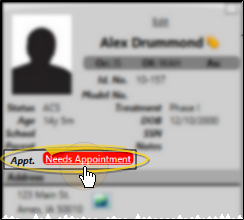
Patient Folder - If a patient is on the needs appointment list, you can
click the Needs
Appointment link
on the Patient Information Panel to open either the Scheduler date or the Smart Scheduler with that patient activated. (See "Set Up General Scheduler Options" for details about setting up your Needs Appointment patient link.)
Use This Feature
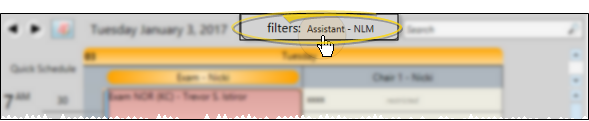
Enable / Disable Patient Filters - Only
patients assigned to the doctor, office, and assistant shown at the top of your Scheduler window are included in the needs appointment list. To
be certain all patients are included, set the filters to All.
Search for a Patient - Use the Search field at the top of the bar to search for patients on the needs appointment list by all or part of the first name, last name, full name (in Last.First format), or appointment procedure code.
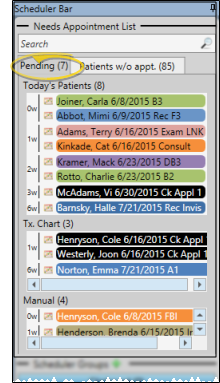
Pending Appointments - Click the Pending tab of the needs appointment list to view Today's Patients, Tx. Chart appointments, and Manually placed appointments. Each section heading indicates the number of patients in each list. Patients are grouped by the number of weeks until their next appointment is/was due.
Pending Tab Sections
Today's Patients - Patients are moved to this section when they have either a Tx. Chart or Manual needs appointment record, and have an appointment scheduled for today.
Tx. Chart - Patients are added to this section when you create a treatment chart record that contains the procedure and date that should be scheduled for the next appointment.
Manual - Patients are added to this section when you process a patient's appointment without scheduling a future appointment, or add next appointment details to a patient on the Patients Without Appointments tab of the list (described below).
Pending Tab Actions
Drag & Drop to Schedule - You can drag and drop a patient from the board onto an appointment time slot in your schedule. Any related appointment messages, milestone reminders, and workflows will be triggered appropriately.
Schedule the Patient - Click the Smart Scheduler button beside the patient name, or right-click the name and select Search for Appointment to open the Smart Scheduler for that patient.
Open Patient Folder / Treatment Hub - Right-click a patient name and select to go to the home page of the Patient Folder, or open the Treatment Hub page.
Go to Scheduler Date - Right-click a patient name in the board, and select Go To Scheduler Date to open your Scheduler to the date of the pending appointment.
Remove from Needs Appointments List - Right-click a patient name in the list, and select Remove to delete the next appointment properties (procedure, weeks until due, length, and reminder). If the patient is in a status that requires an appointment, the patient will be moved to the Patients w/o Appointments tab of the list. If the patient's status does not require an appointment, the patient is completely removed from the needs appointment list. Note that patients are automatically removed from the needs appointment list when an appointment for the next procedure is scheduled.
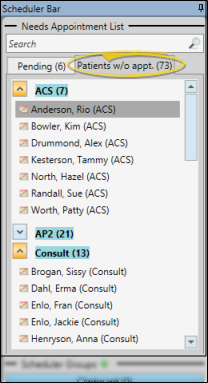
Patients Without Appointments - Patients in an appointment-required status that have no future appointment scheduled are automatically placed on the Patients w/o Appointments tab of your needs appointment list. Hover over a patient name to view additional details, including the patient's primary code, the next treatment sequence procedure and weeks away (if any), and patient contact information. You can choose to group patients by status or simply list them alphabetically by last name, and choose whether to include past due recall appointments on this list. (See "Set Up General Scheduler Options" for details about these settings.)
Expand / Collapse Status Groups - If your list is grouped by status, you can click the arrows beside each status heading to expand / collapse that section of the list.
Schedule the Patient - Click the Smart Scheduler button beside the patient name, or right-click the name and select Search for Appointment to open the Smart Scheduler for that patient.
Activate a Patient - Double-click a patient name, or right-click and select Activate to activate the patient in your Scheduler. You can then use any of the tools listed in the Active Patient section of the Scheduler ribbon bar, such as open the patient folder, post a payment, or review the appointment history. (See "View & Navigate Your Schedule" for details about using the Active Patient ribbon bar options.)
Needs Appointments Details - Right-click a patient name in the list, and select Set Next Appt Details to enter the next appointment properties, including the procedure, number of weeks until the appointment is due, appointment length, and reminder. When you click Appoint to save the changes, the patient will be moved from the Patient w/o Appointments list to the appropriate Pending section of your needs appointment list (described above).
Open Patient Folder / Treatment Hub - Right-click a patient name and select to go to the home page of the Patient Folder, or open the Treatment Hub page.
Remove from Needs Appointments List - If the patient is in a status that requires an appointment, you cannot remove him or her from the needs appointment list: You must either schedule an appointment for the patient, or change the status assignment in the patient folder. ( See "Set Up Status List" for details about the "Appointment Required" option.)
More Information
Trigger a Workflow - Use the Needs Appointment trigger to activate a workflow whenever you process an appointment or change a patient status that places them on your needs appointment list. (Note that placing a patient on the needs appointment list by creating a Treatment Chart record will not trigger the workflow.)
Print Needs Appointment List - Run the Needs Appointment report to see which patients with a status requiring an appointment do not have one appointment scheduled. Among other data, the report includes the next required procedure, if available, to assist you in scheduling appropriate appointments for the patients.
 Scheduler
 Search field at the top of the bar to search for patients on the needs appointment list by all or part of the first name, last name, full name (in Last.First format), or appointment procedure code.
 │
│


 Smart Scheduler button beside the patient name, or right-click the name and select Search for Appointment to open the