Example receipt in business card format.
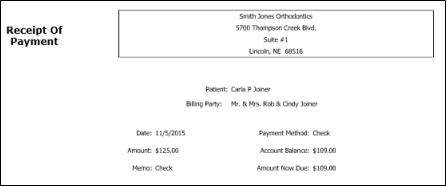
You can generate a receipt of payment for your patients
Example receipt in business card format.
Post a new payment / refund transaction - Before you post a payment or refund, enable the  Display receipt after posting option to display the receipt signature form, and generate a receipt immediately. (When you print a receipt in this manner, you have the opportunity to sign it; in addition, the event is recorded in the correspondence history.) See "Post Payments" for details.
![]()
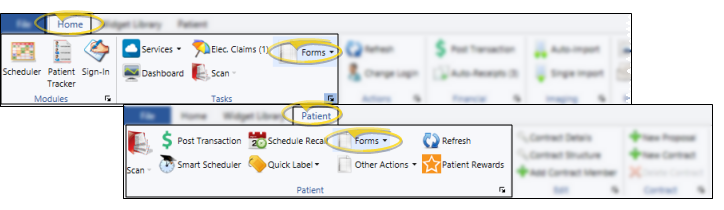
Quick Report form - From the Home/Tasks or Patient/General ribbon bar, click  Forms and select Receipt. (The first time you initiate this form from the Home/Tasks ribbon, you will set your Quick Report settings. From then on, the form is loaded with those settings automatically.)
Example from Home/Tasks ribbon bar.
You can also generate receipts for the Active patient in your Scheduler (See "View & Navigate Your Schedule" for details), or by right-clicking a transaction in the patient's ledger (See "Transactions Panel" for details), or from the Reporting section of the Home ribbon bar (See "Run Reports" for details).
Select the options to use for choosing records and generating this report or form. Choose carefully, as your selections will affect which patients are included in the report.
When you open a patient folder, then initiate this form from the Patient ribbon bar, your Quick Reports settings take effect, bypassing your setting options, and the form is immediately generated for the active patient. See "Use Quick Reports" for details. In addition, when you print a receipt as you post a transaction, your options are slightly different. See "Post Payments" for details.
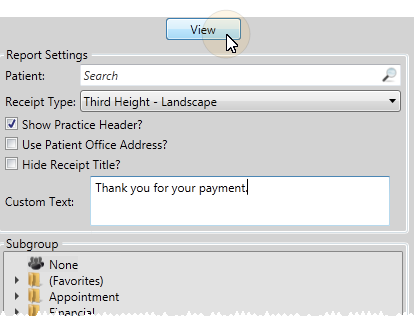
Patient - Search for the patient to print the form for. If you choose a subgroup instead (described later), this field is cleared.
Receipt type - Select from several receipt formats, from business card size to full size sheets of paper.
Show office/practice header - Enable this option to print your office name and address at the top of the form. If you print this form on paper that is pre-printed with this information, disable this option.
Use patient office address - Enable this option to use the address of the office assigned to the patient folder on the form. Otherwise, your main office address will be printed. If the Show Office Header option is available for this form, and is disabled, this option is ignored.
Hide receipt title - Enable this option to omit the Receipt of Payment title from the form. You might then use the custom text field to insert your own text onto the form.
Custom text - You may include additional text on your receipts, such as "Thank you for your payment" or "Receipt For Orthodontic Services", which may be required by some patients' flex or insurance plans. This option is not available for the business card format.
Subgroup - Select the subgroup to use when generating this report or form. Only records that fit your selected subgroup as well as all other report parameters will be included.
View Results - If needed, click View at the top of the report settings panel to view the results on your screen. When you run a report or form from your Recent Report list, or when you run a Quick Report, the initial results are sent to your screen immediately, with one exception: A Quick Report that has the Print Only option enabled will not show your results on the screen at all, but prompt you for the printer to use.
Manage Options and Output - With the results on your screen, you can choose different report settings from the left side of the screen and click View again to obtain different results. In addition, you can manage the output with the toolbar at the top of the report window. See "Navigate, Print, & Export Report Results" for details. In addition, reports can either be printed, or exported as an image or PDF file.
 │
│
Ortho2.com │1107 Buckeye Avenue │ Ames, Iowa 50010 │ Sales: (800) 678-4644 │ Support: (800) 346-4504 │ Contact Us
Remote Support │Email Support │New Customer Care │ Online Help Ver. 8/3/2015


