
Run Statement forms to provide your patients and billing parties with clear information about their current financial obligation.
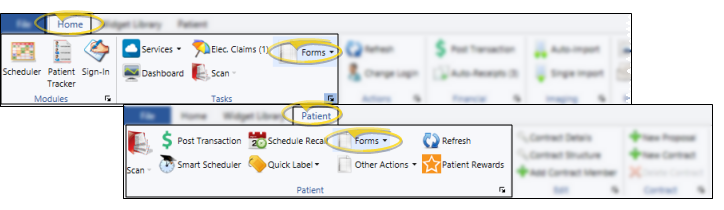
Home or Patient ribbon bar >  Forms > Statements. (The first time you initiate this form from the Tasks ribbon, you will set your Quick Report settings. From then on, the form is loaded with those settings automatically.)
You can also generate statements from the Reporting section of the Home ribbon bar, under the Forms heading. (See "Run Reports" for details.)
Select the options to use for choosing records and generating this report or form. Choose carefully, as your selections will affect which patients are included in the report.
When you open a patient folder, then initiate this form from the Patient ribbon bar, your Quick Reports settings take effect, bypassing your setting options, and the form is immediately generated for the active patient. See "Use Quick Reports" for details.
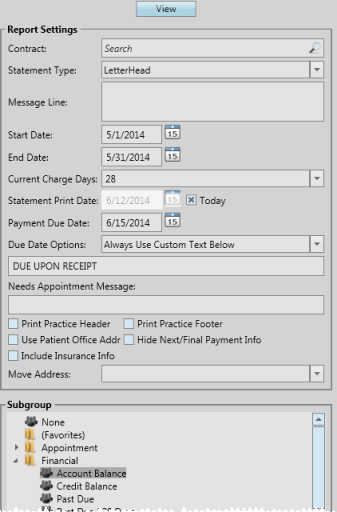
Contract - Search for the patient account to print the statement for. (If you will be running statements for a subgroup, ignore this field.)
Statement type - Choose to print on 8.5" x 11" Plain Paper, or special Pre-Printed Forms that include your practice address pre-printed at the top and bottom. You can also choose Letterhead, which omits your name and address from the top of the statement.
Message - You can include messages that will appear on all the statements in this print job.
Start & End dates - Enter the range of transaction dates to include on the form.
Current Charge Days - This field is required for the Current Transactions / Past Transactions sections of the statement to function properly). Enter the number of days after posting a charge or payment that the transaction is still considered current. For example, if you enter "30", transactions posted 30 or fewer days ago will be in the Current Transactions section of your statements. Transactions posted 31 or more days ago will be in the Past Transactions section.
Statement Print Date - Enter the date to print in the "Statement Date" field of the statement form, or enable the Today option to use today's date.
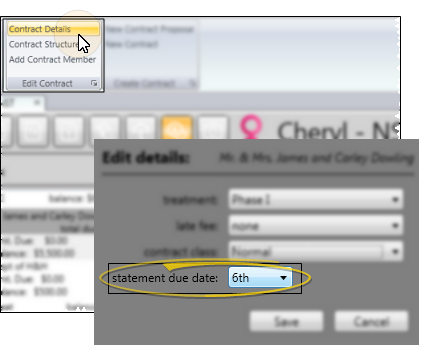
Payment due date - Select a default due date to use for your statements. Note that this date might be overridden by your responses to the following payment date fields.
Always Use Payment Day Above - This choices prints the date from your Payment Due Date field (described above) on all the statements in this print job.
Res Party Day or Date Above - This choice uses the date from the
Always Use Custom Text Below - This choice prints the message from the
Res Party Day or Text Below - This choice uses the date from the
Payment date alternate text field - Use
Needs appointment message - Use this field to include a message when the patient has no future appointment scheduled, but is in a status that requires an appointment. If you leave the field blank, no extra message is included.
Print practice header - Enable this option to print your office name and address at the top of the form. If you print this form on paper that is pre-printed with this information, disable this option.
Print practice footer - Enable this option to print your office name and address at the bottom of the form. If you print this form on paper that is pre-printed with this information, disable this option.
Use patient office address - Enable this option to use the address of the office assigned to the patient folder on the form. Otherwise, your main office address will be printed. If the Show Office Header option is available for this form, and is disabled, this option is ignored.
Include Insurance Information - Enable this option to include expected insurance coverage and any insurance payments on the statements. Otherwise, your statements will ignore insurance information. Insurance information is not calculated in the Next Payment section of the statement .
Hide next and final payment info - Enable this option to include only transactions that have been posted to the account on the statement, omitting future financial obligations.
Move Address - This field functions only if you have enabled the Print Practice Header option. Use this field to position the billing address to fit your window envelopes. The value -2 moves the address the farthest up on the page. 0 is the default position. The value 2 moves the address the farthest down on the page.
Subgroup - Select the subgroup to use when generating this report or form. Only records that fit your selected subgroup as well as all other report parameters will be included.
View Results - If needed, click View at the top of the report settings panel to view the results on your screen. When you run a report or form from your Recent Report list, or when you run a Quick Report, the initial results are sent to your screen immediately, with one exception: A Quick Report that has the  Print Only option enabled will not show your results on the screen at all, but prompt you for the printer to use.
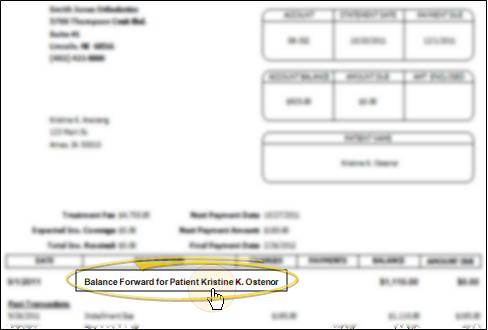
Link to patient folder - As you view statements on your screen, you can click the balance forward description line to open the patient folder.
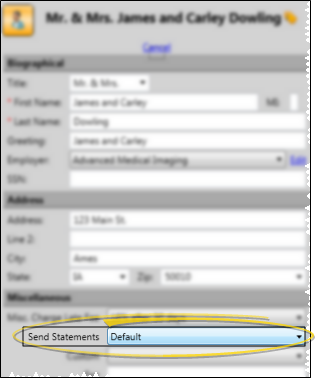
Responsible party override - Note that you can force or prevent statements from generating for certain responsible parties, regardless of your subgroup, by setting the Send Statement field to Always or Never in the responsible party record.
Balance forward calculation - Transactions that fall before the Start Date are lumped together and calculated as the balance forward.
Manage Options and Output - With the results on your screen, you can choose different report settings from the left side of the screen and click View again to obtain different results. In addition, you can manage the output with the toolbar at the top of the report window. See "Navigate, Print, & Export Report Results" for details. In addition, reports can either be printed, or exported as an image or PDF file.
 │
│
Ortho2.com │1107 Buckeye Avenue │ Ames, Iowa 50010 │ Sales: (800) 678-4644 │ Support: (800) 346-4504 │ Contact Us
Remote Support │Email Support │New Customer Care │ Online Help Ver. 8/3/2015


