Receipt of Payment
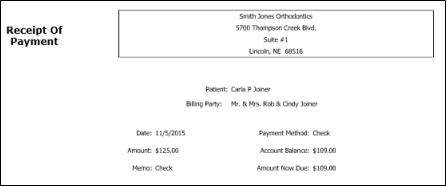
You can generate a receipt of payment for your patients as you post the transaction, or after the transaction is complete, in a variety of formats. When you print a receipt as you post a payment, a copy of the receipt is automatically added to both the patient and responsible party correspondence history. If you print a receipt later, the event is not recorded. The payment method is noted in the memo section of the receipt form. In addition, you may choose to email receipts to responsible parties, rather than printing them.
Since Edge Cloud has multiple receipt formats, including emailing receipts to billing parties, you can set up the defaults you want to use when generating payment receipts for your patients.
Choose Default Format - Use the Default Forms section of your Reports and Forms editor to select the default format to use for your forms. This is the format that will be used when you run the form from the Forms option of the Home or Patient ribbon bar. If you have purchased customized forms, you may choose your form as the default. See "Set Up Reports and Forms" for details. This format will only be used when you print receipts; emailed receipts use the Form Email editor settings instead.
Set Up Email Receipt Format - (Only required when you email receipts.) Use the Form Email Setup tools to set up your online correspondence system. The setup options include specifying your return email address, web site, and logo, as well as creating the text of appointment card and receipt messages.See "Set Up Form Email Options" for details.
You must set up your Form Email Setup editor before the email option will be available for your appointment cards and payment receipts.
When you generate a receipt as you post a payment or refund, you have the opportunity to sign the receipt, and the event is recorded in the patient and responsible party correspondence histories.
-
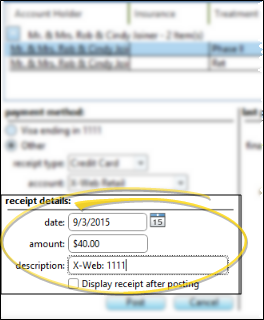
 Enable Receipt Option - Before posting the payment, enable the Display receipt after posting option at the bottom of the window. A receipt will be generated for all credit card payments whether or not this option is enabled.
-
Sign & Print Receipt - If you enabled the Display receipt after posting option, or if you posted a credit card payment, a receipt form appears on your screen, waiting for a signature.
Show Account Balance & Amt Due - Enable this option to expand the signature form and display the contract's account balance and amount due. Disable the option to remove these amounts from the form. This is the form that will be saved in the patient's Correspondence History: The form you print or email may look different.
Sign the Receipt - Use your pointing device (i.e. your mouse) to sign the receipt. If needed, click the  beside the signature field to clear the signature and start over. If you do not display and sign a receipt form as you post a transaction, you will not be able to obtain a signature for the payment.
Send Receipt - Choose to Print or Email the receipt. Printed forms will use your Quick Report settings; emailed forms will use your Form Email Setup settings. When you select the email option, you can then choose to send the message to any email address associated with the responsible party that made the payment.
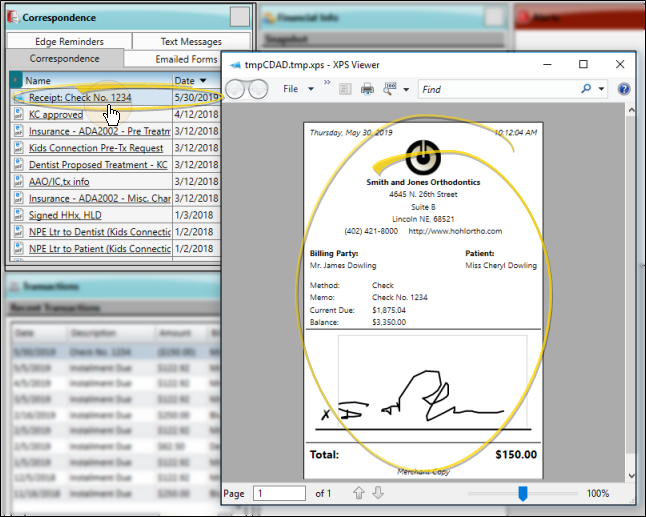
Correspondence History Tracking - When you print a receipt at the time a payment is posted, the event is recorded in both the patient and responsible party Correspondence History. This receipt is a copy of the form that appeared on your screen as you posted the transaction, including any signature. If you print a receipt later, the event is not recorded in the Correspondence History.
If you generate a receipt as a payment is posted (described above), you can open and print that receipt from the patient or responsible party correspondence history. When opening a receipt from the patient folder, receipts that you captured or printed as you posted a transaction will appear in the Correspondence History tab: Receipts that you sent via email will be in the Email tab.
you can print or email payment receipts for transactions that have already been posted to patient accounts. These receipts will not be saved to the patient or responsible party correspondence history.
-
Open the Form - You can open this feature in multiple ways: Use the method that's most convenient for you. Certain methods of opening the form do not allow for selecting the receipt format or emailing the receipt.
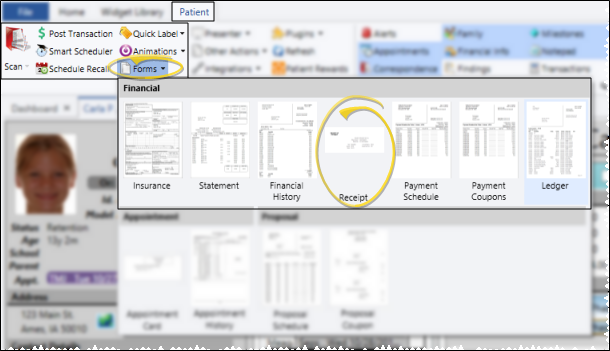
Patient Ribbon Bar - (Email receipt not available.) Patient section > Forms > Receipt. (An Edge Cloud patient folder must be open for the Patient ribbon bar to be available.) The form will be generated for the patient's last-posted payment. The form will automatically use your Quick Report settings.
Patient Folder Home Page - Transaction panel > Right-click the transaction > Choose Receipt > Select View to choose the receipt output options; or select Print to generate the receipt with your current Quick Report settings; or select Email to use your Form Email Setup options. (See "Patient Transactions Panel" for details.)
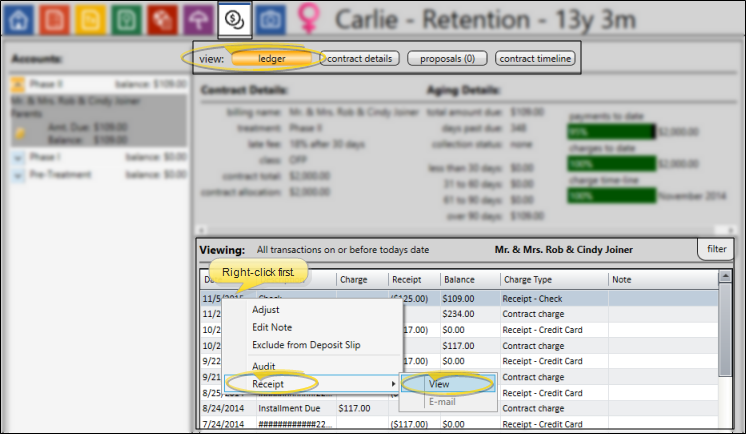
Patient Folder Finance Page - View: Ledger > Right-click the transaction > Choose Receipt > Select View to choose the receipt output options; or select Print to generate the receipt with your current Quick Report settings; or select Email to use your Form Email Setup options. (See "Patient Finance Page" for details.)
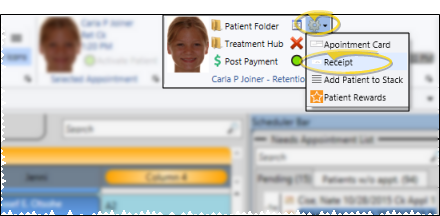
Scheduler Ribbon Bar - Active patient section > Actions > Receipt > Select Email to use your Form Email Setup options, or select Quick Receipt to use your current Quick Report settings. The form will be generated for the patient's last-posted payment.
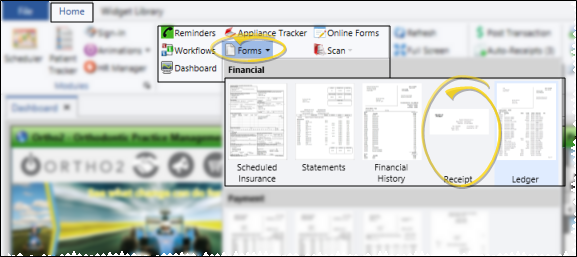
Home Ribbon Bar - (Email receipt not available.) Tasks section > Forms > Receipt. You will be able to select the receipt format options, and generate the form for one patient or a subgroup of patients.
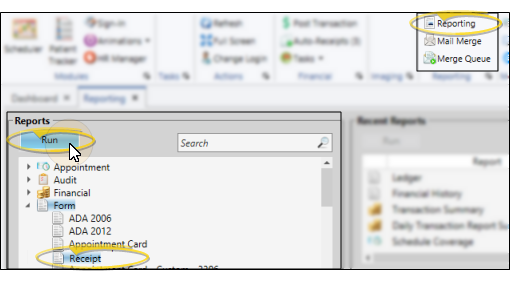
Home Ribbon Bar - (Email receipt not available.) Reporting section > Reporting > Form > Receipt. (You can also use the Search field to find the form you want to work with.) You might also be able to run this form from your Recent Reports or Quick Reports list. See "Run Reports" for details. You will be able to select the receipt format options, and generate the form for one patient or a subgroup of patients.
-
Form Settings - Select the options to use for choosing records and generating this form.(If the settings panel is not visible, click the  Show/Hide icon in the upper left corner of the Reporting window.)
When you open a patient folder, then initiate this form from the Patient ribbon bar Forms icon, your Quick Reports settings take effect, and the form is immediately generated for the active patient. To use different settings, click the Slider icon at the upper left edge of the report to open the report settings window, if available, or edit the Quick Report settings. See "Quick Reports" for details.
Patient - If you did not open the report with a patient active, use the Patient field to select the patient contract to work with. If you select a subgroup, as described below, this field is ignored.
Receipt Type - Select from several receipt sizes, including business card size, third-sheet landscape or portrait, full sheet, and Canadian Insurance formats, which include the insurance subscriber name, group policy and certificate numbers.
Show Office / Practice Header - Enable this option to print your office name and address at the top of the form. If you print this form on paper that is pre-printed with this information, disable this option.
Use Patient Office Address - Enable this option to use the address
of the office assigned to the patient folder on the form. Otherwise, your main office address will be printed.
Hide Receipt Title - Enable this option to omit the Receipt of Payment title from the form. You might then use the custom text field to insert your own text onto the form.
Custom Text - You may include additional text on your receipts, such as "Thank you for your payment" or "Receipt For Orthodontic Services", which may be required by some patients' flex or insurance plans. This option is not available for the business card format.
-
(Not available for email receipts.) Subgroup - Select the subgroup to use when generating this report or form. Only records that fit your selected subgroup as well as all other report parameters will be included. See "Subgroup Editor" for details. To include all records that fit the other report criteria, select None. The report will display the name of your selected subgroup just under the report name, so you know which criteria was used to generate the results.
-
(Not available for email receipts.) View Results - If needed, click View at the top of the report settings panel to view the results on your screen. When you run a report or form from your Recent Report list, or when you run a Quick Report, the initial results are sent to your screen immediately, with one exception: A Quick Report that has the Print Only option enabled will not show your results on the screen at all, but continue with the printing options.
-
(Not available for email receipts.) Manage Options and Output - With the results on your screen, you can choose different report settings from the left side of the screen and click View again to obtain different results. In addition, you can manage the output with the toolbar at the top of the report window. See "Use Report Results" for details.
Review Sent Forms - A copy of the form is saved in the patient's correspondence history: Use the Emailed Forms tab of the patient's correspondence history to review the appointment cards and payment receipts that were sent using the Edge Form Email feature, instead of being printed. (See "Set Up Form Email Options" for details about enabling this feature.)
Batch-Print Receipts for Auto Receipt Payments - You can choose to mass-print receipts after posting Auto-Receipts. See "Post Auto Receipts" for details.