Treatment Chart & Plan Lists
You can assign pre-defined lists of answers to the columns in your Treatment Chart and Plan styles so that all you have to do is select a response from the list, instead of typing the answer into the patient chart or plan. For example, you might make a list of arch wires and assign that list to a treatment chart column, so that when you add a treatment chart record for a patient, you only need to select the type of arch wires from the list. You use the Treatment Chart List Editor to create those lists. Within a treatment list, you can optionally assign patient reward points, and trigger workflows when specific responses are entered into the patient's treatment chart. Once
you create a list, you can use it over and over again in any Treatment Chart and Plan style.
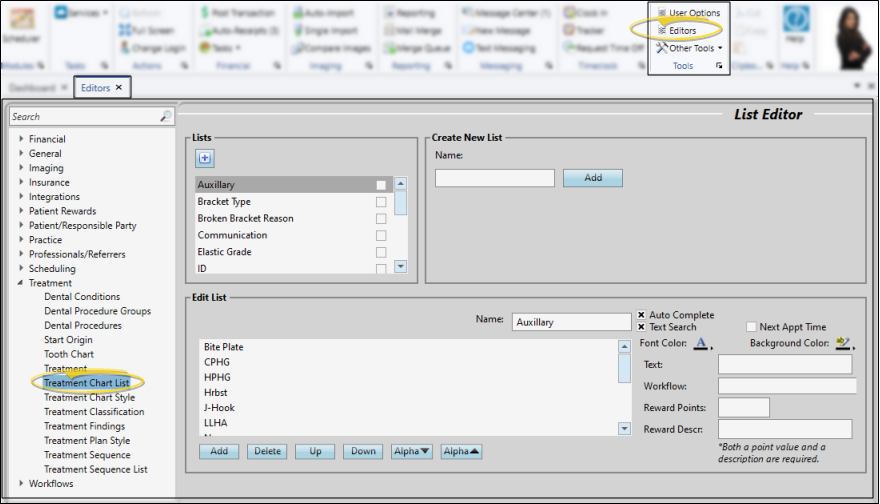
Select Editors from the Tools section of the Home ribbon bar. Then, from the Treatment section, open the Treatment Chart List editor. (You can also use the Search field to look for the editor you want to work with.)
Treatment Chart and Treatment Plan Lists - The lists you create here can be used with both your Treatment Chart and Treatment Plan styles. If you have Edge Specialist, you can use the same lists for both orthodontics and pediatric dentistry chart records.
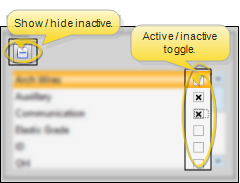
Cannot Delete Created Records - Once you create a record, you cannot delete it. You can, however, flag it Inactive. Records you flag as Inactive are not available for general use, but they remain in your system for reporting and other data collection needs. In addition, you can toggle records back to Active whenever needed.
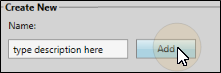
 Create a New List - Type a description in the Create New List portion of the window. Then click Add. You can then edit your list details, and add responses to it.
Select Existing List - Choose a list from the Lists section at the top-left of the window.
You can use the checkbox at the right of the list to toggle the active / inactive status of an record. If not all your lists appear, use the  Show / Hide Inactive icon at the top of the window to include both active and inactive records.
These settings determine how the entire list behaves.
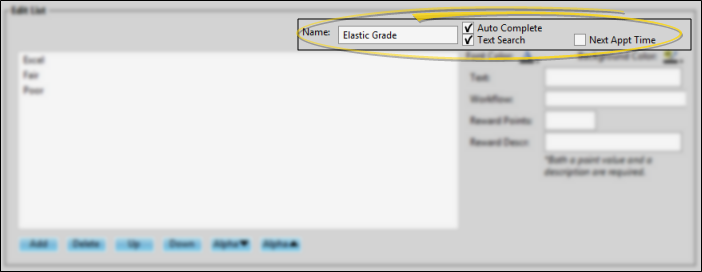
List Name - Use the Name field the Edit List section of the window to change the name of your list.
Auto Complete Option - When the Auto Complete option is enabled for a list, you can press the Tab key on your keyboard to add the entirety of the currently selected response to the treatment chart / plan record. If this option is disabled, you must click the response to add the entire response text to the record.
Text Search Option - When the Text Search option
is enabled for a list, you can begin typing a list response, and your cursor will jump to the response that begins with your typed text. (The matching will occur only after you have stopped typing.) If this option is disabled, your list responses will be numbered, and you can type a number to jump to the response you want.
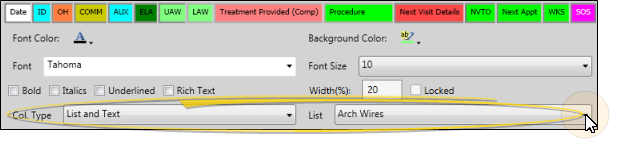
Next Appt Time Option - Enable the Next Appt option to indicate that this list specifies the time frame for scheduling the patient's next appointment. When a treatment chart style includes both a column that requires a response from this list, and a column that requires a Procedure response (described below), the information will automatically transfer to your Needs Appointment List. (See "Needs Appointment List" for details.)
You can add as many responses as you need to your lists, edit and remove responses, and re-order how responses will display when you enter the information into a patient's treatment chart or plan.
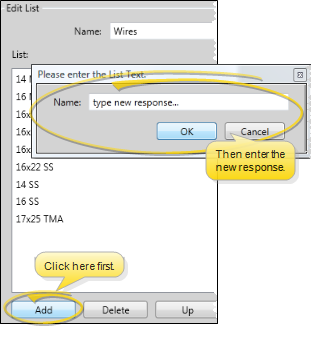
Add a Response
Click Add in the Edit List section at the bottom of the window, then type the response in the text box and click Ok.
Response Details
Select a response from the list at the bottom of the window, then make your changes. Any changes you make do not change any existing treatment chart or plan records.
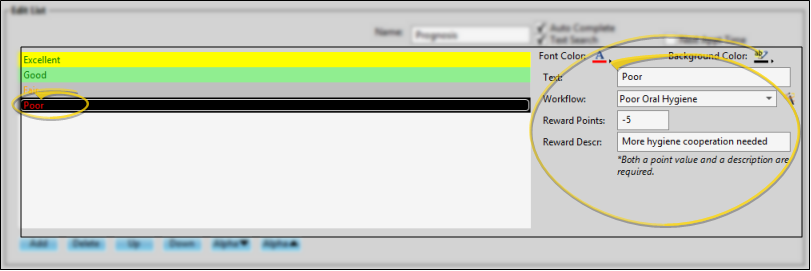
Colors -
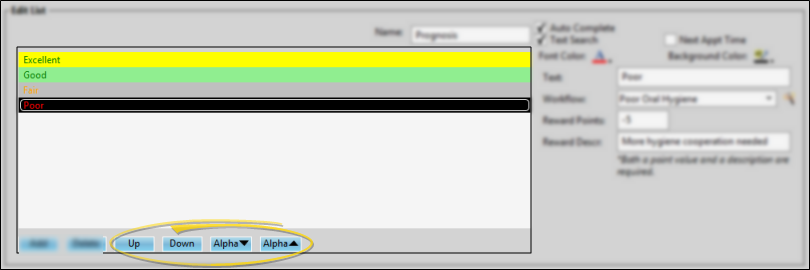
Use the Font Color and Background Color tools to select the colors for this response.
Text - Use this field to enter the response as you want it to appear in the patient's Treatment Chart or Treatment Plan.
Workflow - (Optional.) You can choose an existing workflow, or use the  Workflow Wizard icon to create a new workflow to assign to this response. When you enter this response in a patient's Treatment Chart or Treatment Plan, the assigned workflow (if any) will be triggered automatically.
Patient Reward Points - Use the Patient Reward fields of your Treatment Chart List editor to add or deduct Patient Reward points for specific responses. For example, you might create an Oral Hygiene list where you award 5 points for the response "Excellent" and deduct 5 points for the response "Poor". Then assign the list to a column in one or more Treatment Chart styles. When you create a treatment chart record with that style, and a response is selected for that column, the appropriate points will be added / deducted from the patient's total. Both you and the patient will be able to see the reward description.
Rearrange Responses
Select a response you want to move, then use the up and down buttons at the bottom of the list to rearrange the responses. Or use the alpha + and alpha - to arrange the entire list alphabetically. This is the order the list will appear in as you enter the response in a patient's treatment chart or plan.
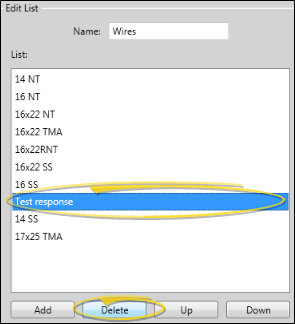
Delete a Response
Click the response to work with, then click Delete at the bottom of the window. This removes the response from the list, but does not remove the response from any existing patient treatment chart or plan records.
Click  Save in your Quick Access toolbar or File ribbon bar (or press Ctrl+S on your keyboard) to save any changes you have made.
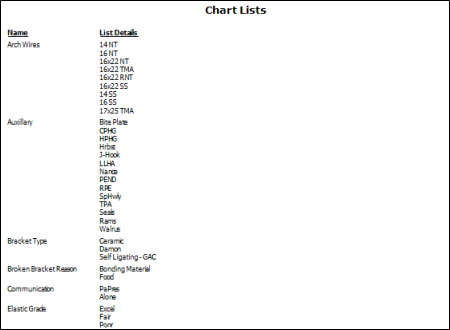
Run the Chart List report, available from the Tables section of your Reporting window, to view the active lists that you have created to use with your Treatment Chart and Treatment Plan styles, in alphabetical order. The report includes both the name of the list and all of the responses in that list. Only active records are included in the report: Any items flagged Inactive in the editor are omitted. See "Treatment Chart and Plan List Report" for details.