Treatment Chart & Plan Style Editor
Use the Style Editor to set up the columns of information you want to include when you create a patient treatment chart or plan record. You may create as many styles as needed, so that you only need to record certain types of information during certain phases or stages of a patient's treatment.
Testing Your Styles![]() - While working on treatment chart and plan styles, you may want to make some test entries. If you do this, be aware that treatment chart and plan records become permanent after 24 hours. So, you might want to either use a training and practice database, or consider using a fictional patient for these tests, so as not to “mess up” an actual patient’s chart.
- While working on treatment chart and plan styles, you may want to make some test entries. If you do this, be aware that treatment chart and plan records become permanent after 24 hours. So, you might want to either use a training and practice database, or consider using a fictional patient for these tests, so as not to “mess up” an actual patient’s chart.
You can assign pre-defined lists of answers to the columns in your Treatment Chart and Plan styles so that all you have to do is select a response from the list, instead of typing the answer into the patient chart or plan. For example, you might make a list of arch wires and assign that list to a treatment chart column, so that when you add a treatment chart record for a patient, you only need to select the type of arch wires from the list. You use the
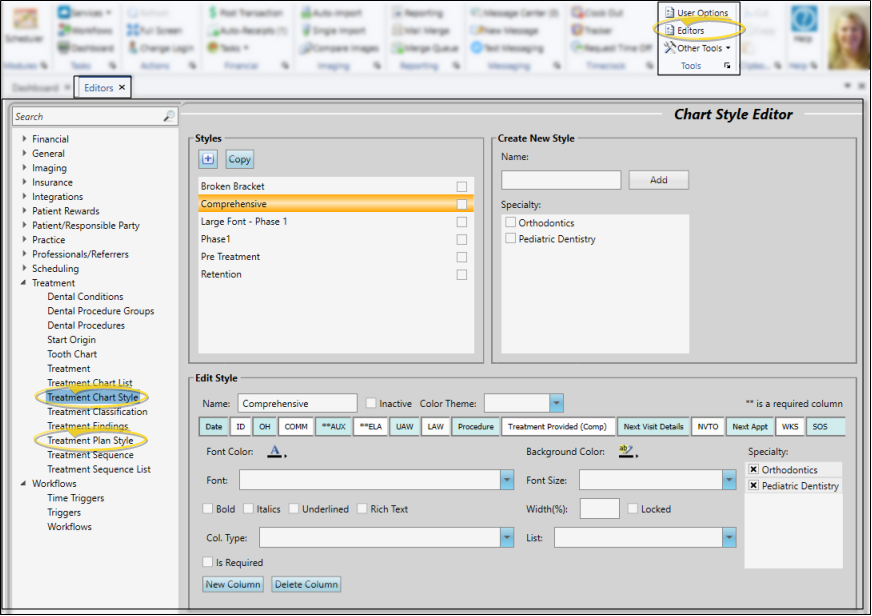
Select Editors from the Tools section of the Home ribbon bar. Then, from the Treatment section, open the Treatment Chart Style or Treatment Plan Style editor. (You can also use the Search field to look for the editor you want to work with.)
The styles are different for your treatment chart and treatment plan: Be sure you open the editor for the type of styles you want to work with.
You can choose to edit an existing style, copy a style, or create a new style from scratch.
Cannot Delete Styles - Once you create a record, you cannot delete it. You can, however, flag it Inactive. Records you flag as Inactive are not available for general use, but they remain in your system for reporting and other data collection needs. In addition, you can toggle records back to Active whenever needed.
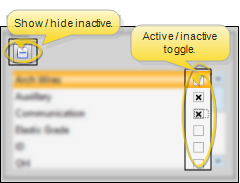
Your list of existing records appears at the left. Click the record to work with, then review and edit the details. You can use the checkbox at the right of the list to toggle the active / inactive status of an record. If not all your records appear in the list, use the  Show / Hide Inactive icon at the top of the window to include both active and inactive records.
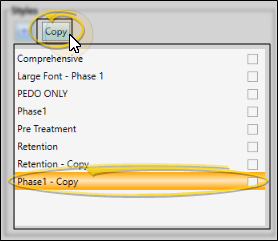
Click a style name, then click Copy to create a copy of a style. You may then edit the details.
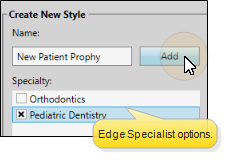
Type a description in the Create New portion of the window. Edge Specialist users can also select whether this style can be used for their orthodontics specialty, their pediatric dentistry specialty or both. Then click Add. You can then edit your style to complete the details.
Several settings affect the entire style.

Be sure you name you styles to they are easily distinguishable from one another.
Once you create a record, you cannot delete it. You can, however, flag it Inactive. Records you flag as Inactive are not available for general use, but they remain in your system for reporting and other data collection needs. In addition, you can toggle records back to Active whenever needed.
This option is for future development and does not affect your styles.
If you are working with a Treatment Plan style, you can enable the Include on Tx. Hub option to display the contents of this style on the patient's Treatment
Edge Specialist users only.
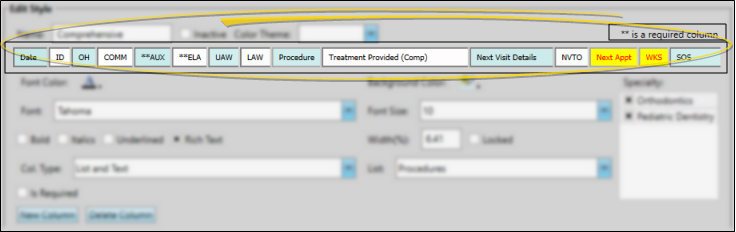
If you did not select the specialties to assign to the style when you first created it, you can use the Specialty section of the window to assign them. When you create a treatment chart or plan record for a patient, only styles assigned to the active Specialty will be available to you. If a style has no specialty assigned in the Styles editor, it will not be available at all.
You add columns to your style for each type of information you want to collect. You can arrange the columns in any order, and use color and other properties to emphasize certain columns. Treatment chart columns that require a response when entered into the patient folder are preceded by two asterisks ( ** ), and the notice "** is a required column" appears in the window if you have at least one required column in the style. (This applies to treatment chart styles only: Treatment plan styles do not have this feature.)
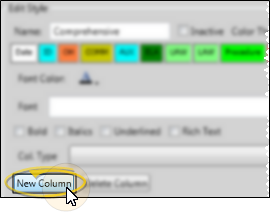
Click New Column and type a name to add a column. The column appears at the end of the style. However, you can easily rearrange columns by clicking and dragging them to new locations.
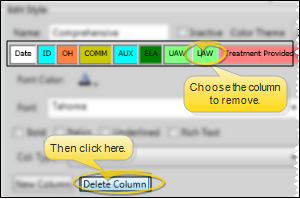
Click the column to work with, then click Delete Column.
To edit a column heading, click in the column you want to change, and type the new heading. You can also copy, cut and paste text into the heading.
Required Column Notice - Two asterisks will appear in the headings of columns you have flagged as required. This applies to treatment chart styles only: Treatment plan styles do not have this feature.
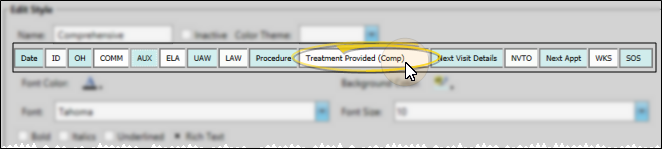
Click the column you want to work with, then change the settings as needed. The settings determine how the column looks.
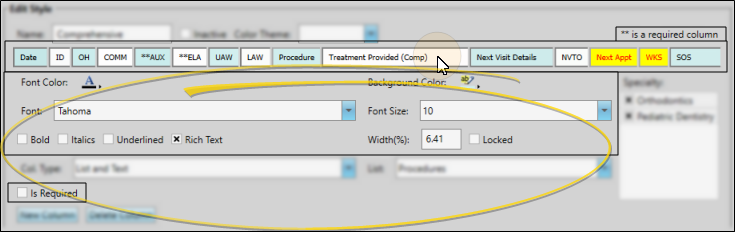
Colors & Fonts![]() -
You can change the background color, font, and text emphasis (Bold, Italics, Underline) for the selected column. As
you make changes, the sample style will change to reflect your new settings.
-
You can change the background color, font, and text emphasis (Bold, Italics, Underline) for the selected column. As
you make changes, the sample style will change to reflect your new settings.
Rich Text Option![]() - Enable the Rich Text option if you want to be able to apply formatting to only selected portions of the column text as you create new chart or plan records. If this option is disabled, any formatting changes you make to the text of a new record will affect all of the text in that column.
- Enable the Rich Text option if you want to be able to apply formatting to only selected portions of the column text as you create new chart or plan records. If this option is disabled, any formatting changes you make to the text of a new record will affect all of the text in that column.
Width![]() - Adjust the width of your columns by dragging the column boundaries in the sample style. .Or, enter a number in the Width field to set the column to a specific percentage. If you enable the Locked option, that column's width cannot be changed by dragging the boundaries, and will not be adjusted when you drag other column boundaries. Of course, the total percentage of all column widths must equal 100 before the style can be saved.
- Adjust the width of your columns by dragging the column boundaries in the sample style. .Or, enter a number in the Width field to set the column to a specific percentage. If you enable the Locked option, that column's width cannot be changed by dragging the boundaries, and will not be adjusted when you drag other column boundaries. Of course, the total percentage of all column widths must equal 100 before the style can be saved.
Is Required![]() - (This applies to treatment chart styles only: Treatment plan styles do not have this feature.) To require an answer to this column, enable the "Is Required" option that appears toward the bottom of the window. Two asterisks will appear in the column heading to indicate that you have flagged this column as required. Then, when you use this style to enter a treatment chart record for a patient, the user must complete the required field before the record can be saved.
- (This applies to treatment chart styles only: Treatment plan styles do not have this feature.) To require an answer to this column, enable the "Is Required" option that appears toward the bottom of the window. Two asterisks will appear in the column heading to indicate that you have flagged this column as required. Then, when you use this style to enter a treatment chart record for a patient, the user must complete the required field before the record can be saved.
Click the column you want to work with, then use the Column Type field to choose the way you want to enter data into that column. If you select the "List Only" or "List and Text" input option, you must also select a List to assign to that column.
Import Integration Requirements - Specific Column Type and List settings are required in your Treatment Chart / Plan Styles editor before you can import data from other areas of Edge Cloud into treatment chart and treatment plan records. Be sure to review the requirements carefully if you want to use those features.
When you create a patient treatment chart or plan record with this column type, you must type (or copy & paste) text into the column.
Findings, Narratives, and Tooth Chart Integrations - You must choose either the Text Only column type or the List and Text column type for the patient findings, appointment narratives, and tooth chart integrations to function.

This column type must have a treatment list assigned to it. When you create a patient treatment chart or plan record with this column type, you must select a response from that list. You cannot edit the response. (See "Treatment Chart & Plan Lists" for details about setting up your lists.)
Patient Rewards and Workflow Integrations - You must choose either the List Only column type or the List and Text column type and assign a treatment list that includes patient rewards or workflow flags to trigger reward points and workflows when the response is entered into a treatment chart.
Findings, Narratives, and Tooth Chart Integrations - You must choose either the Text Only column type or the List and Text column type for the patient findings, appointment narratives, and tooth chart integrations to function.

This column type provides for both selecting from an assigned treatment list, and/or typing text into the patient's treatment chart or plan record. You can select multiple responses from the list by pressing the space bar between responses. You can edit the text of the list responses, as well as add additional text as needed. (See "Treatment Chart & Plan Lists" for details about setting up your treatment lists.)
Patient Rewards and Workflow Integrations - You must choose either the List Only column type or the List and Text column type and assign a treatment list that includes patient rewards or workflow flags to trigger reward points and workflows when the response is entered into a treatment chart.
Findings, Narratives, and Tooth Chart Integrations - You must choose either the Text Only column type or the List and Text column type for the patient findings, appointment narratives, and tooth chart integrations to function.

This column type requires that you select a procedure from your
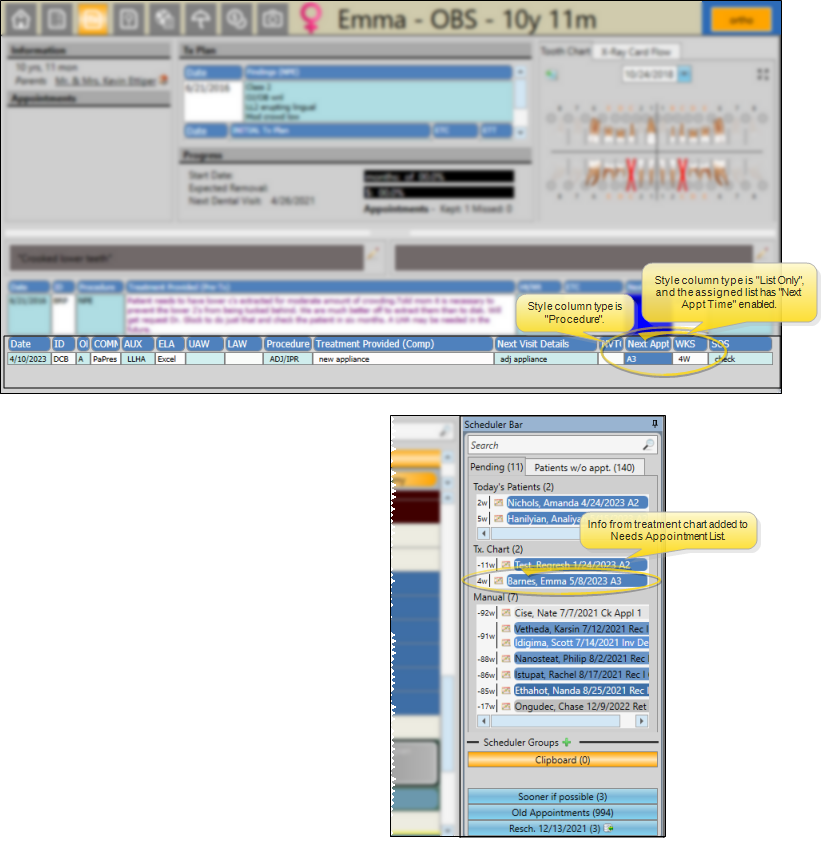
Needs Appointment and Treatment Sequence Integration - Choose this column type to integrate the treatment chart with your Needs Appointment list and the patient's Treatment Sequence.

Specific Column Type and List settings are required for treatment chart integrations to function properly. Please review this information carefully.
The tooth chart / treatment chart integration provides a way for you to add narrative text about tooth chart data directly into a patient's treatment chart in real time. To function, you need a treatment chart style column with either the Text Only or List and Text column type. See "Patient Tooth Chart" for details. (You can optionally turn this feature off. See "Tooth Chart Editor" for details.)
Use the Import Findings tool to add data from the Findings page of a patient folder to a treatment chart or treatment plan record. To function, you need a treatment chart style column with either the Text Only or List and Text column type. See "Add Findings to Treatment Plan / Chart" for details.
![]() Appointment and Treatment Sequence Narrative Integration
Appointment and Treatment Sequence Narrative Integration
Use the Import Narrative tool to add notes from the scheduled appointment and / or Treatment Sequence items directly into the patient's treatment chart. To function, you need a treatment chart style column with either the Text Only or List and Text column type.
You can optionally assign a treatment chart style to a dental procedure. Then, after applying the dental procedure to a patient folder, you can edit that procedure and enter the treatment chart details. These details remain in the dental procedure record, and do not appear in as separate treatment chart records. See "Dental Procedures Editor" for details about assigning a treatment chart style to a procedure.
To automate adding a patient's next appointment information to your Needs Appointment list, use a treatment chart style that includes both 1) a List Only or List and Text column assigned to a list that has the Next Appt Time option enabled, and 2) a Procedure List column type. As soon as you save the treatment chart record for a patient, the Next Appt Time and Procedure that you entered into the chart will automatically transfer to your Needs Appointment List. (See "Needs Appointment List" for details.) If you select a procedure group or chain, each procedure is entered into the Needs Appointment List separately.
![]() Patient Rewards and Workflow Integrations
Patient Rewards and Workflow Integrations
You must choose either the List Only column type or the List and Text column type and assign a treatment list that includes patient rewards or workflow flags to trigger reward points and workflows when the response is entered into a treatment chart.
![]() Treatment Sequence Integration
Treatment Sequence Integration
To integrate the patient's treatment sequence with their treatment chart records, use a treatment chart style that includes both 1) a List Only or List and Text column assigned to a list that has the Next Appt Time option enabled, and 2) a column with the Procedure List column type. As you create a treatment chart record for the patient, their next treatment sequence appointment information will be entered as the default for those columns. See "Treatment Sequence" for details.
Click  Save in your Quick Access toolbar or File ribbon bar (or press Ctrl+S on your keyboard) to save any changes you have made.

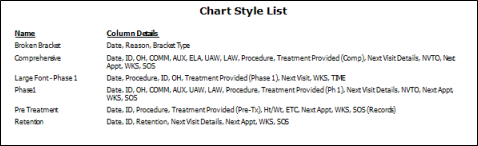
Run the Chart Styles List report, available from the Tables section of your Reporting window, to view the active Treatment Chart Styles you have created to input data into your patients' treatment charts. The report includes both the name of the style, and the column headings in that style. This report includes your Treatment Chart styles only: Treatment Plan styles are not included. Only active records are included in the report: Any items flagged Inactive in the editor are omitted. If you have Edge Specialist, the records for both orthodontics and pediatric dentistry are included in the report. See "Treatment Chart Styles List" for details.