Set Up Auto Receipt Agreements
Set up Auto Receipt plans to facilitate collecting regular payments from your responsible parties via credit card or ACH electronic transfer.
Watch the movie. (A valid Ortho2 customer login is required to run video tutorials, webinars, and training programs.)
Set Up Payments On File - The responsible party must have a credit card, debit card, or electronic transfer (ACH)* payment on file account before you can create an auto receipt plan for that responsible party. See "Set Up Payments on File" for details. * Electronic transfer (ACH) processing is available only for Edge Cloud users in the United States and Canada through Global Payments Integrated, and the United States only through Vanco Payment Solutions.
-
Open Responsible Party Page - Open the responsible party record you want to work with. (See "Responsible Party Records" for details.)
-
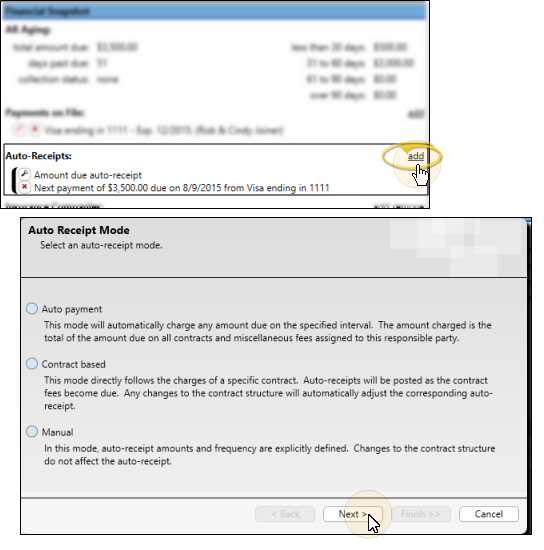
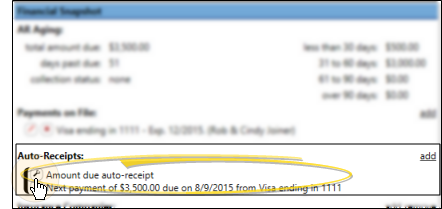
Add or Edit Auto Receipt Plan - Click add beside the Auto Receipts section of the responsible party record to create a new plan, or click the  Settings icon beside the agreement you wish to change.
Add a Plan - When you create a new auto receipt plan, you first select how you want to calculate the amount of the payment. Choose auto payment, which processes payments for the entire amount due on a specific date, including miscellaneous charges; contract based, which processes payments for contract fees as they fall due, thus excluding any miscellaneous charges that may have been posted to the account, or manual, which processes payments for the amount and frequency defined by you, which disregards contract fees and miscellaneous charges posted, but processes payments only as defined.
Edit a Plan - When you edit an existing auto receipt plan, you can change the payment details, but not the auto receipt mode.
You can only choose the Auto Receipt Mode when you first create an auto receipt plan: You cannot change the mode later.
-
Auto Receipt Details - The details of your auto receipt plan depend on the mode you selected when you first added the plan to the responsible party record.
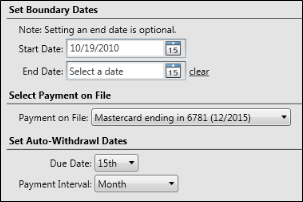
Auto Payment Mode - Auto receipt plans set to the Auto Payment mode process payments for the current amount due from all contracts for this responsible party. You enter the start (and optionally end) dates, the payment on file to use for processing the payments, day of the month the payment should be withdrawn, and the payment interval (i.e. Monthly, Quarterly).
If you do not enter a specific end date, the plan will stop processing payments when there is no amount that should be collected. In addition, if the responsible party is paid ahead on all contracts, no payment will be processed for that interval.
Contract Based Mode - Auto receipt plans set to the Contract Based mode process payments as the fees for a specific contract fall due. You specify the contract to work with at the right of the details window, then enter the start (and optionally end) dates, and the payment on file to use for processing the payments.
The contract summary at the right of the window highlights the contract charges this agreement will cover: Keep in mind that any charges that fall due before your start date and / or after your end date will not be covered by this auto receipt agreement.
The payment amounts and dates are determined by the contract itself. Any changes you make to contract dates and amounts will automatically affect this agreement. If you do not enter a specific end date, the plan will stop processing payments when no contract fees remain. The agreement will also stop processing payments when the contract is fully paid, even if not all charges have yet fallen due. In other words, if the responsible party pays ahead, the agreement will stop processing automatic payments when the contract balance is paid.
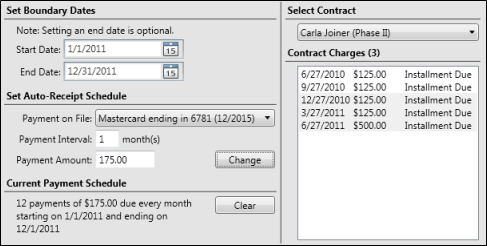
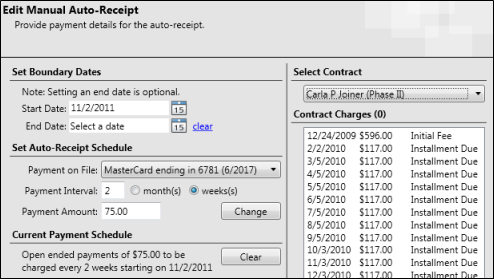
Manual Mode - (Use this mode sparingly.) Auto receipt plans set to the Manual mode process payments according to a schedule you specify. Neither the actual amount due nor the associated contract affect this agreement.
First, select the contract to work with at the right of the details window. A summary of the contract appears to help you determine the best way to manage the payments. You then enter the start and end dates, and the payment on file to use for processing the payments. The start date determines the day of the month that the payments will be processed.
You also need to enter the payment interval, in either months or weeks, and the amount of each payment. For example, to process a payment each month, enter an interval of 1. To process a payment every other month, enter an interval of 2. Click Add to initially set up the plan. If you edit the plan, click Change to adjust the payments as needed. The plan will automatically use the start and end dates, along with the payment interval to calculate the number of payments to process.
If you leave the end date blank, the account will continue to be charged until you either delete the auto receipt plan, or supply an ending date.
-
Save - Click Finish at the bottom of the details window to save the auto eeceipt plan and return to the responsible party record.
Delete an Auto Receipt Plan - Click the  icon beside the agreement you wish to remove from the responsible party record. Then confirm your action.
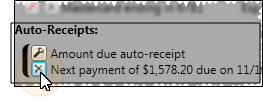
Multiple Auto Receipt Plans - You can add multiple auto receipt plans to individual responsible party records. For example, you might create a contract mode agreement to be sure payments are processed for all contract fees, and create an auto payment agreement to process payments for miscellaneous (non-contract) charges.
Post Auto Receipt Payments - Once you have set up auto receipt plans, you must review and post the payments regularly. See "Post Auto Receipts" for details.
Print Reports - Run an Auto Receipts Review report to obtain a list of patients who have an auto receipt currently scheduled to be posted. The patient and responsible party names, patient ID number, treatment phase, payment description, date of the next scheduled payment, current balance, credit card expiration date, and amount of the pending auto receipt are all featured on this report. We suggest that you print this report before posting your auto receipts, then compare it to the receipts posted on your next Transaction report.See "Auto Receipts Review Report" for details.
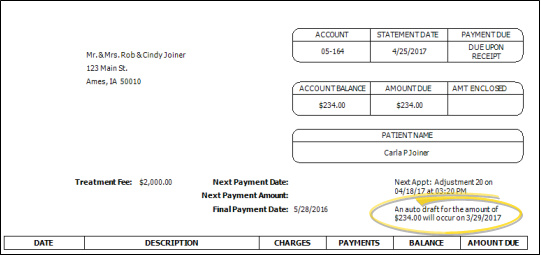
Auto Receipt Notification
When a contract is linked to an active auto receipt plan, the Next Payment Date and Next Payment Amount fields on the statement form are replaced with a notice of the pending auto payment. In addition, the Day Sheet - Financial report will append the patient's name with "(AR)".