Responsible Party Records
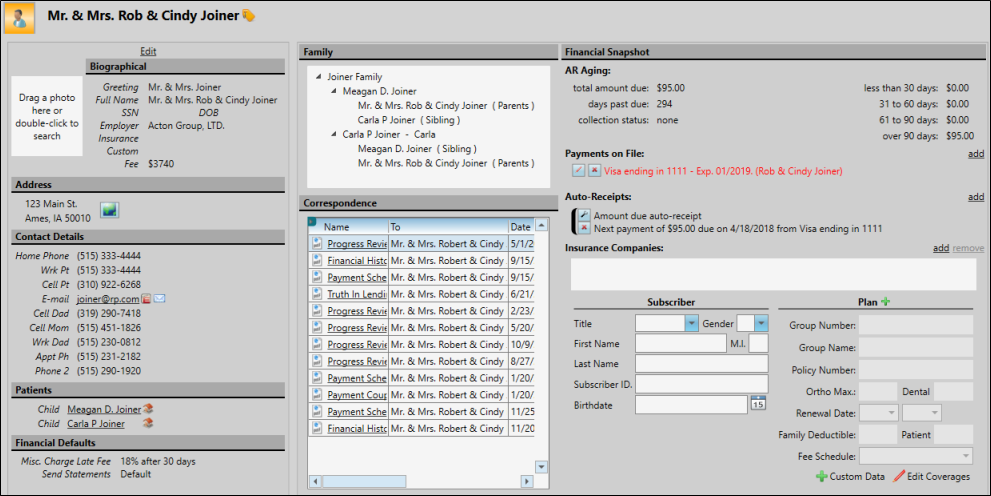
The responsible party page(s) of your patient folders contain demographic and contact information, as well as basic family relationships and insurance plans, and an optional photo for identification purposes. You can open a responsible party record by hovering over the Open icon on the File ribbon bar, or by clicking the responsible party name anywhere in the patient folder.
![]() Create Responsible Party Records
Create Responsible Party Records
You can create responsible party records as you create new patient folders, or from the Family panel of the patient folder, or by hovering over the New icon on the File ribbon bar. Once a responsible party record is created, it can be linked to multiple patient folders. See "Create Responsible Party Records" for details.
![]() Open Responsible Party Records
Open Responsible Party Records
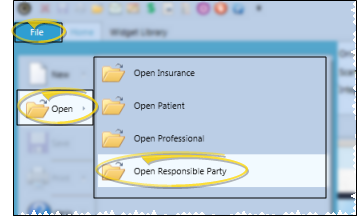
File Ribbon Bar - Hover over the Open icon on the File ribbon bar, and select Open Responsible Party. Once the search window opens, you can locate a responsible party by typing the first and last names, or other Fast Find search criteria you have enabled. (You can also open this feature from the Quick Access toolbar at the top of your Edge Cloud system window.)
Throughout Edge Cloud - You can click an underlined responsible party name anywhere in Edge Cloud (such as the Patient Information Panel, the Treatment
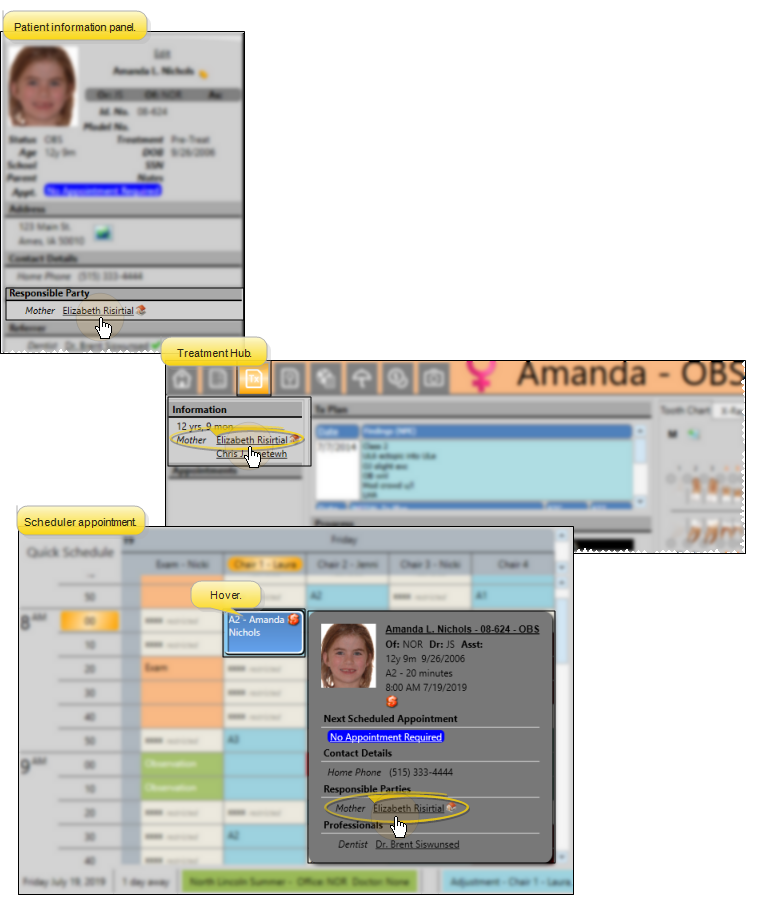
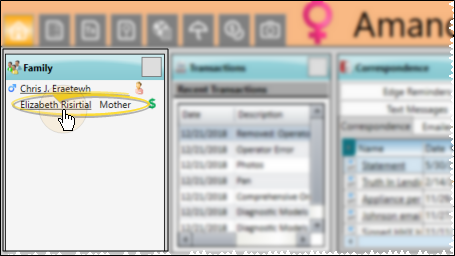
Family Panel - You can double-click a responsible party name from the family panel of the patient folder Home page to open that responsible party page in a different window. See "Patient Family Panel" for details.
The left side of the responsible party page is similar to the patient folder's Patient Information Panel: It includes an optional photo, biographical data, address, contact details, list of linked patient folders, and financial defaults. You can print a mailing label, send a quick email message, and view a map of the street address from this panel.
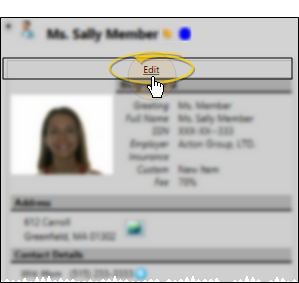
Editing Details - To add or change information, click the Edit link at the top of the panel. If you make changes, be sure to click  Save on the Quick Access toolbar (or press Ctrl+S on your keyboard) to save the changes. Or, click Cancel to ignore them.
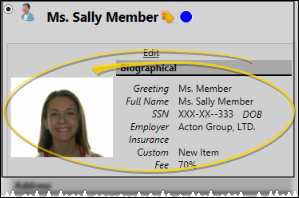
![]() Biographical Section - This section includes the responsible party name, social security number, birthdate, and other biographical details.
Biographical Section - This section includes the responsible party name, social security number, birthdate, and other biographical details.
When someone has both a patient folder and a responsible party record, certain fields, such as the social security number, are not synced between records. However, when the relationship field in the Family panel of the patient's Home page is flagged as "Self", the phone number and address of both records are automatically synced whenever a change is made.
Print Quick Label![]() - Click the
- Click the  Label button beside the name field or in the ribbon bar to print a Quick Label for this record. See "Responsible Party Labels" for details.
Visual Tag - If this person's record has a visual tag applied, the appropriate color/shape appears beside the name. (In this example, the visual tag is a blue circle.) See "Visual Tags" for details.
Photo![]() - Click the photo space and choose the photo to use, or drag a photo into the photo space. You can repeat this process to change the photo at any time. To remove the photo completely, right-click the photo and select Clear Image.
- Click the photo space and choose the photo to use, or drag a photo into the photo space. You can repeat this process to change the photo at any time. To remove the photo completely, right-click the photo and select Clear Image.
Greeting![]() - This name is used primarily as a mail merge variable.
- This name is used primarily as a mail merge variable.
Full Name- The responsible party full name is comprised of the title, first name, middle initial and last name fields.
Social Security Number - While you can view and modify the entire social security number from the New Responsible Party and the Edit Responsible Party windows, only the last four digits appear when you view the responsible party page.
DOB![]() - You can enter the responsible party birthday, and choose to use the information when searching for patients and responsible parties with Fast Find. While insurance records assigned to the responsible party default to this birthday, you can change the date on Insurance records without changing this date and vice versa.
- You can enter the responsible party birthday, and choose to use the information when searching for patients and responsible parties with Fast Find. While insurance records assigned to the responsible party default to this birthday, you can change the date on Insurance records without changing this date and vice versa.
Employer![]() - Select an employer from your Employers editor, or select NEW to create a new employer record. You can also click the Edit link beside the employer field to edit the selected employer's details. If the employer has insurance details associated with it, you are asked whether you want to add the insurance to the responsible party record. See "Employer Editor" for details. Changing the employer does not change the employer listed on any exiting Insurance Detail records.
- Select an employer from your Employers editor, or select NEW to create a new employer record. You can also click the Edit link beside the employer field to edit the selected employer's details. If the employer has insurance details associated with it, you are asked whether you want to add the insurance to the responsible party record. See "Employer Editor" for details. Changing the employer does not change the employer listed on any exiting Insurance Detail records.
User Defined Fields - (i.e. Custom, Fee fields above) Each patient folder and responsible party record can contain two user defined fields that you can use for any purpose. Hyperlinks are supported: You can put Internet web site addresses or email addresses into these fields, then double-click the field to follow the hyperlink. See "User Defined Fields Editor" for details.
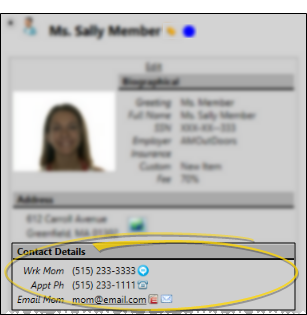
![]() Address Section - This section displays the responsible party's home address.
Address Section - This section displays the responsible party's home address.
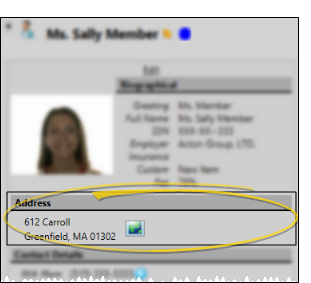
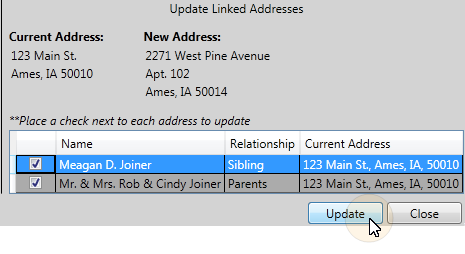
Update Linked Addresses - When you edit the address or contact details for a patient or responsible party, you have the opportunity to change linked records to match. In some cases, you must refresh the record before the update records dialog appears. Click for details...
When someone has both a patient folder and a responsible party record, certain fields, such as the social security number, are not synced between records. However, when the relationship field in the Family panel of the patient's Home page is flagged as "Self", the phone number and address of both records are automatically synced whenever a change is made.
When you edit the address or contact details for a patient or responsible party, you have the opportunity to change linked records to match. In some cases, you must refresh the record before the update records dialog appears.
Example address change update dialog.
Example phone number / email change update dialog.
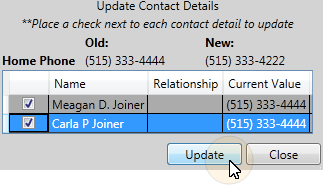
Select records to update - Click the box beside individual records to update.
View Map![]() - While viewing the record, you can click the
- While viewing the record, you can click the  Map icon beside the address to open a map of the street address. (An active Internet connection is required for this feature to work.)
![]() Contact Details Section - This section displays the phone numbers and email addresses you have listed for this party. These contact details are separate from the details you may have listed in the patient folder. An icon beside a phone, cell phone, or email contact indicates that contact has been flagged to receive Edge Reminders messages, and an icon beside an email contact indicates that the party is registered for Edge Portal: You can hover over an icon to review the details. In addition, you can click an email address to send a Quick Message to the responsible party. (See "Contact Categories Editor" for details about creating / editing your contact category names.)
Contact Details Section - This section displays the phone numbers and email addresses you have listed for this party. These contact details are separate from the details you may have listed in the patient folder. An icon beside a phone, cell phone, or email contact indicates that contact has been flagged to receive Edge Reminders messages, and an icon beside an email contact indicates that the party is registered for Edge Portal: You can hover over an icon to review the details. In addition, you can click an email address to send a Quick Message to the responsible party. (See "Contact Categories Editor" for details about creating / editing your contact category names.)
You can enable / disable Edge Reminders contact flags for any subgroup of patients with the Assign Edge Reminders Defaults tool. You might use this, for example, to enable the Text Message flag for the Patient Cell contact type of all "Active" patients when you first start sending appointment reminder text messages. See " Apply Edge Reminders Contact Flags to a Subgroup" for details.
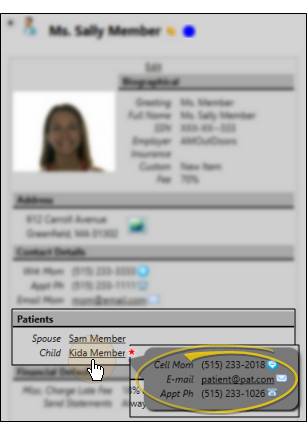
![]() Patients Section - This section lists the patient folders associated with this responsible party. The
Patients Section - This section lists the patient folders associated with this responsible party. The  Guardian icon appears beside a name when the patient's address exactly matches the responsible party's address, indicating that the patient lives with that party. If this person's record has a visual tag applied, the appropriate color/shape appears beside the name. You can hover over the underlined name to view contact details, then click the email address in the popup to send a Quick Message, or click the name to open that record. Patients are also listed in the Family section of the page, described below.
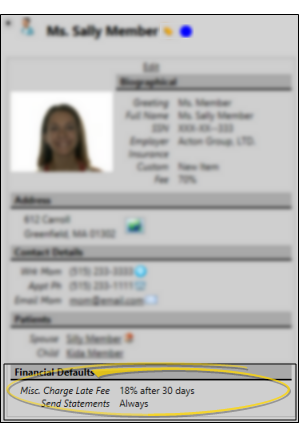
![]() Financial Details Section - This section lists the miscellaneous charge late fee policy and send statement setting for the responsible party.
Financial Details Section - This section lists the miscellaneous charge late fee policy and send statement setting for the responsible party.
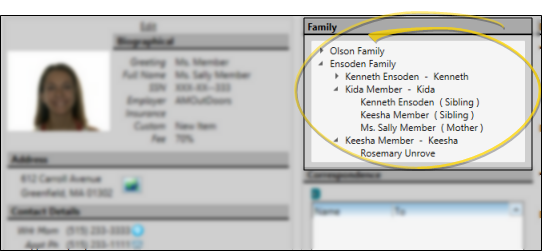
The Family section of the responsible party window lists the patients and other family members associated with this responsible party. You cannot edit the family links from this page: You can only link family members from the Family panel of the patient folder Home page. Family members that are Edge Cloud patients are also listed in the Patients sections on the left side of the responsible party page.
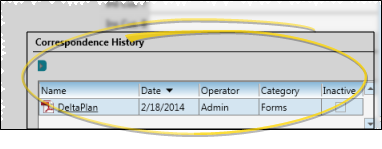
Use the Correspondence History section of the window to review the documents you have saved for this party, as well as messages they have sent to your office via Edge Portal.
View a Document / Video![]() - Click the file name to open a document or run a video. You must have an appropriate viewing / editing tool, such as Adobe Acrobat, installed to be able to open files.
- Click the file name to open a document or run a video. You must have an appropriate viewing / editing tool, such as Adobe Acrobat, installed to be able to open files.
Drag Document / Image / Video![]() - You can drag and drop almost any type of digital file into a correspondence history for archive and reference purposes. Files you may want to drag and drop include .PNG graphic files, .PDF document files, .MP3 sound files, and .MP4 video files. See "Drag & Drop Documents" for details.
- You can drag and drop almost any type of digital file into a correspondence history for archive and reference purposes. Files you may want to drag and drop include .PNG graphic files, .PDF document files, .MP3 sound files, and .MP4 video files. See "Drag & Drop Documents" for details.
Scan Document![]() - Use the Scan tool to send a digital copy of any document from your scanning device to a correspondence history.See "Scan Documents" for details.
- Use the Scan tool to send a digital copy of any document from your scanning device to a correspondence history.See "Scan Documents" for details.
This section of the window summarizes responsible party's financial contracts, including amounts past due, payments on file, and auto-receipt agreements.

AR Aging - Review the amount due and account aging for this responsible party. (You can also view account aging from the Financial page of the patient folder. See "Patient Finance Page" for details.)
Payments on file - Review and modify credit card and electronic transfer accounts the responsible party has authorized for your integrated collection purposes. See "Set Up Payments on File" for details.
Auto-receipts - Review and modify auto-receipt agreements. See "Set Up Auto Receipt Agreements" for details.
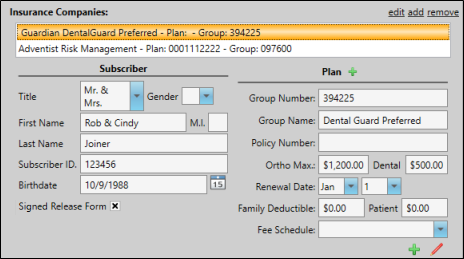
Use the Insurance section of the window to add, review, and remove insurance plans for this responsible party. Also, when you add or change an employer for the responsible party, you have an opportunity to add any associated insurance plans to the responsible party record.
Insurance plan details are linked in your Employer editor, Insurance Company editor, and the Responsible Party and Insurance Detail pages of your patient folders. When you make a change in one place, the change affects the others automatically, with the exception of changes to "Plan" fields in the Insurance Detail page. These fields are for review only and any changes you make here will not be saved.
![]() Correspondence History Each insurance plan can have its own correspondence history that is in addition to the insurance company's correspondence history. You can capture or scan documents, and view these documents from the Insurance Company
Correspondence History Each insurance plan can have its own correspondence history that is in addition to the insurance company's correspondence history. You can capture or scan documents, and view these documents from the Insurance Company
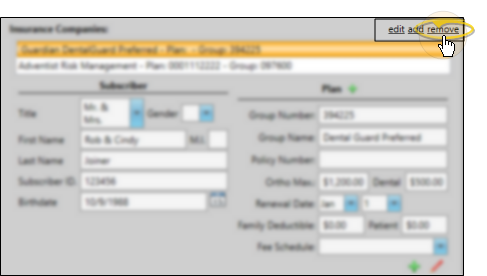
![]() Edit Insurance Companies - Click edit to open the Insurance Company editor in a separate tab. This does not affect the responsible party record in any way. You can also open the Insurance Company editor by double-clicking an assigned insurance company.
Edit Insurance Companies - Click edit to open the Insurance Company editor in a separate tab. This does not affect the responsible party record in any way. You can also open the Insurance Company editor by double-clicking an assigned insurance company.
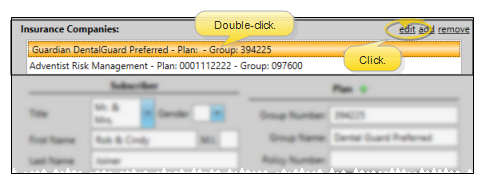
![]() Add Insurance - Click add to add insurance coverage for this responsible party. You then select the insurance company and plan, and edit any plan and subscriber details.
Add Insurance - Click add to add insurance coverage for this responsible party. You then select the insurance company and plan, and edit any plan and subscriber details.
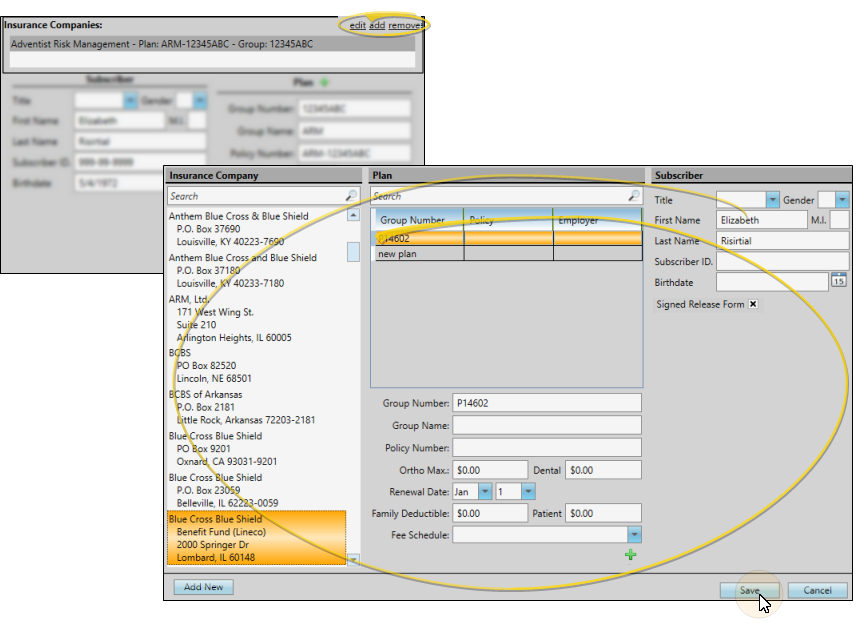
If the insurance company you need is not listed, click Add New at the bottom of the insurance company list to open the New Insurance Company window, where you can add the company information. After selecting the insurance company, choose the plan to assign in the Plan section of the window. The details for that plan appear below the list. If the plan you need is not listed, click to select the new plan row in the Plan section of the window, then enter the information in the fields below list. When finished, click Save.
If you create a new plan for an insurance company in this way, it will be added to this responsible party record, and the Insurance Company editor. However, no employer will be associated with this plan.
![]() Review Insurance - Select the insurance company to work with, then use the Subscriber and Plan sections of the window to and edit details, including custom data. Any changes you make to the plan will also change the patient's Insurance Detail page, and the corresponding plan in the Insurance Company and Employer editors.
Review Insurance - Select the insurance company to work with, then use the Subscriber and Plan sections of the window to and edit details, including custom data. Any changes you make to the plan will also change the patient's Insurance Detail page, and the corresponding plan in the Insurance Company and Employer editors.

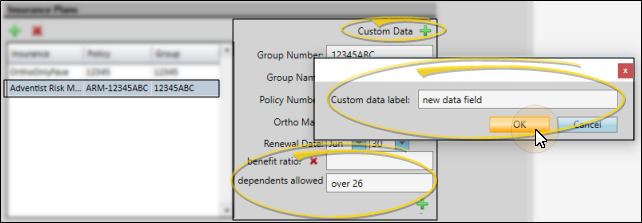
If you need to add more information about this insurance plan, such as the type of form required, or specific benefit circumstances, click  Custom Data to create your own text field. Type a title for your data and click Ok. You can now use your new text field to enter unique information for this plan. If a custom field is blank, you can click
  beside the field name to remove it.
![]() Remove Insurance - Select the insurance company / plan to remove from this responsible party, then remove. You might need to delete an insurance plan, for example, if the responsible party changes jobs. You cannot remove insurance that is associated with an active financial contract.
Remove Insurance - Select the insurance company / plan to remove from this responsible party, then remove. You might need to delete an insurance plan, for example, if the responsible party changes jobs. You cannot remove insurance that is associated with an active financial contract.
Click Save in your Quick Access toolbar or File ribbon bar (or press Ctrl+S on your keyboard) to save any changes you have made.

Use ribbon bar icons to access several tasks and tools.
Scan Document - Use the Scan tool to send a digital copy of any document from your scanning device to a correspondence history.See "Scan Documents" for details.
Print Quick Label![]() - Click the Label button beside the name field or in the ribbon bar to print a Quick Label for this record.See "Responsible Party Labels" for details.
- Click the Label button beside the name field or in the ribbon bar to print a Quick Label for this record.See "Responsible Party Labels" for details.
Presenter - Use the Presenter to duplicate whatever is currently being shown on your
Register for Practice Connect - Use the  Register for Practice Connect icon in the Responsible Party ribbon bar to initiate a Practice Connect account for this person. If no Practice Connect account exists yet, the party will receive temporary credentials and a verification code. The party must have a valid cell phone number and email address (as defined in your Contact Category editor) in their Edge Cloud responsible party record to be able to register for Practice Connect.
![]() Edge Portal Registration / Password
Edge Portal Registration / Password
Use the  Register for Portal icon in the Responsible Party or Professional ribbon bar to create an Edge Portal account for that party, or to reset the password. If no Edge Portal account exists yet, temporary credentials and a verification code are sent to the email address on record. If an account already exists, and you choose to overwrite the password, the party will receive an email message requesting the password change. The party must have a valid email address in their Edge Cloud record to be able to register for Edge Portal.
Password Recovery - Use the  Recover Password icon in the Responsible Party or Professional ribbon bar to send a forgotten Edge Portal password to that person's email address.