Insurance Company Editor
Use the Insurance Company
![]() Open the Insurance Company Editor
Open the Insurance Company Editor
You can open this feature in multiple ways: Use the method that's most convenient for you.
Select Editors from the Tools section of the Home ribbon bar. Then, from the Insurance section, open the Insurance Companies editor. (You can also use the Search field to look for the editor you want to work with.)

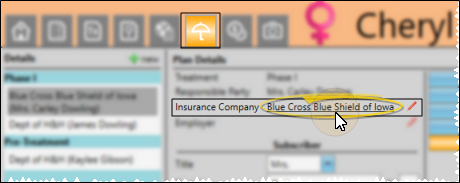
Open the Insurance Detail page of the patient folder, then click the underlined insurance company name in the Plan Details section of the window to open the Insurance Company editor with that company selected. (You can also click the  Edit icon to change the insurance company assigned to this record.)
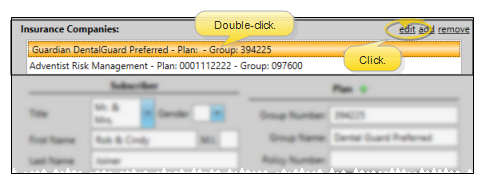
You can open the Insurance Company editor from the Insurance section of a responsible party page by clicking the Edit link, or double-clicking an associated insurance company name.
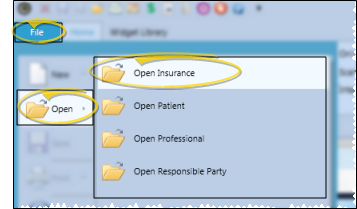
Select the File ribbon bar, then hover over the Open icon. When the options menu appears, click Open Insurance. (You can also open this feature from the Quick Access toolbar at the top of your Edge Cloud system window.)
![]() Create or Edit an Insurance Company Record
Create or Edit an Insurance Company Record
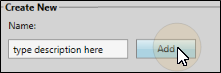
Type a description in the Create New portion of the window. Then click Add. You can then edit your record to complete the details.
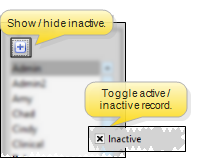
Your list of existing records appears at the left. Click the record to work with, then review and edit the details at the right. You can use the Inactive option in the record details to toggle the active / inactive status of an record. If not all your records appear in the list, use the  Show / Hide Inactive icon at the top of the window to include both active and inactive records.
Enter claim submission details and preferences for this insurance company in the General section of the window.
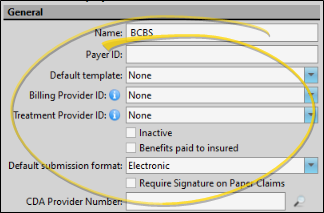
Name![]() - You can change the company name if needed.
- You can change the company name if needed.
Payer ID #![]() - (Electronic insurance submission only.) Enter the appropriate payer identification code for this Insurance Company record in this field. You can obtain a list of insurance company payer id numbers from your electronic
insurance form clearinghouse.
- (Electronic insurance submission only.) Enter the appropriate payer identification code for this Insurance Company record in this field. You can obtain a list of insurance company payer id numbers from your electronic
insurance form clearinghouse.
Default Template![]() (Optional.) - Select the default contract template to use when creating a financial contract for this insurance company. See "Contract Templates Editor" for details.
(Optional.) - Select the default contract template to use when creating a financial contract for this insurance company. See "Contract Templates Editor" for details.
Billing / Treatment Provider ID Links![]() - Use the Provider ID Link field to select the type of orthodontist identification that is required for claims submitted to this company. When the forms are generated, the identification data is pulled from the corresponding field in your Orthodontist
- Use the Provider ID Link field to select the type of orthodontist identification that is required for claims submitted to this company. When the forms are generated, the identification data is pulled from the corresponding field in your Orthodontist
Inactive / Active Toggle![]() - Once you create a record, you cannot delete it. You can, however, flag it Inactive. Records you flag as Inactive are not available for general use, but they remain in your system for reporting and other data collection needs. In addition, you can toggle records back to Active whenever needed.
- Once you create a record, you cannot delete it. You can, however, flag it Inactive. Records you flag as Inactive are not available for general use, but they remain in your system for reporting and other data collection needs. In addition, you can toggle records back to Active whenever needed.
Benefits Paid to Insured![]() - Enable this option if the insurance benefits should be sent directly to the responsible party, and not to your office. This setting overrides the Assignment of Benefits default in your Insurance Setup editor.
- Enable this option if the insurance benefits should be sent directly to the responsible party, and not to your office. This setting overrides the Assignment of Benefits default in your Insurance Setup editor.
Default Submission Format![]() - (Applies to Edge Specialist insurance companies only.) Choose whether pediatric dentistry insurance claims created for this insurance company should default to electronic or paper.
- (Applies to Edge Specialist insurance companies only.) Choose whether pediatric dentistry insurance claims created for this insurance company should default to electronic or paper.
Require Signature on Paper Claims![]() - Enable this option if paper forms generated for this insurance company require signatures.
- Enable this option if paper forms generated for this insurance company require signatures.
CDA Provider Number![]() - (Applies to practices integrating with CDAnet/ITRANS insurance processing. If you practice in Canada, you must enter the CDA Provider Number here in order to submit insurance claims via CDAnet/ITRANS directly through Edge Cloud. You can use the search icon to help you find the appropriate code. See "Canadian CDAnet/ITRANS Insurance Processing" for details.
- (Applies to practices integrating with CDAnet/ITRANS insurance processing. If you practice in Canada, you must enter the CDA Provider Number here in order to submit insurance claims via CDAnet/ITRANS directly through Edge Cloud. You can use the search icon to help you find the appropriate code. See "Canadian CDAnet/ITRANS Insurance Processing" for details.
![]() Address and Contact Information
Address and Contact Information
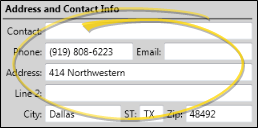
Enter the name of your contact, as well as the insurance company address, phone number and email address. The state must be in 2-letter postal abbreviation format.
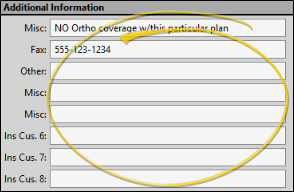
Use these fields to track any further data you need for working with insurance companies. In addition to providing you with the information you need to see, the fields can be included in sugrouping, and added to merge documents. You use the User Defined Fields
Insurance plan details are linked in your Employer editor, Insurance Company editor, and the Responsible Party and Insurance Detail pages of your patient folders. When you make a change in one place, the change affects the others automatically, with the exception of changes to "Plan" fields in the Insurance Detail page. These fields are for review only and any changes you make here will not be saved.
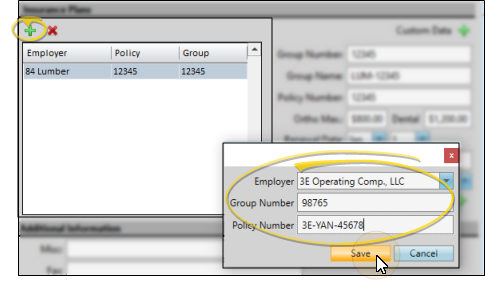
When you select an employer for a responsible party, you will have the opportunity to add any associated insurance plans to the responsible party record as well.
Click Add and enter the name, group number and policy number. If you add a plan from the Insurance Company editor, you also specify the employer; if you add a plan from the Employer editor, you specify the insurance company. If you add a plan from the Responsible Party page of the patient folder, the employer is left blank.
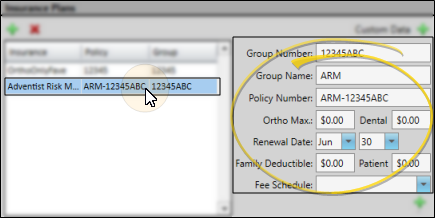
Select the plan you want to work, then use the fields at the right to add and edit the, including the group number and name, policy number, maximum benefits, renewal date and deductibles. Note that the fields available may be different, depending on whether you have Edge Specialist or integrate with Canadian CDAnet/ITRANS insurance processing.
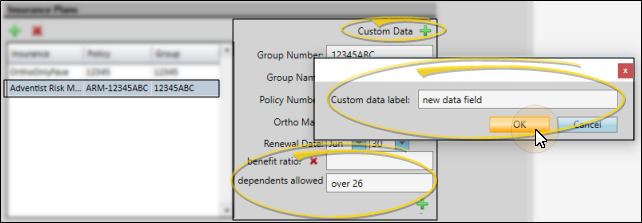
If you need to add more information about this insurance plan, such as the type of form required, or specific benefit circumstances, click Custom Data to create your own text field. Type a title for your data and click Ok. You can now use your new text field to enter unique information for this plan. If a custom field is blank, you can click  beside the field name to remove it.
Each insurance plan can have its own correspondence history that is in addition to the insurance company's correspondence history. You can capture or scan documents, and view these documents from the Insurance Company
Select the plan to remove, then click . You cannot remove a plan that is associated with an active financial contract.
Use the notepad to type free-form notes. You can categorize your notes, then use the filter to view only the categories of notes you need to see. In addition, you can use entries from the internal Edge Cloud dictionary, as well as your personal and shared dictionaries, to auto-complete your text.
Use the Patient Record security group in your Security editor to set up the level of access Edge Cloud users have to creating, editing, deleting, and viewing notepad entries.
If the Notepad option is set to Full Access, which gives the user rights to create and edit notepad entries, you can set the Modify Notepad Entries Created by Other Users to No Access. The user will then still be able to create notepad entries, but only edit and delete entries they created themselves. If you leave the Modify Notepad Entries setting to Full Access, the user will be able to edit / delete anyone's notepad entries.

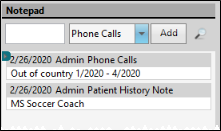
View Notes![]() - All notepad entries are date stamped automatically, and listed by date, user, and category. Newer entries appear at the top of the notepad. You can use the
- All notepad entries are date stamped automatically, and listed by date, user, and category. Newer entries appear at the top of the notepad. You can use the  Filter icon to view only certain types of notes.
Filter Notes to Display![]() - Click the Filter icon at the left of the frame to select the categories of items to display. When you are finished, move your cursor off the filter selection box to close it. Edge Cloud remembers filter settings by user and page: So, no matter what workstation you use, or which notepad you are working with, your favorite filters go along with you. See "History Categories Editor" for details about setting up your categories.
- Click the Filter icon at the left of the frame to select the categories of items to display. When you are finished, move your cursor off the filter selection box to close it. Edge Cloud remembers filter settings by user and page: So, no matter what workstation you use, or which notepad you are working with, your favorite filters go along with you. See "History Categories Editor" for details about setting up your categories.
Add a Note![]() - Type your note in the text field at the top of the notepad window, and select a category from the drop down list. You can use the Notepad Font section of the ribbon bar, as well as standard word processing keyboard shortcuts (i.e. cut, copy, paste, bold, underline, italics) to enhance the text. As you type, your Edge Cloud dictionaries provide suggestions to auto-complete the text. If your text is not recognized, you may right-click for spelling suggestions, or to add the text to a dictionary for later use. When you are finished, click Add. The date, your Edge Cloud user name, and the assigned category are inserted automatically, and the new note is added to the beginning of the notepad. (See "History Categories Editor" for details about creating your notepad category list.)
- Type your note in the text field at the top of the notepad window, and select a category from the drop down list. You can use the Notepad Font section of the ribbon bar, as well as standard word processing keyboard shortcuts (i.e. cut, copy, paste, bold, underline, italics) to enhance the text. As you type, your Edge Cloud dictionaries provide suggestions to auto-complete the text. If your text is not recognized, you may right-click for spelling suggestions, or to add the text to a dictionary for later use. When you are finished, click Add. The date, your Edge Cloud user name, and the assigned category are inserted automatically, and the new note is added to the beginning of the notepad. (See "History Categories Editor" for details about creating your notepad category list.)
Edit a Note![]() - Right-click a note and choose Edit, then make your changes to the text. As you type, your Edge Cloud dictionaries provide suggestions to auto-complete the text. If your text is not recognized, you may right-click for spelling suggestions, or to add the text to a dictionary for later use.You can also right-click to access a basic text editing menu, or use standard cut, copy, and paste You can cut, copy and paste to add and edit text and/or images to many areas of your system using standard keyboard shortcuts ( Ctrl+X , Ctrl+C , Ctrl+V , respectively). Or, you can often right-click the field or image you are working with and select the action from a menu. In many cases, Ctrl+A selects all available text or images, ready for you to cut or copy, Ctrl+Z performs an Undo of the last action, and Ctrl+Y performs a redo of the last action. keyboard shortcuts. You cannot change the category assigned to the note.
- Right-click a note and choose Edit, then make your changes to the text. As you type, your Edge Cloud dictionaries provide suggestions to auto-complete the text. If your text is not recognized, you may right-click for spelling suggestions, or to add the text to a dictionary for later use.You can also right-click to access a basic text editing menu, or use standard cut, copy, and paste You can cut, copy and paste to add and edit text and/or images to many areas of your system using standard keyboard shortcuts ( Ctrl+X , Ctrl+C , Ctrl+V , respectively). Or, you can often right-click the field or image you are working with and select the action from a menu. In many cases, Ctrl+A selects all available text or images, ready for you to cut or copy, Ctrl+Z performs an Undo of the last action, and Ctrl+Y performs a redo of the last action. keyboard shortcuts. You cannot change the category assigned to the note.
Search Notes![]() - Click the
- Click the  Search icon beside the Add button to search for any text within the notepad entries.
Delete a Note![]() - Right click a note, and choose Delete to remove it from your
- Right click a note, and choose Delete to remove it from your
Company vs Plan Histories![]() - Your Insurance Company
- Your Insurance Company
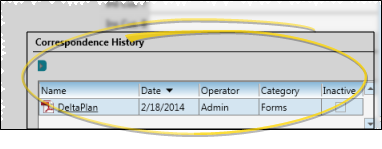
![]() View the Correspondence History
View the Correspondence History
View the Correspondence History section of the window to review the documents you have saved for this party.
![]() Use the Correspondence History
Use the Correspondence History
You can filter the correspondence history items you wish to see, open and view items, and scan and drag new items into the history.
Filter Items to Display![]() - Click the Filter icon at the left of the frame to select the categories of items to display. When you are finished, move your cursor off the filter selection box to close it. Edge Cloud remembers filter settings by user and page: So, no matter what workstation you use, or which notepad you are working with, your favorite filters go along with you. See "History Categories Editor" for details about setting up your categories.
- Click the Filter icon at the left of the frame to select the categories of items to display. When you are finished, move your cursor off the filter selection box to close it. Edge Cloud remembers filter settings by user and page: So, no matter what workstation you use, or which notepad you are working with, your favorite filters go along with you. See "History Categories Editor" for details about setting up your categories.
Inactive / Active Toggle![]() - Once you create a record, you cannot delete it. You can, however, flag it Inactive. Records you flag as Inactive are not available for general use, but they remain in your system for reporting and other data collection needs. In addition, you can toggle records back to Active whenever needed.
- Once you create a record, you cannot delete it. You can, however, flag it Inactive. Records you flag as Inactive are not available for general use, but they remain in your system for reporting and other data collection needs. In addition, you can toggle records back to Active whenever needed.
View a Document / Video![]() - Click the file name to open a document or run a video. You must have an appropriate viewing / editing tool, such as Adobe Acrobat, installed to be able to open files.
- Click the file name to open a document or run a video. You must have an appropriate viewing / editing tool, such as Adobe Acrobat, installed to be able to open files.
Drag Document / Image / Video![]() - You can drag and drop almost any type of digital file into a correspondence history for archive and reference purposes. Files you may want to drag and drop include .PNG graphic files, .PDF document files, .MP3 sound files, and .MP4 video files. See "Drag & Drop Documents" for details.
- You can drag and drop almost any type of digital file into a correspondence history for archive and reference purposes. Files you may want to drag and drop include .PNG graphic files, .PDF document files, .MP3 sound files, and .MP4 video files. See "Drag & Drop Documents" for details.
Scan Document![]() - Use the Scan tool to send a digital copy of any document from your scanning device to a correspondence history.See "Scan Documents" for details.
- Use the Scan tool to send a digital copy of any document from your scanning device to a correspondence history.See "Scan Documents" for details.
Click  Save in your Quick Access toolbar or File ribbon bar (or press Ctrl+S on your keyboard) to save any changes you have made.
