Patient Finance Page
You view and edit your patients' transaction ledgers, proposals and contract details from the Finance page of the patient folder.
Open from Patient Folder Header - Open a patient folder and select the  Finance tab in the patient folder header.
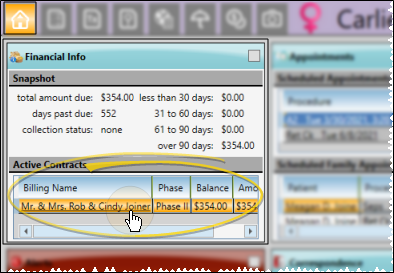
Open from Home Page Financial Panel - You can click a billing name in the Active Contracts section of the Financial Info panel of the patient's Home page to open the patient's Finance page to that contract ledger. See "Patient Financial Panel" for details.
Open from the Post Transactions Window - You can click a billing name in the Contracts section of the Post Transactions window to open the patient's Finance page to that contract or billing line ledger. See "Post Payments" for details.
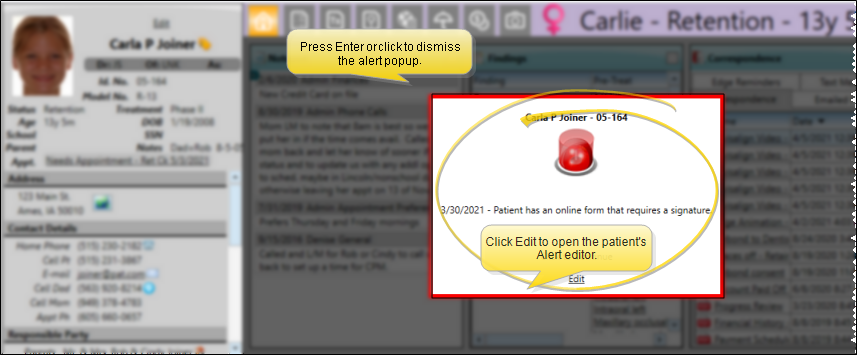
Alert Stop - If the patient has an alert trigger enabled for this feature, the Alert Stop pop-up window will appear when you initiate this feature for the patient. Review the alert information, then either press Enter on your keyboard, or click the box to continue. You can also click the Edit link to open the Alert editor for that patient.
Select the account you want to view from the list at the left of the window, then use the buttons at the top of the right side of the window to work with the ledger, contract details, proposals, or contract timeline.
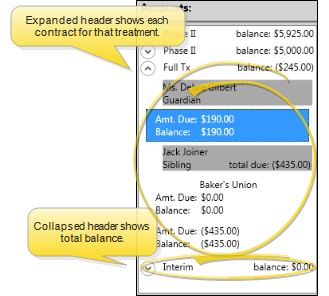
![]() Accounts List - The accounts section of the window summarizes the patient's contracts. You can expand a treatment phase header to see the current outstanding balance and amount due for each responsible party and insurance account. When collapsed, you see only the sum of outstanding balances for all accounts for that treatment.
Accounts List - The accounts section of the window summarizes the patient's contracts. You can expand a treatment phase header to see the current outstanding balance and amount due for each responsible party and insurance account. When collapsed, you see only the sum of outstanding balances for all accounts for that treatment.
OrthoBanc Integration - When an Edge Cloud patient folder is linked to an OrthoBanc record, linked accounts will include an OrthoBanc icon. Click the icon to manage the patient's Edge Cloud / OrthoBanc accounts.If the account does not include an OrthoBanc icon, you must first correctly link the patient folder to an OrthoBanc record. See "OrthoBanc Integration" for details.)
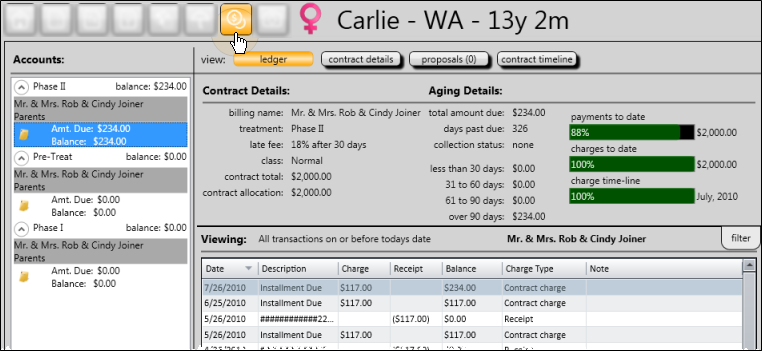
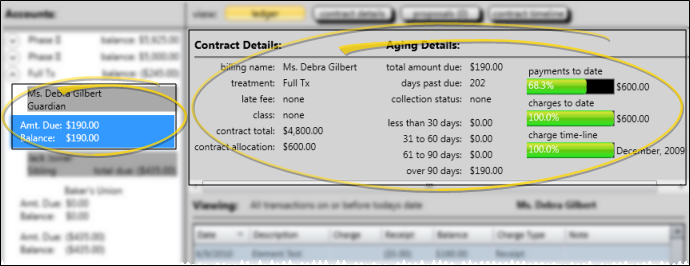
![]() Account Details - The contract details are at the top of the right-hand pane. You also see the account aging and the contract progress bar, which contrasts the projected financial charges and payments (according to the contract structure) with the percentage of actual financial transactions that have taken place for the account. See "Contract Details Editor" for details about making changes to the contract class and late fee.
Account Details - The contract details are at the top of the right-hand pane. You also see the account aging and the contract progress bar, which contrasts the projected financial charges and payments (according to the contract structure) with the percentage of actual financial transactions that have taken place for the account. See "Contract Details Editor" for details about making changes to the contract class and late fee.
Additional Ways to View Account Aging - You can also view account aging from the Financial Info panel of the patient folder Home page, or the responsible party page of the patient folder, which considers only accounts assigned to that party.
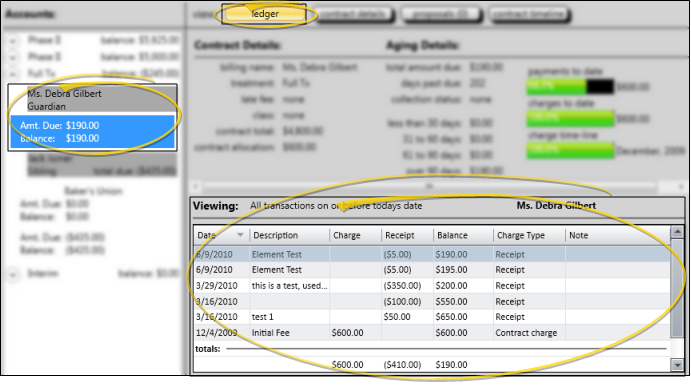
![]() Transaction Ledger - Enable the Ledger option at the top of the Finance page to review and manage the patient's transaction ledger in the bottom half of the window. You can filter the ledger by the type of transaction to include, and choose to view the only the transactions for the selected account, or for all accounts. In addition, you can adjust miscellaneous charges and receipts, audit transactions, and add internal notes to transactions as needed.
Transaction Ledger - Enable the Ledger option at the top of the Finance page to review and manage the patient's transaction ledger in the bottom half of the window. You can filter the ledger by the type of transaction to include, and choose to view the only the transactions for the selected account, or for all accounts. In addition, you can adjust miscellaneous charges and receipts, audit transactions, and add internal notes to transactions as needed.
View Ledger from Patient Home Page - You can also view the patient ledger from the Transactions panel of the patient folder Home page. (See "Patient Transactions Panel" for details.)
![]() Filter Transactions - Click the panel heading or the Filter tab at the right of the window to display your choices. Then, choose the type of transactions to include in the ledger, whether to include future contract charges, and whether to view the transactions from all contracts, or only the currently selected contract.
Filter Transactions - Click the panel heading or the Filter tab at the right of the window to display your choices. Then, choose the type of transactions to include in the ledger, whether to include future contract charges, and whether to view the transactions from all contracts, or only the currently selected contract.
![]()
Transaction Type to Include - Select to include only a certain transaction type, such as receipts, or all transactions. The heading changes to indicate the type of transactions you are viewing.
![]()
Display Future Charges Option - Enable this option to include contract charges scheduled for future dates. The panel heading indicates that you are viewing all transactions. Disable this option to view only charges with dates of today or in the past. The heading indicates that you are viewing all transactions on or before today's date.

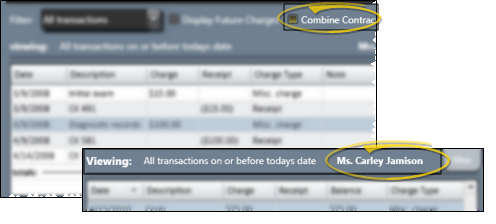
Combine Contracts Option - Enable this option to include all transactions from all accounts and Edge Specialist billing lines for this treatment phase. Disable this option to include only the transactions for the selected account. The heading indicates whether the transactions are from combined contracts, or a single contract. If you have Edge Specialist, when you view combined contracts from the patient's Finance page, the left-hand column of the ledger is color-coded to indicate which specialty the transaction is from. When you print the Ledger report, the specialty is not noted. If you are viewing a single contract, the heading includes the name of that individual account. Otherwise, it indicates that you are viewing all patient contracts.
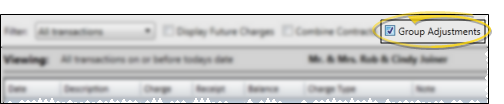
Group Adjustments - Enable this option to group any receipt adjustment you make with its original receipt transaction. When this option is disabled, transactions are sorted individually by posting date, or by whatever column you choose, which can make identifying adjustments and their paired transaction more difficult.
Sort Data - Click a column heading to sort the data by that column. Click the same column heading to reverse the sort order.
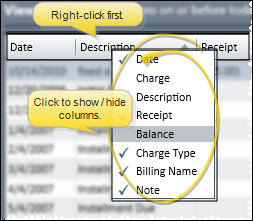
![]() Show / Hide Columns - Right-click any column heading, then click a heading name to show / hide that column on your ledger.
Show / Hide Columns - Right-click any column heading, then click a heading name to show / hide that column on your ledger.
![]() Manage Transactions - You can adjust amounts, apply notes, audit the posting trail, and print payment receipts for transactions from the patient's ledger.
Manage Transactions - You can adjust amounts, apply notes, audit the posting trail, and print payment receipts for transactions from the patient's ledger.
Adjust Miscellaneous and Dental Charges - Double-click a miscellaneous or dental charge*, or right-click and select Adjust. Then enter the amount and reason for the change. See "Adjust Miscellaneous Charges." for details. (You cannot adjust orthodontic contract charges in this manner: See "Contract Structure Editor" for details about making changes to contracts.)
* While miscellaneous dental charge types are posted in a similar manner, charges posted with descriptions from your Dental Charge Types editor are classified as dental charges, while charges posted with descriptions from your Miscellaneous Charges editor are classified as miscellaneous charges in the patient's ledger.
Adjust Receipt - Double-click a receipt, or right-click and select Adjust. Then select the reason for the change, and other details. See "Adjust Receipts" for details. (You cannot issue refunds from the patient's transaction ledger: See "Issue Refunds" for details about posting this type of transaction.)
Exclude From Deposit Slip - (Uncommon.) You can right-click a receipt in the patient's transaction ledger, and select Exclude From Deposit Slip. The receipt will still be applied to the patient account, and included in the Receipts section of your Transaction report (flagged with an asterisk * ), but it will not be counted as part of your deposits for the day. You might use this feature, for example, if you are re-entering a payment after making a correction, and the payment amount had already appeared on a deposit slip,
Edit Note - Right-click a transaction, then select Edit note. You can then review and enter further details about the transaction. The notes can optionally appear on the patient's Financial History form. (See "Financial History Form" for details.)
Audit Transaction - Right-click a transaction and select Audit. Then review details about when and who posted the transaction. (You can also audit the last-posted transaction directly from the Post Transactions window.)
Generate Receipt of Payment - Right-click a payment, and select Receipt. Then select View to choose the receipt output options; or select Print to generate the receipt with your current Quick Report settings; or select Email to use your Form Email Setup options. When generated in this manner, the receipt is not recorded in the correspondence history. See "Receipt of Payment Forms" for details.
Contract Payment Plan Descriptions - You cannot edit contract payment plan descriptions (i.e. "Initial Fee", "Installment Due") from within the ledger, but you can edit the descriptions with the Contract Structure tool. See "Contract Fees and Non-Production Adjustments" for details.
Print Ledger - Click Print in your Quick Access toolbar to open the Ledger form for this patient. See "Ledger Report" for details.
Trigger a Workflow - Use the Transaction Excluded from Deposit Slip workflow trigger to activate a workflow whenever you flag a ledger receipt with Exclude From Deposit Slip. (Note that receipt adjustments and refunds are always excluded from the deposit slip, and do not trigger this workflow.)
![]() Contract Details - Enable the Details option at the top of the Finance page of the patient folder, then use the bottom half of the window to review and compare payment schedules for all parties in the selected contract. You can change the level of information that you see, but you cannot edit payment schedules from this window.
Contract Details - Enable the Details option at the top of the Finance page of the patient folder, then use the bottom half of the window to review and compare payment schedules for all parties in the selected contract. You can change the level of information that you see, but you cannot edit payment schedules from this window.
See "Contract Fees and Non-Production Adjustments" for details about changing payment plans.
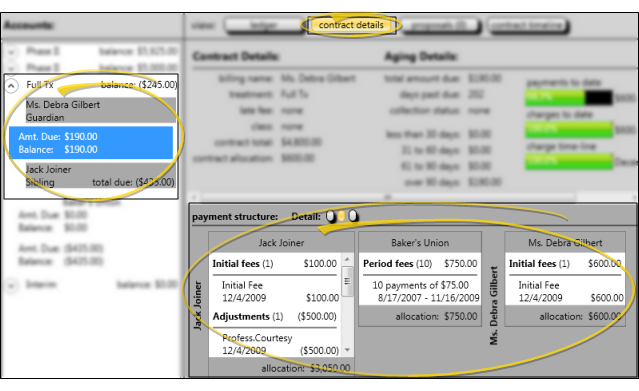
![]() Review Contract Members - The current payment plan for all responsible parties and insurance companies assigned to this contract appear in the window. Any insurance coverage is listed directly to the right of the associated responsible party.
Review Contract Members - The current payment plan for all responsible parties and insurance companies assigned to this contract appear in the window. Any insurance coverage is listed directly to the right of the associated responsible party.
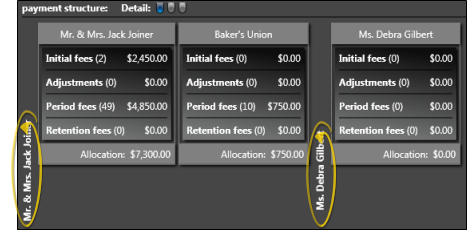
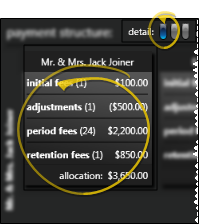
![]() Choose Level to View - Use the Detail buttons to select the level of information to view: Summary only, summary and contract dates, or the entire payment plan structure.
Choose Level to View - Use the Detail buttons to select the level of information to view: Summary only, summary and contract dates, or the entire payment plan structure.
Level One - Summary Only - Enable the first-level detail button to see a summary of the payment schedule for each account. The summary includes the number of transactions scheduled for each type of fee, and the total amount of money allocated to each fee type.
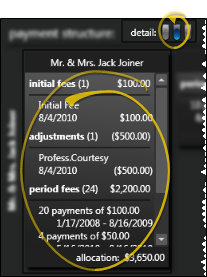
Level Two - Summary & Dates - Enable the second-level detail button to see the summary, with the addition of the initial, adjustment and retention fee dates, and the number and amount of each series of period fees.
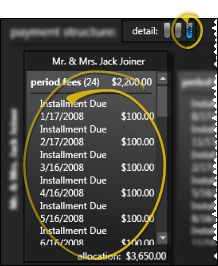
Level Three - Individual Transactions - Enable the third-level detail button to see the individual transactions that make up the payment schedule.
![]() Proposed Contracts - Enable the Proposals option at the top of the Finances page to review and apply contract proposals. See "Contract Proposals (Legacy Proposal System)" for details.
Proposed Contracts - Enable the Proposals option at the top of the Finances page to review and apply contract proposals. See "Contract Proposals (Legacy Proposal System)" for details.

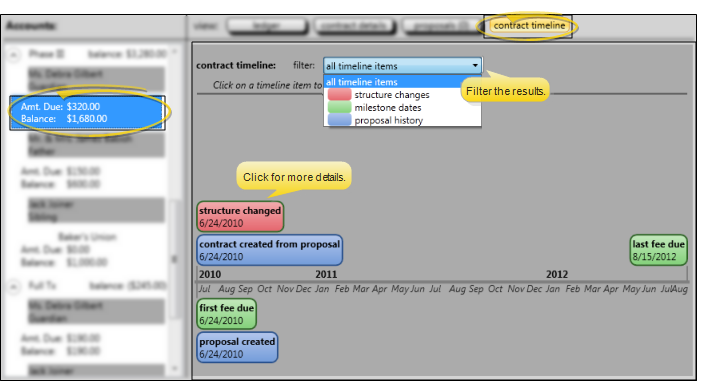
![]() Contract Timeline - Enable the Contract Timeline option at the top of the Finances page to see a graphical representation of the selected contract, along with information about when the contract was created and changed. Use the filter to include only certain types of items on the timeline. Click an item on the timeline to view details about that item, such as the reason for a structure change..
Contract Timeline - Enable the Contract Timeline option at the top of the Finances page to see a graphical representation of the selected contract, along with information about when the contract was created and changed. Use the filter to include only certain types of items on the timeline. Click an item on the timeline to view details about that item, such as the reason for a structure change..