Create Responsible Party Records
You can create responsible party records as you create new patient folders, or from the Family panel of the patient folder, or by hovering over the New icon on the File ribbon bar. Once a responsible party record is created, it can be linked to multiple patient folders.
![]() Open the New Responsible Party Window
Open the New Responsible Party Window
You can open this feature in multiple ways: Use the method that's most convenient for you.
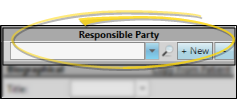
New Patient Folder - While creating a new patient folder, click +New from the Responsible Party section. This option also allows you to copy certain data from the patient. (See "Create a New Patient Folder " for details.)
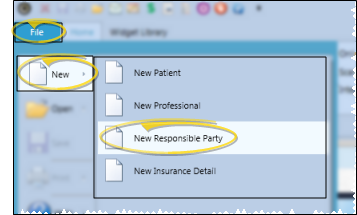
File Ribbon Bar -  New > New Responsible Party. Or, press Ctrl-N on your keyboard from nearly any
Patient Family Panel - View the expanded Family panel from the patient folder Home page, and click New RP. (See "Patient Family Panel" for details.)

You can enter the responsible party name, address, and other details into the New Responsible Party window. However, only the first and last names are required.
Enter the responsible party name, greeting name, relationship to the patient, employer, social security number (if collected by your office) and birthday. *Only the first name and last name are required in this section.

Copy From Current Patient![]() - (Available only when creating a new patient folder.) If the patient is also the responsible party, you can fill in the patient name at the right of the New Patient window, then click +New to create a new responsible party from the patient's information, or use the Copy from Current Patient link to auto-fill the responsible party first name and last name to match. If you had already entered information into some of the responsible party fields, they will be overwritten by the patient information.
- (Available only when creating a new patient folder.) If the patient is also the responsible party, you can fill in the patient name at the right of the New Patient window, then click +New to create a new responsible party from the patient's information, or use the Copy from Current Patient link to auto-fill the responsible party first name and last name to match. If you had already entered information into some of the responsible party fields, they will be overwritten by the patient information.
Title![]() - (Optional.) Although you can type a title into this field, to keep your data consistent, we recommend you select a title from the list. The title is most often used as a variable in mail merge documents, and can be used in subgroups as well. (See "Titles Editor" for details about managing the list.)
- (Optional.) Although you can type a title into this field, to keep your data consistent, we recommend you select a title from the list. The title is most often used as a variable in mail merge documents, and can be used in subgroups as well. (See "Titles Editor" for details about managing the list.)
*First Name![]() - The first name field is required.
- The first name field is required.
MI![]() - The middle initial field is optional.
- The middle initial field is optional.
*Last Name![]() - The last name field is required.
- The last name field is required.
Greeting![]() - This name is used primarily as a mail merge variable.
- This name is used primarily as a mail merge variable.
Relationship![]() - Select the responsible party's relationship to the patient. In addition to using the list for your own reference, it is used for submitting insurance claims. You can also enter the relationship from the Family panel of the patient folder.
- Select the responsible party's relationship to the patient. In addition to using the list for your own reference, it is used for submitting insurance claims. You can also enter the relationship from the Family panel of the patient folder.
Employer![]() - Select an employer from your Employers editor, or select NEW to create a new employer record. You can also click the Edit link beside the employer field to edit the selected employer's details. If the employer has insurance details associated with it, you are asked whether you want to add the insurance to the responsible party record. See "Employer Editor" for details.
- Select an employer from your Employers editor, or select NEW to create a new employer record. You can also click the Edit link beside the employer field to edit the selected employer's details. If the employer has insurance details associated with it, you are asked whether you want to add the insurance to the responsible party record. See "Employer Editor" for details.
SSN![]() - Social Security Number - While you can view and modify the entire social security number from the New Responsible Party and the Edit Responsible Party windows, only the last four digits appear when you view the responsible party page.
- Social Security Number - While you can view and modify the entire social security number from the New Responsible Party and the Edit Responsible Party windows, only the last four digits appear when you view the responsible party page.
DOB![]() - You can enter the responsible party birthday, and choose to use the information when searching for patients and responsible parties with Fast Find. While insurance records assigned to the responsible party default to this birthday, you can change the date on Insurance records without changing this date and vice versa.
- You can enter the responsible party birthday, and choose to use the information when searching for patients and responsible parties with Fast Find. While insurance records assigned to the responsible party default to this birthday, you can change the date on Insurance records without changing this date and vice versa.
Visual Tags![]() - Visual tags are displayed in the patient folder header, responsible party record, post transaction window, Smart Scheduler, appointment hover, and optionally on your Patient Tracker and Scheduler appointments.See "Visual Tags" for details.
- Visual tags are displayed in the patient folder header, responsible party record, post transaction window, Smart Scheduler, appointment hover, and optionally on your Patient Tracker and Scheduler appointments.See "Visual Tags" for details.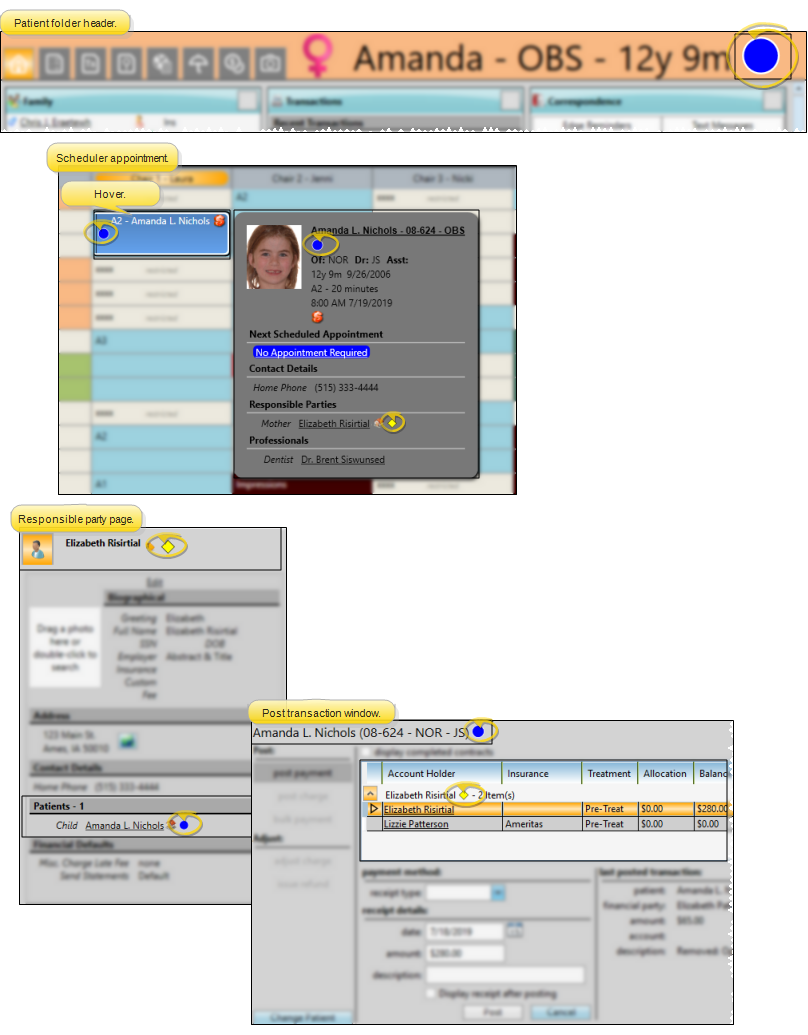
Enter the responsible party's home address in these fields. These fields are not required in order to create a responsible party record.
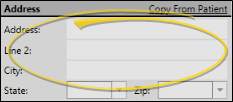
Copy From Current Patient![]() - (Available only when creating a new patient folder.) If the patient is also the responsible party, you can fill in the Patient address at the right of the New Patient window, then click the Copy from Current Patient in the responsible party section of the window link to auto-fill the address to match. If you had already entered information into some of the responsible party address fields, they will be overwritten by the patient information.
- (Available only when creating a new patient folder.) If the patient is also the responsible party, you can fill in the Patient address at the right of the New Patient window, then click the Copy from Current Patient in the responsible party section of the window link to auto-fill the address to match. If you had already entered information into some of the responsible party address fields, they will be overwritten by the patient information.
Address and Zip Code![]() - If you select the zip code from the drop down list while the city and state fields are blank, the appropriate city and state will be filled in for you automatically. Also note that electronic insurance submission requires the state be entered in standard 2-letter postal abbreviation format. (See "Zip Code Editor" for details about entering your local cities, states, and zip codes.)
- If you select the zip code from the drop down list while the city and state fields are blank, the appropriate city and state will be filled in for you automatically. Also note that electronic insurance submission requires the state be entered in standard 2-letter postal abbreviation format. (See "Zip Code Editor" for details about entering your local cities, states, and zip codes.)
Use the miscellaneous section of the responsible party window to enter a late fee policy, statement frequency, and up to two user-defined responses. These fields are not required in order to create a responsible party record.
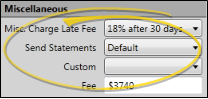
Misc. Charge Late Fee![]() - Select the late fee policy to apply to miscellaneous charges posted to this responsible party. See "Late Fee Editor" for details. The late fee applied to miscellaneous charges (i.e. diagnostic records charges and panorex charges) can be different from the late fee applied to contract charges (i.e. initial fees and period fees). See "Contract Details Editor" for details about applying late fee policies to contract charges.
- Select the late fee policy to apply to miscellaneous charges posted to this responsible party. See "Late Fee Editor" for details. The late fee applied to miscellaneous charges (i.e. diagnostic records charges and panorex charges) can be different from the late fee applied to contract charges (i.e. initial fees and period fees). See "Contract Details Editor" for details about applying late fee policies to contract charges.
Send Statements![]() - Choose when you would like to generate statements for this responsible party. Select Default to generate a statement for this party whenever they fit your statement subgroup. Or, select Always or Never to force or prevent statements from generating for this party regardless of your selected subgroup.
- Choose when you would like to generate statements for this responsible party. Select Default to generate a statement for this party whenever they fit your statement subgroup. Or, select Always or Never to force or prevent statements from generating for this party regardless of your selected subgroup.
User Defined Fields![]() - Each patient folder and responsible party record can contain two user defined fields that you can use for any purpose. Hyperlinks are supported: You can put Internet web site addresses or email addresses into these fields, then double-click the field to follow the hyperlink. See "User Defined Fields Editor" for details.
- Each patient folder and responsible party record can contain two user defined fields that you can use for any purpose. Hyperlinks are supported: You can put Internet web site addresses or email addresses into these fields, then double-click the field to follow the hyperlink. See "User Defined Fields Editor" for details.
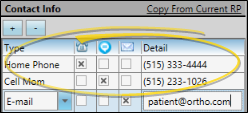
Enter phone numbers and email addresses into the Contact Info fields. You can also flag the contact information to use for delivering Edge Reminders messages.
Contact Type Requirements![]() - Certain Edge Cloud features, such as emailing forms and the Edge Portal app, require that you use specific contact types. See "Contact Categories Editor" for details.
- Certain Edge Cloud features, such as emailing forms and the Edge Portal app, require that you use specific contact types. See "Contact Categories Editor" for details.
Copy From Current RP / Copy from Patient![]() - (Available only when ceating a new patient folder.) If you have already filled out contact details for either a new patient or a new responsible party, you can click the Copy from Current RP link from the patient section of the window, or the Copy from Current Patient link from the responsible party section of the window to add those contacts to the corresponding list. If you had already entered some contact details, the new details will simply be added to the list.
- (Available only when ceating a new patient folder.) If you have already filled out contact details for either a new patient or a new responsible party, you can click the Copy from Current RP link from the patient section of the window, or the Copy from Current Patient link from the responsible party section of the window to add those contacts to the corresponding list. If you had already entered some contact details, the new details will simply be added to the list.
Add a Contact![]() - Click [ + ] to add a new line to the contact list, and select the appropriate type. (See "Contact Categories Editor" for details about setting up your contact types.) Then enter the phone number or email address in the Detail column. If you want to send text messages with Edge Reminders, be sure to include at least one phone number categorized as a cell phone in your Contact Categories.
- Click [ + ] to add a new line to the contact list, and select the appropriate type. (See "Contact Categories Editor" for details about setting up your contact types.) Then enter the phone number or email address in the Detail column. If you want to send text messages with Edge Reminders, be sure to include at least one phone number categorized as a cell phone in your Contact Categories.
Assign Edge Reminders Contacts![]() - In the Contact section of the record, enable the
- In the Contact section of the record, enable the  Telephone,
  Text, and/or
  Email icon beside the contact you want to use for the delivery of Edge Reminders messages. Tell me more...
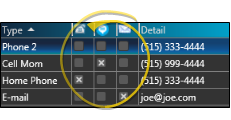
Multiple Messages Possible![]() - If you flag multiple contact types, the party will receive a message in each of the selected formats; if you do not flag any contact types, the party will not receive any messages, even when they fit the subgroup you select. However, if the patient and responsible party contact information matches,
- If you flag multiple contact types, the party will receive a message in each of the selected formats; if you do not flag any contact types, the party will not receive any messages, even when they fit the subgroup you select. However, if the patient and responsible party contact information matches,
Default Flags![]() - Use the Default columns of your Contact Category editor to set up default Edge Reminders contact descriptions. Then, when you add that contact description to the Contact Info section of a patient folder, responsible party, or professional record, they will automatically be enabled to receive reminders.
- Use the Default columns of your Contact Category editor to set up default Edge Reminders contact descriptions. Then, when you add that contact description to the Contact Info section of a patient folder, responsible party, or professional record, they will automatically be enabled to receive reminders.
Apply Flags to a Subgroup![]() - You can enable / disable Edge Reminders contact flags for any subgroup of patients with the Assign Edge Reminders Defaults tool. You might use this, for example, to enable the Text Message flag for the Patient Cell contact type of all "Active" patients when you first start sending appointment reminder text messages. See " Apply Edge Reminders Contact Flags to a Subgroup" for details.
- You can enable / disable Edge Reminders contact flags for any subgroup of patients with the Assign Edge Reminders Defaults tool. You might use this, for example, to enable the Text Message flag for the Patient Cell contact type of all "Active" patients when you first start sending appointment reminder text messages. See " Apply Edge Reminders Contact Flags to a Subgroup" for details.
Remove a Contact![]() - Select the contact detail you want to work with, then click [ - ] to remove it from the patient folder.
- Select the contact detail you want to work with, then click [ - ] to remove it from the patient folder.
Send an Email![]() - When viewing the record, you can click the email address in the Contact Details section to send a Quick Message to this party. See "Send Quick Email Messages" for details.
- When viewing the record, you can click the email address in the Contact Details section to send a Quick Message to this party. See "Send Quick Email Messages" for details.
Save the Record - Click Save at the bottom of then window to save the new responsible party. Fields flagged with a red asterisk ( * ) require a response before you can save the record.