Acquire Staff Fingerprints
Obtaining fingerprint data for the orthodontists and staff in your office allows you to log into Edge Cloud and your timeclock with the touch of a finger. Each orthodontist and staff member must have their own operator account in which to store the fingerprint data.
This feature does not store actual fingerprints. Ten data points or markers are stored that enable the fingerprint matching. Except for during the initial fingerprint acquisition process when fingerprints are shown on the screen, fingerprints cannot be viewed, printed, or reconstructed in any way from the stored data.
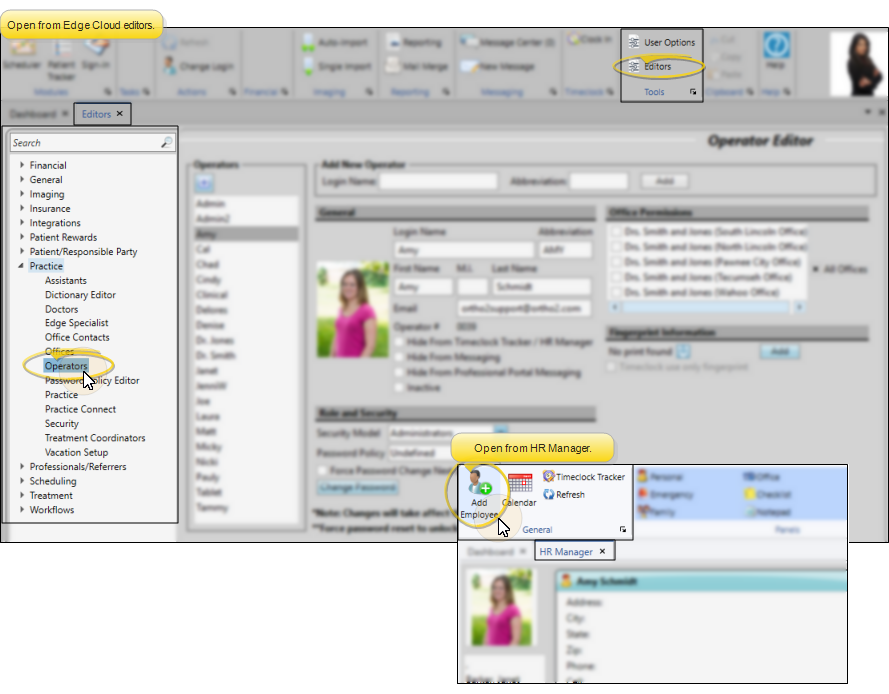
 Open Operators Editor
Select Editors from the Tools section of the Home ribbon bar. Then, from the Practice section, open the Operators editor. (You can also use the Search field to look for the editor you want to work with.)
HR Manager - You can also select Add Employee from the General section of the HR Manager ribbon bar to open the Operators editor. (See "HR Manager" for details about opening your HR Manager module.)
Provide Credentials - Enter your Edge Cloud user name and password. Only operators assigned to a security model that allows full access to the Operator Editor setting of the Practice Administration group can make changes in this editor. See "Security Editor" for details.
Select Employee Record
Your list of existing records appears at the left. Click the record to work with, then review and edit the details at the right. The Fingerprint Information section of the window indicates whether the account already has a valid fingerprint stored for this user.

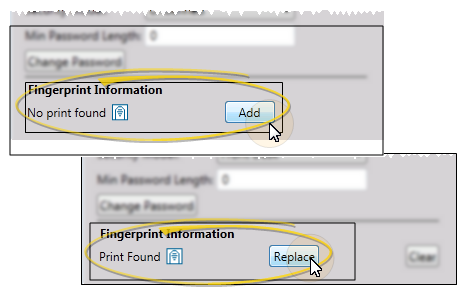
Open Fingerprint Screen
If no previous fingerprint file is found for this operator, click Add; if a fingerprint is already stored, click Replace.
Acquire Fingerprint
Following the instructions on your screen, place the user's right index finger (or a finger of choice) on the sensor to acquire the first fingerprint sample. A graphic of the fingerprint appears in the first section of the Acquire Fingerprint screen. Repeat three more times: The system uses all four samples to create the file. Note the Quality notation below the fingerprint samples: Samples that are not of good quality must be redone.
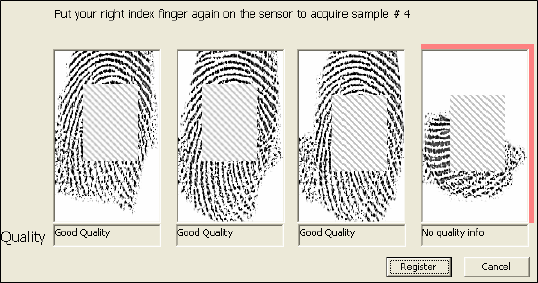
Register Files - Click Register when four good samples have been acquired, then click Yes to verify the fingerprint data.
Test Match - Ask the user to touch the sensor once more. You should see a screen indicating that the fingerprint matched.
Confirm Fingerprint Registration - Before exiting, you are given the opportunity to change / overwrite the stored fingerprint if needed. This allows you to re-register existing fingerprint samples when necessary.
Delete Fingerprint - Click Clear to erase the fingerprint file for an operator. This prevents that operator from using your fingerprint sensors to log into your system.

Once their fingerprints are registered, orthodontists and staff can log into into your Edge Cloud system, and into your time clock simply by pressing the fingerprint sensor installed at that workstation. Anyone without registered fingerprint data attempting to log on using the sensor pad will see a No Fingerprint Found on File message.
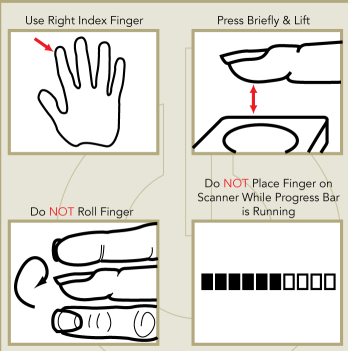
To use the sensor, always use the right index finger (or the finger that was registered) to log into your system. Press the sensor briefly and lift. Do not roll the finger on the sensor, and do not touch the sensor while the progress bar is running.