View Monthly Schedule
Use Month View mode to see a monthly calendar that includes template assignments and scheduling statistics.
You can open this feature in multiple ways: Use the method that's most convenient for you.
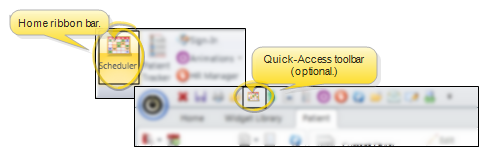
 Home ribbon bar or Quick Access toolbar
Clicking the  Scheduler icon from either the Home ribbon bar or your Quick Access toolbar while a Scheduler session is already active can either bring the open Scheduler tab to the front of your Edge Cloud window, or open another Scheduler tab. See "Scheduler User Options" for details about setting up this option.
Patient Folder
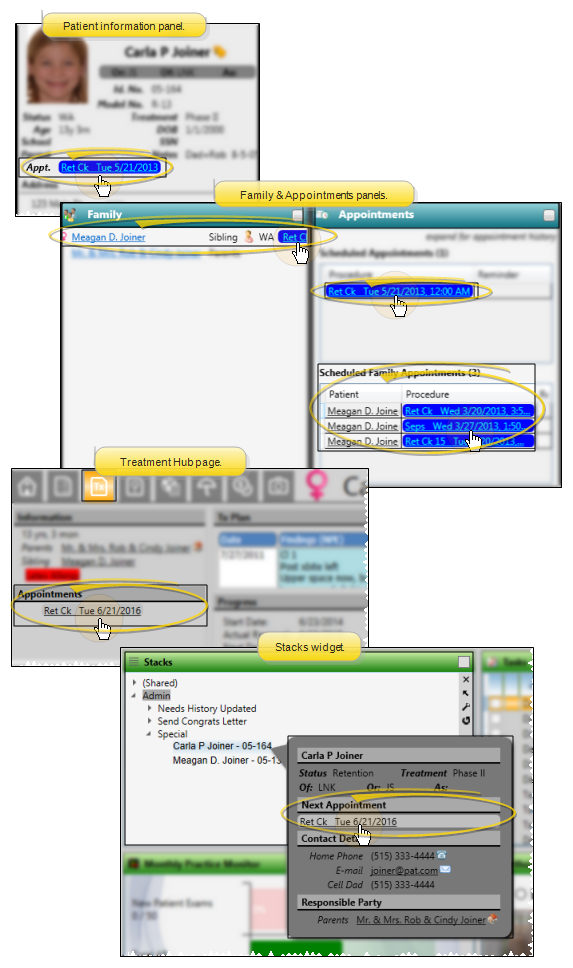
You can open your Scheduler to a specific appointment by clicking the appointment link wherever it appears in the patient folder, such as on the Patient Information Panel, the Family panel, or the Appointments panel of the patient folder Home page, on the Treatment Hub page, or by hovering over the patient name in your Stacks widget.
Arranging Multiple Scheduler Tabs - If you have multiple Scheduler tabs open, clicking a patient appointment link will bring the left-most tab to the front of your Edge Cloud window. Note that before you click the link, you can reorder your tabs by simply dragging them into place, thus selecting which Scheduler tab you want to work with. See "Scheduler User Options" for details about enabling/disabling the multiple Scheduler option.
Select  Month View from the Scheduler ribbon bar.
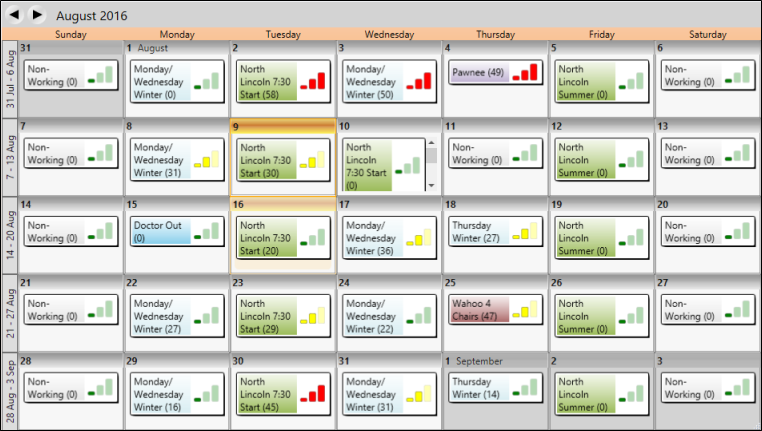
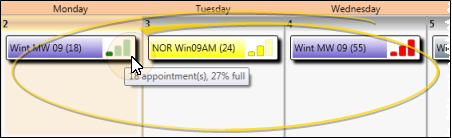
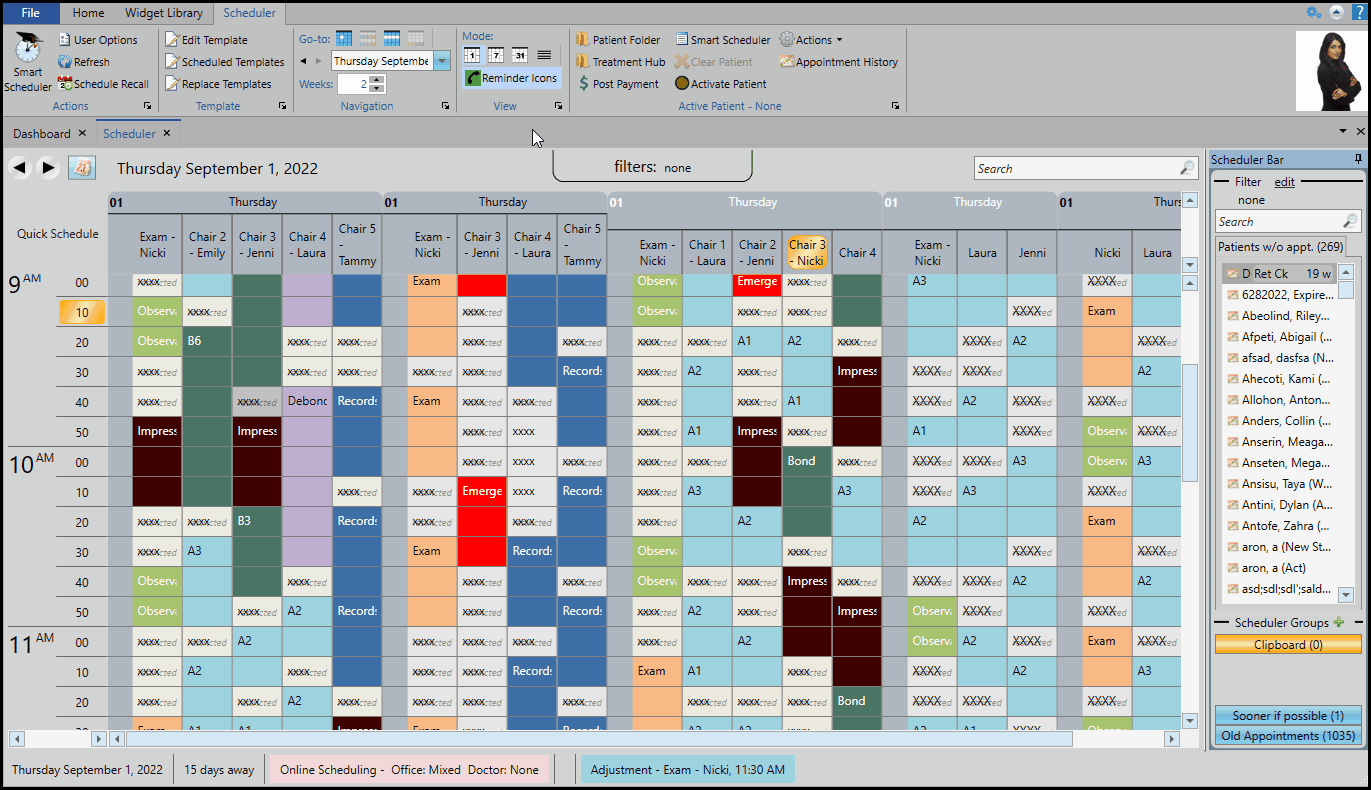
Each date shows the name and color of each assigned template, as well as the number of scheduled appointments (in parentheses). The graph icon indicates how heavily the day is scheduled: Green indicates a light day (0 - 40%), yellow indicates a moderate day (40-75%), and red indicates a heavily scheduled day (75% or above). These calculations are based on the number of scheduled and open cells, regardless of classification, but not counting any that are flagged as "restricted" or "prohibited. You can hover over the date to see the exact percentage of the day that is scheduled.
When viewing your Scheduler in Month-View, you can filter which office(s) you would like to include, so you can more easily see statistics and apply templates that are relevant only for your location. This feature is especially useful for practices with a large number of offices.
Set Up This Feature
To function correctly, every chair of your Scheduler templates must be classified by office. To do this, go to the Scheduler Templates editor and choose a template to work with. Click Edit Grid Template. With the Grid Template Editor on your screen, choose the Modify Chair option. Assign an office to each chair of the template. (Most often, it is best to assign all the chairs of a template to the same office, and have at least one template per office.) Be sure to save your changes. To apply your new office assignments to all instances of the template that are already in use, click Reclassify Chairs from the Scheduler Templates editor screen, and select the Office option.
Use This Feature
When viewing your Scheduler in Month-View, use the Office Filter setting at the right of the screen to select one or more offices to view. Your Month-View screen will include only templates with all chairs assigned to the office(s) you selected, and you will be able to apply only those templates to the schedule. To include templates that have at least one, but not all, chairs assigned to your selected office(s), you must also choose the "Multi-Office" option.
Set Up Tip - To find out which templates have chairs that have not been assigned to an office, choose the "Unassigned" option in your Office Filter. Then right-click a date in your Month-View schedule to see a list of the unassigned templates.
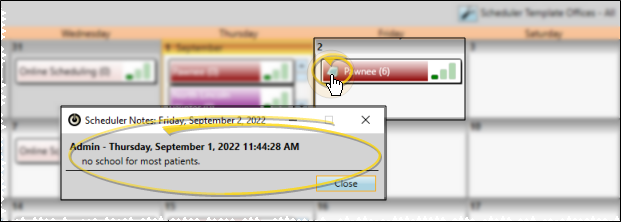
Click the  Notes icon on your monthly schedule to see any notes that have been created for that day. You cannot add or edit notes from month-view mode. If you don't see a Notes icon, there are no notes available for that date. See "Scheduler Notes" for details.
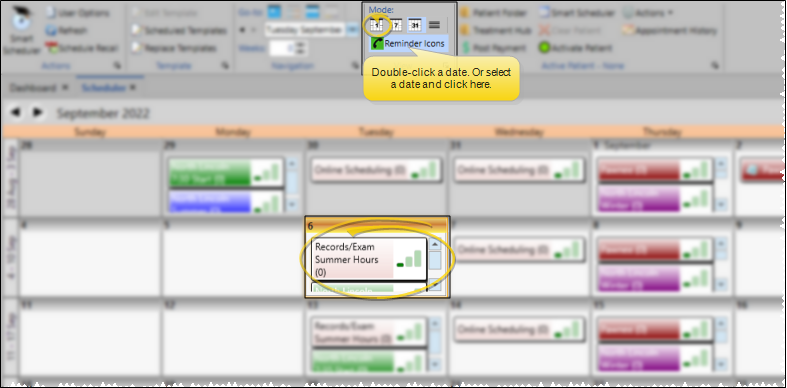
Double-click a date on the Month View screen, or click a date then click  Day View from the Scheduler ribbon bar to go to the scheduling grid for that day.
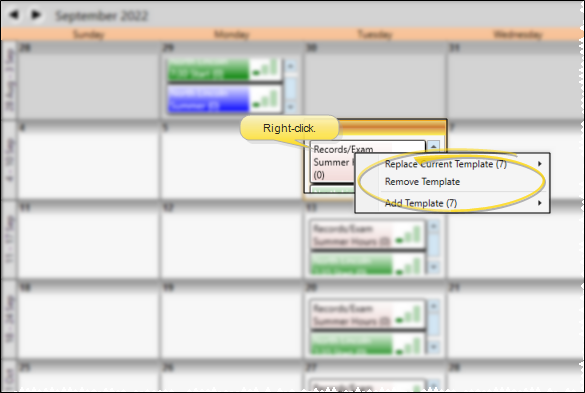
While in Month View mode, right click a date (today or in the future) and choose to add, remove, or replace the scheduling template. You can add as many templates as needed to each date. For example, a practice with multiple office location might assign a template for each office on each date. You can quickly apply the same template to multiple dates by holding down the Shift or Ctrl key while you choose the dates, then right-clicking and choosing Add a Template. When you remove a template from today or a date in the future, any appointments already scheduled to that template are moved to your Scheduler bar, with the date as the bar heading. Finally, when you replace a template for today or a date in the future, any appointments that do not fit into the new template are moved to a Scheduler bar for rescheduling. If you use Procedure Groups, be sure the templates you include on your schedule will accommodate the requirements of each procedure included in the group.
Click  Print from your File ribbon bar or Quick Access toolbar (or press Ctrl+P on your keyboard) to print a copy of the current screen contents.