,Use the
Watch video tutorial. (Windows Media Player, an active Internet connection, and a valid Ortho2 customer login are required to run video tutorials, webinars, and training programs.)
Home or Patient or Patient Finances ribbon bar > Post transaction.
You can also post transactions from the Quick Access toolbar at the top of your Edge screen, and from your scheduler;
Show posted transactions warning - You can set up Edge so that when you attempt to post a transaction before you finalize the Transaction Report for the previous day, you see a warning message. You must then confirm your action before continuing. This feature helps you maintain the integrity of daily transaction postings. After you have seen the message once, you can select not to see it again that day, if you choose. (See "Set Up Financial Options" for details.)
Select Patient and Billing Party Choose the account to work with. If needed, you can
display completed contracts option to be sure you are viewing all accounts associated with this patient. In addition, the AR column at the far right of the post transactions window indicates whether the contract is set up with an Auto Receipts agreement.
Enable issue refund action - If needed, click to enable the
Select refund type - Choose whether you want to issue money back to the responsible party, or apply the refund amount to another contract.
Refund to responsible party - If you choose this type of refund, you will use the Refund Destination and Refund Details fields to specify how much money is being returned, and how you will return it (i.e. cash, credit card, electronic transfer). Note that you must also supply a reason for the refund before you can post it. You can optionally initiate a receipt for the refund immediately after posting.
Apply refund to another contract - If you choose this type of refund, you will enter the amount of money to move, and select the contract to apply the money to. You may move the money to another contract for the active patient, or click in the Patient text box to select a different patient to apply the refund to. This feature makes it easy to apply refund money from one sibling's account to another sibling's account.
Post the Transaction - Click Post.
Alert - If the patient has an alert stop flag for this feature, the alerts box will appear when you initiate this feature for the patient. Review the alert information, then click the box to continue.
Last Posted Transaction The last transaction you posted appears at the
Completed contracts option - Contracts that are fully paid do not appear in the list of accounts when you are posting transactions unless you enable the 
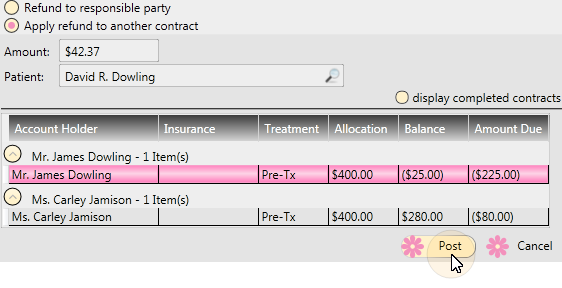
display completed contracts option at the top of the window.
Open ledger from post transaction window - Click the responsible party name in the Post Transaction window to open the patient's Finance page to the ledger details. You may need to drag the Post Transaction window to another location on your screen, or minimize it to your task bar in order to view the transactions.
Refund tracking - The Receipt Adjustments section of your Transaction report lists transactions posted as receipt adjustments and refunds. These transactions are not included in your deposit total. In addition, refunds appear as receipt adjustments in the patient ledger.
Ortho2.com │1107 Buckeye Avenue │ Ames, Iowa 50010 │ Sales: (800) 678-4644 │ Support: (800) 346-4504 │ Contact Us
Remote Support │Email Support │New Customer Care │ Online Help Ver. 8/3/2015